1. What’s New
| Please refer to the upgrade instructions if you want to upgrade your MPP installation to the latest version. The upgrade instructions can be found here. |
MPP 9.3
- onway director
-
mpp 9.3 provides functionality that allows the onway director to configure sites and docking networks on the mpp.
The what’s new archive can be found here. :doctype: book :doctitle: MPP Configuration Manual
2. Configuration
2.1. Administration
2.1.1. Manage Config
Navigation: Administration | Manage Config
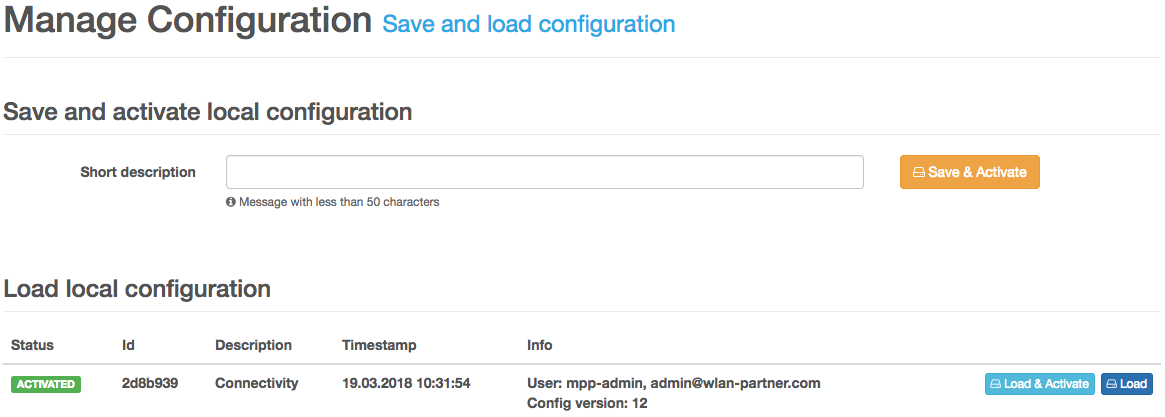
The MPP’s configuration management is based on GIT. Therefore every configuration revision has an unique id assigned. To save the current configuration enter a short description and click the button Save & Activate. After the configuration has been applied you see the new revision in the table underneath. To load a previously applied configuration, you have two options. First, you have the ability to just load the configuration by clicking Load. In this case, you can modify or view the desired configuration and may activate it afterward by pressing Save & Activate. The second option is to press Load & Activate. The latter will keep the configuration activated until the next reboot.
2.2. Network Access
2.2.1. Templates
Navigation: Network Access | Template Bundles
The MPP uses Mustache to compile the templates.
Variables
| Name | Description |
|---|---|
|
Dotted decimal formatted IP address of the client, eg. |
|
Hyphen delimited MAC address of the client, eg. |
|
Mobile phone number. Only available during the SMS authentication process. |
|
Name of the site, where the client is online |
|
The name of the customer to whom the session belongs |
|
The name of the profile to which the session belongs |
|
Fully-qualified domain name of the serving MPP |
|
ID of the session |
|
Intercepted URL of the client |
|
Fully-qualified domain name of the landing page URL |
|
The session’s end time. May be |
|
Numerical representation of an error. May be |
|
A textual representation of an error. Not localized and may be |
|
Remaining upload amount in a human readable format. Only available if a Metered Device Authenticator with metering mode Traffic exists. |
|
Remaining download amount in a human readable format. Only available if a Metered Device Authenticator with metering mode Traffic exists. |
|
The name of the tag. May be |
|
Signed JSON Web Token (JWT). The customer’s shared secret is used to sign the message. |
|
Hashed Username. Only available if the customer has a shared secret configured. |
|
Hashed MAC address. Only available if the customer has a shared secret configured. |
|
Token to prevent cross-site request forgery (CSRF) attacks. |
|
MPP authenticator may provide a registration username. |
|
MPP authenticator may provide a registration password. |
|
OpenID Connect Authenticator must provide a code challenge, if authentication method is PKCE. See OpenID Connect. |
Authentication Error Codes
| Code | Default Message | Description |
|---|---|---|
0 |
OK |
- |
1 |
Internal Server Error |
Will be returned if the MPP could not fulfill the request or could not reach the authentication server. |
2 |
Invalid credentials |
Returned if no configured authentication server is responsible for this type of authentication or if the specified credentials were invalid. |
3 |
Terms not accepted |
The responsible authenticator requires the user to accept the terms and conditions. |
4 |
Invalid mobile number |
The provided phone number is not valid. |
5 |
Concurrent session limit reached |
The configured session limit has been reached and the Concurrent Login Limit Policy has been set to Reject. |
6 |
Account locked |
The account for the provided credentials is locked. An account can be blocked by the MPP itself if it detects a bad behavior. |
7 |
Account disabled |
The user account found by the authenticator is disabled. An account can only be disabled by a human being. |
8 |
Account expired |
The user account is currently not valid. |
9 |
SMS provider unavailable |
The SMS could not be sent. |
10 |
Session not found |
Will be returned if no session was found. |
11 |
Invalid security token |
Returned if the specified security token was not valid. |
12 |
Authentication timeout |
The timeout for authentication has been reached. |
To check for an error, you can use the variable error_code_<error code>, eg. error_code_2. An error handling block
may look as follows:
{{^error_code_0}} (1)
<strong>Error!</strong>
{{#error_code_1}} (2)
Internal Server Error
{{/error_code_1}} (3)
{{#error_code_2}} (4)
Invalid Credentials
{{/error_code_2}} (5)
{{/error_code_0}} (6)| 1 | Checks that an error has occurred and therefore "error" code 0 is not set |
| 2 | Checks if error code 1 is set |
| 3 | End marker for error code 1 check |
| 4 | Checks if error code 2 is set |
| 5 | End marker for error code 2 check |
| 6 | End marker for error code 0 check |
Web Forms
| Field Name | Description |
|---|---|
|
Contains the username. Used by login templates. |
|
Provides the password. Used by login templates. |
|
If present, the MPP assumes that the client has accepted the terms and conditions. |
|
Intercepted URL. If present and no redirect URL is configured on the current site, the client will be redirected to this URL on successful authentication. |
|
Contains the phone number. Used by SMS registration templates. |
|
Contains the security token. Currently used by the SMS validation templates. |
|
Provides the tag. If present and the given tag is configured as Tagged Redirect URL, the client will be redirected
to the configured URL on successful authentication. This mechanism is more secure than using the |
|
Contains the CSRF token. Usually rendered as hidden field, eg. |
|
Contains the voucher code. Currently only supported by the SMS registration templates. |
|
Contains the code challenge for OpenID Connect Authenticator PKCE. |
|
Contains the code challenge method for OpenID Connect Authenticator PKCE, always set to S256. |
Links
| Parameter Name | Description |
|---|---|
|
Key to identify a resource. Mainly used by Route Authenticator to decide if it is responsible for authentication or not. |
|
Requests the page with the given language, eg. |
|
Provides the session ID for consecutive requests. May speed up the session ID lookup process. |
|
Intercepted URL. If present and no redirect URL is configured on the current site, the client will be redirected to this URL on successful authentication. |
|
Provides the tag. If present and the given tag is configured as Tagged Redirect URL, the client will be redirected
to the configured URL on successful authentication. This mechanism is more secure than using the |
|
Contains the CSRF token. Required by the Route Authenticator when CSRF prevention is enabled. |
|
If present, the MPP assumes that the client has accepted the terms and conditions. |
|
Contains the code of a successful authentication response. Required by the OpenID Connect Authenticator login request. |
|
Contains the state of a successful authentication response. Required by the OpenID Connect Authenticator login request. |
|
Contains the error of a failed authentication response. Used by the OpenID Connect Authenticator login request. |
|
Contains the optional error description of a failed authentication response. Used by the OpenID Connect Authenticator login request. |
|
Contains the code challenge for OpenID Connect Authenticator PKCE. |
|
Contains the code challenge method for OpenID Connect Authenticator PKCE, always set to S256. |
Endpoints
| Path | Method | Description |
|---|---|---|
|
GET |
Used internally to serve templates. |
|
POST |
Use this URL to authenticate the user with the specified Web form fields. |
|
GET |
Ends the current client session. If CSRF prevention is enabled, you must specify the template bundle Template Bundle (Logout) in the customer configuration. |
|
GET |
Sets the language of the current session. Requires at least the GET parameter |
|
GET |
Navigate to the template bundle with the given key provided by the GET parameter |
|
GET |
Authenticates the client session with the key specified by the GET parameter |
|
POST |
Authenticates a client session via Route Authenticator. See MPP Client API |
|
GET |
Shows debug information of the current client session. If CSRF prevention is enabled, you must specify the template bundle Template Bundle (Debug) in the customer configuration. |
|
GET |
De-registers the current client device from the user account. If CSRF prevention is enabled, you must specify the template bundle Template Bundle (Device de-association) in the customer configuration. |
|
GET |
Shows device information such as user group and mark information. See MPP Client API |
|
POST + DELETE |
Remote session manager API to start and stop MPP client sessions. See MPP Client API |
2.2.2. Sites
Navigation: Network Access | Sites
Presence Mode
The presence mode decides how user sessions are started and stopped. It can be configured per site.
Presence Mode DHCP
This is the standard presence mode. In DHCP mode, a user session is started when a valid DHCP lease is detected and stopped when the lease expires.
Presence Mode Traffic
In this mode sessions are managed manually via the MPP Client API.
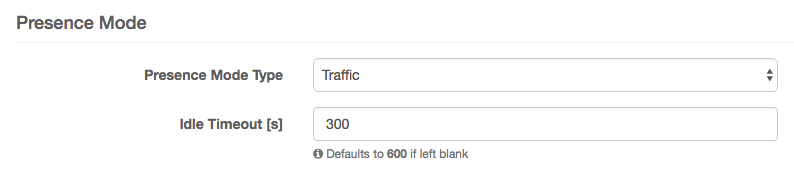
- Idle Timeout
-
Number of seconds after which a session is automatically terminated if no traffic is detected. A default value can be configured per customer (System | Customers).
2.2.3. Docking Networks
Navigation: Network Access | Docking Networks
Docking networks are configured to introduce a client network to a certain customer. If a target site is assigned at docking network level, the site assignment algorithm will always choose this site for the client user session.
The DHCP option 82 match configuration is ignored, when a target site is configured.
The docking network must not have any DHCP scopes or hosts in case the target site has presence mode Traffic.
2.2.4. DHCP Option 82 Matches
Navigation: Network Access | DHCP Option 82 Matches
As a second site assignment method, DHCP relay agent information may be used. This method is only enabled, if the target site is not assigned on docking network level.
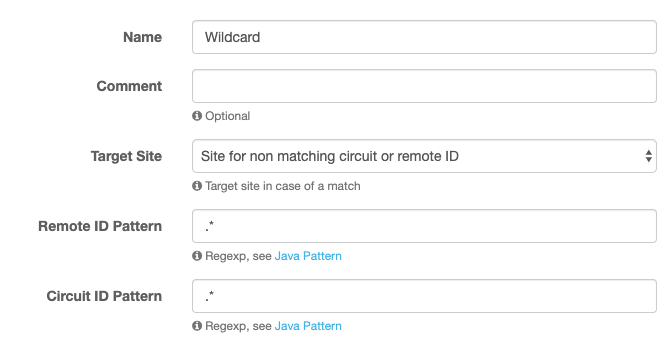
Java regexp patterns for circuit and remote ID are configured for each DHCP option 82 match. The configured target site of the first match is assigned to the client user session. See Java Pattern for further documentation.
Consider a wildcard match as last resort to ensure all clients have an assigned site and running user session.
2.2.5. Authenticators
Navigation: Network Access | Authentication Schemes
OpenID Connect Authenticator
OpenID Connect Authenticator supports OpenID Connect based on the specification documented at OpenID Connect Core 1.0 with the following implementation:
-
Endpoints (URI) must be configured, Discovery Endpoint is not supported
-
Authentication Flow: the authenticator supports the Authorization Code Flow and PKCE
-
Client Authentication method can be either
client_secret_basicfor the Token Endpoint (using HTTP Basic authentication), ornone(using PKCE) -
Scope:
openid, optionalphone email offline_access -
Nonce claim as CSRF protection
-
UserInfo
submust be provided and depending on the configurationphone_number,phone_number_verified,emailandemail_verifiedmust also be provided. -
Configured additional claims can be requested using the
claimsauthorization request parameter. Claim Parameters -
JWKS supports only asymmetric encryption with RSA
-
Access- and refresh token location is HTTP header:
Authorization: Basic … -
UserInfo token location is HTTP header:
Authorization: Bearer … -
Currently, the following algorithms are supported for signing a JWT:
none,RS256,RS384,RS512,ES256,ES384andES512- Configuration
-
Among other common authenticator properties, the following OpenID Connect-specific must be configured:
-
client_id, configured within the OIDC backend -
client_secret, configured within the OIDC backend in case of Basic authentication -
PKCE
code_challengeto support Authorization Code with PKCE Flow. Code challenge method (code_challenge_method) isS256 -
redirect_uri, configured within the OIDC backend (MPP landing page URL) -
Issuer
iss, used for JWT validation -
Token Endpoint, used to exchange authentication
codeto an access-token/refresh-token -
JWKS Endpoint, used to fetch the JSON web key set for JWT validation
-
UserInfo Endpoint, used to fetch user info such as
sub,phone_number,phone_number_verified,emailandemail_verified -
Custom claim
mpp_target_profilein the UserInfo Response allows the authorization server to define the target profile for the authenticated user. If the claim is not present in the response, the configured target profile of the OpenID Connect or MAC Authenticator configuration must be used. Profile ID or name may be used formpp_target_profile -
Custom claim
mpp_session_durationin the UserInfo Response that allows the authorization server to define the session duration for the authenticated user. If the claim is not present in the response, the configured session duration of the OpenID Connect or MAC Authenticator configuration must be used. Numerical session duration value in seconds or as ISO 8601 duration encoded string may be used asmpp_session_duration -
Additional Claims, essential custom claims which have to be provided with
userinforesponse. All non-null values are valid -
Enable Request Refresh Token to refresh the access_token within the MAC authenticator (
offline_access), may need scopeoffline_accessand promptconsentin authorization request
If Request Refresh Token is enabled, a MAC Authenticator must be present for the configured
MAC User Group to refresh the token each time the user joins the network. Make sure that either
Reject Authentication, Lock User Account, or Delete User Account (incl. Registered Devices) is selected for the
Inactive Remote User Action setting in the MAC Authenticator. Otherwise, the user is not validated by its refresh
token!
|
If the mpp is not used as DHCP server, the DHCP option 114 (text) must be configured manually on the external
DHCP server. This option must return the URI of the API. This is the configured landing page URL of the customer with
/captive at the end, e.g. https://wifi.example.org/captive. It is mandatory that the URI uses the HTTPS scheme.
|
- Authorization Request Sample with PKCE (GET request template)
<a href="https://test.example.org/oauth2/authorize?client_id=my-client-id&scope=openid%20phone%20offline_access&prompt=consent&redirect_uri=https%3A%2F%2Fwifi.example.org%2Flogin&state={{csrf_token}}&nonce={{csrf_token}}&response_type=code&code_challenge={{code_challenge}}&code_challenge_method=S256&ui_locales=en">
    OpenID Connect Login
</a>- Authorization Request Sample with PKCE (Login form template)
<form method="get" action="https://test.example.org/oauth2/authorize">
    <input type="hidden" name="client_id" value="my-client-id"/>
    <input type="hidden" name="scope" value="openid phone offline_access"/>
    <input type="hidden" name="prompt" value="consent"/>
    <input type="hidden" name="redirect_uri" value="https://wifi.example.org/login"/>
    <input type="hidden" name="state" value="{{csrf_token}}"/>
    <input type="hidden" name="nonce" value="{{csrf_token}}"/>
    <input type="hidden" name="response_type" value="code"/>
    <input type="hidden" name="code_challenge" value="{{code_challenge}}"/>
    <input type="hidden" name="code_challenge_method" value="S256"/>
    <input type="hidden" name="ui_locales" value="en"/>
    <button id="submit-btn" type="submit">
        OpenID Connect Login
    </button>
</form>- Request Additional Claims
-
Pretty printed sample requesting voluntary scope-phone and
another_claim:
{
  "userinfo": {
    "phone_number": null,
    "phone_number_verified": null,
    "another_claim": null
  }
}{"userinfo":{"phone_number":null,"phone_number_verified":null,"another_claim":null}}claims parameter must be URL encoded before adding it to the authentication request URL, to make sure all special characters are properly escaped.
<form method="get" action="https://test.example.org/oauth2/authorize">
    ...
    <input type="hidden" name="claims" value="%7B%22userinfo%22%3A%7B%22phone_number%22%3Anull%2C%22phone_number_verified%22%3Anull%2C%22another_claim%22%3Anull%7D%7D"/>
    ...
</form>
<a href="https://test.example.org/oauth2/authorize?claims=%7B%22userinfo%22%3A%7B%22phone_number%22%3Anull%2C%22phone_number_verified%22%3Anull%2C%22another_claim%22%3Anull%7D%7D">
OpenID Connect Login
</a>2.2.6. QoS
Navigation: Network Access | QoS
Quality of Service (QoS), network traffic control or traffic shaping can control the downstream (incomming) traffic with destination matching and the upstream (outgoing) traffic with source matching on the corresponding interface.
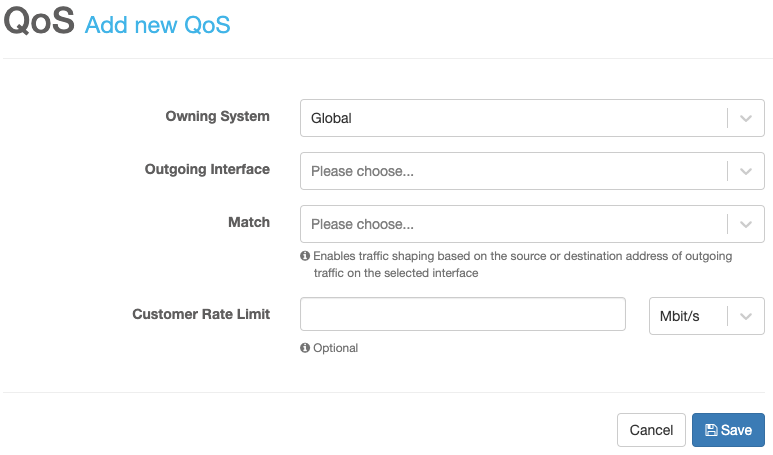
QoS is only possible on outgoing interface (egress) so that client download and upload rate limits must be configured on different interfaces.
Optional rate limits can be assigned per interface, site, profile or device. Site and profile must be assigned where the QoS should be applied.
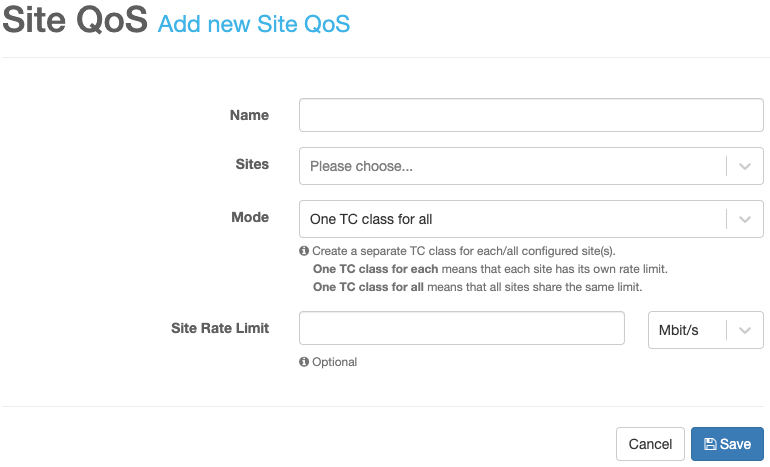
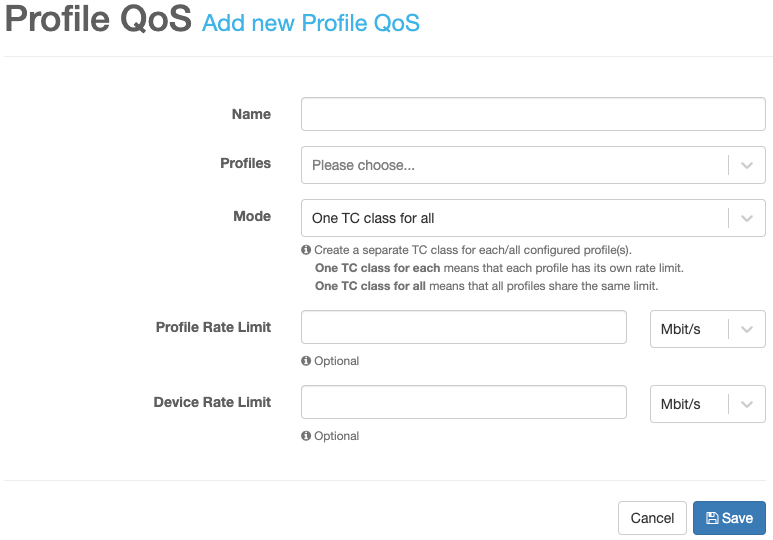
The mode defines if the configured sites or profiles share the same TC class and rate limit
One TC class for all or not One TC class for each. One TC class for each mode is a short to share the same rate
limits and child configuration.
2.2.7. API Access
Navigation: Network Access | API Access
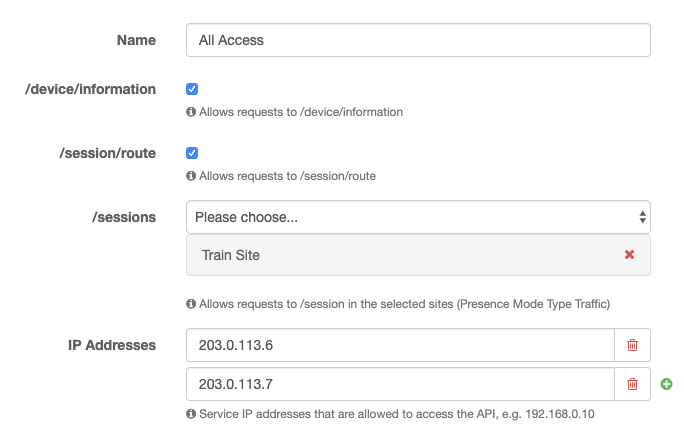
- Name
-
Name of the API access configuration.
- /device/information
-
Allowed to access the device information.
- /session/route
-
Allowed to route sessions.
- /session
-
Allowed sites of presence mode type traffic, to start and stop sessions.
- IP addresses
-
List of IP addresses that are allowed to access the API.
2.3. Advanced
2.3.1. After Network Config Script
Custom Bash hook script may be provided under /etc/mpp/after-network-config, which is executed between network and daemon configuration. The configuration apply process will fail in case of a non-zero exit code. Log entries may be found in /var/log/mpp/system-agent.log. The Bash script is executed with the following command:
/bin/bash /etc/mpp/after-network-config3. Administration
3.1. Upgrade
After you’ve upgraded your MPP installation you need to check that the MPP still runs by issuing the command
systemctl status mpp. The line starting with Active must be active (running). If this is not the case, try to start
start the MPP with systemctl start mpp. We recommend that you restart the operating system after each upgrade. If you
do so, you’re sure that everything works fine.
|
To upgrade a redundant installation you should first update your backup system. After the backup system is back online and its state switched to backup, you should enable the Maintenance Mode on the master system. You can enable the Maintenance Mode at Administration | System Admin. Once you’re done with the upgrade process on the master, you must manually disable the maintenance mode.
| It is recommended to backup the database before upgrading. You can do so, by either taking a snapshot of the VM or by MPP backup functionality. If you want to continue without creating a backup, please be aware that you are doing it at your own risk. |
In case you’re used to run apt-get update && apt-get upgrade or
apt update && apt upgrade to upgrade a system, it might be possible that
some packages are marked as kept back by apt. This avoids dependency problems in more
complex upgrade situations. Such packages are not upgraded automatically.
You must install those packages manually by running
apt-get install <kept-back-pkg> or apt install <kept-back-pkg>.
A more aggressive solution is to run apt-get dist-upgrade, which will force
the installation of those new dependencies.
|
3.1.1. MPP < 9.0
mpp 9.0 is the first version that runs on Ubuntu 22.04 (Jammy Jellyfish).
3.1.2. Upgrade all packages on Ubuntu 20.04
export APT_LISTCHANGES_FRONTEND=none (1)
apt update (2)
apt upgrade (3)
apt autoremove --purge (4)| 1 | Optional: Disable reading of changelog |
| 2 | Update the local package information database |
| 3 | Install all available upgrades of all packages currently installed on the onway director |
| 4 | Remove packages that are no longer needed by the system |
3.1.3. Release Upgrade
-
Update sources.list file to new resources
sed -i 's/focal/jammy/g' /etc/apt/sources.list.d/packages-onway.list
Do not call apt update after you changed the sources.list until the release upgrade is finished.
|
-
Perform Ubuntu release upgrade from 20.04 to 22.04
systemctl stop mpp.service (1)
do-release-upgrade (2)
apt autoremove --purge (3)
shutdown -r now (4)
1 Shutdown MPP before upgrade 2 Perform the release upgrade from Ubuntu 20.04 to 22.04. This will take some time 3 Remove packages that were automatically installed to satisfy dependencies for other packages and are now no longer needed 4 Restart system
3.1.4. MPP < 8.6 and >= 8.0
MPP 8.6 replaces ntpd with systemd-timesyncd.
export DEBIAN_FRONTEND=noninteractive (1)

apt update (2)
apt upgrade (3)
apt install mpp mpp-app mpp-remote-server mpp-system-agent (4)
apt purge ntp (5)
apt autoremove --purge (6)| 1 | Optional: suppress configuration dialogs |
| 2 | Update the local package information database |
| 3 | Install all available upgrades of all packages currently installed on the MPP |
| 4 | Install all packages which are kept back (example) |
| 5 | Remove legacy packages |
| 6 | Remove packages that are no longer needed by the system |
3.1.5. MPP < 8.0 and > 7.0
| From MPP 8.0 upwards the onway director (Sponsoring Portal) 4.0 or higher is required. Otherwise, the communication between these two will not work! |
| Depending on your hardware configuration and the size of your database, the upgrade may take up to 1 hour. Normally, the upgrade process does not take any longer than 20 minutes. |
-
Upgrade all packages on Ubuntu 18.04
export APT_LISTCHANGES_FRONTEND=none (1)
apt update (2)
apt upgrade (3)
apt purge mpp-linda mpp-snoopy mpp-netmaid (4)
apt autoremove --purge (5)
1 Optional: Disable reading of changelog 2 Update the local package information database 3 Install all available upgrades of all packages currently installed on the MPP 4 Remove legacy packages 5 Remove packages that are no longer needed by the system -
Update sources.list file to new resources
sed -i 's/bionic/focal/g' /etc/apt/sources.list.d/packages-onway.list -
Perform Ubuntu release upgrade from 18.04 to 20.04
systemctl stop mpp.service (1)
do-release-upgrade (2)
  Configuration file '/etc/ntp.conf' → N
  Configuration file '/etc/snmp/snmp.conf' → N
  Configuration file '/etc/default/snmpd' → N
  Configuration file '/etc/snmp/snmpd.conf' → N
  Configuration file '/etc/default/dhcp-snoopy' → N
  Configuration file '/etc/default/netmaid' → N
  Configuration file '/etc/bind/named.conf.options' → N
apt install mpp mpp-app mpp-remote-server mpp-system-agent (3)
apt purge postgresql-12 postgresql-client-12 ntp (4)
apt autoremove --purge (5)
shutdown -r now (6)
1 Shutdown MPP before upgrade 2 Perform the release upgrade from Ubuntu 18.04 to 20.04 3 Install all packages which are kept back (example) 4 Remove previously used packages 5 Remove packages that were automatically installed to satisfy dependencies for other packages and are now no longer needed 6 Restart system
3.2. Network Recovery
If the MPP is unable to start and the whole network configuration is gone, you can configure the network by invoking
systemctl start network-setup on the machine’s command line interface.
3.3. Certificate Signing Request (CSR)
To obtain a certificate either for the management console or the landing page you must first create a CSR. The simplest way to create such a request is on the MPP command line itself.
-
Connect to the MPP by SSH
ssh -l mpp-admin HOST -
Create and change directory
mkdir mpp.example.org cd mpp.example.org -
Create configuration file
With the following configuration file we request a certificate with two domain names:
mpp.example.organdmpp.example.com.cat <<EOF >mpp.example.org.cnf [ req ] default_bits = 2048 prompt = no default_md = sha256 distinguished_name = req_dn req_extensions = req_ext [ req_dn ] countryName = CH stateOrProvinceName = Zurich localityName = Zurich organizationName = onway ag commonName = mpp.example.org [ req_ext ] subjectAltName = @alt_names [alt_names] DNS.1 = mpp.example.org DNS.2 = mpp.example.com EOF -
Create CSR with a newly generated key
openssl req -new -newkey rsa -nodes -keyout mpp.example.org.key -out mpp.example.org.csr \ -config mpp.example.org.cnf -
Verify the request
Check at minimum the Subject and the requested Subject Alternative Names.
openssl req -text -noout -in mpp.example.org.csr -
Let your CA sign your request
mpp.example.org.csrRequest the certificates in a PEM-encoded format like.
3.4. VMware Tools
If you are running the MPP in a VMware virtual environment, you should install the tools to run the MPP smoothly and optimally integrated.
apt update
apt install open-vm-tools
3.5. Logging
Any log files generated by the MPP are in /var/log/mpp. To change the configured log level, you need to adjust the
configuration in /etc/mpp/logback.xml or /etc/mpp-system-agent/logback.xml respectively. More information about the
logging framework Logback can be found here.
accounting.log-
The MPP logs all session start and end messages in this file. It is rotated daily and keeps the archive of the last 7 days. The log level is INFO by default.
api.log-
Log file for MPP API log messages. It is rotated after 16 MB and keeps the last 3 archived files. The log level is INFO by default.
console-audit.log-
Log file with every authentication attempt for the MPP console. It is rotated monthly and keeps the archive of the last 7 months. The log level is INFO by default.
mpp.log-
This is the main log file and therefore makes a lot of noise. It is rotated after 16 MB and keeps the last 3 archived files. The log level is INFO by default.
session.log-
Log file that contains session-related information, such as bad authentication attempts. It is rotated after 16 MB and keeps the last 3 archived files. The log level is WARN by default.
sync.log-
If you have synchronization issues, this file is your friend. It is rotated after 16 MB and keeps the last 3 archived files. The log level is INFO by default.
system-agent.log-
If the MPP was unable to activate your configuration, you should look at the entries here. It is rotated after 16 MB and keeps the last 3 archived files. The log level is INFO by default.
3.6. Daemons
3.6.1. Lawful Interception Daemon
LINDA (Service name: linda) is the new Lawful Interception Daemon. It writes a binary logfile for each
day stored in /var/log/mpp/li-*.log. To read such a binary file we provide a small utility called linda-parse that
reads from stdin and writes to stdout. With the command cat /var/log/mpp/li-*.log | linda-parse you can read any
Lawful Interception file and print it in a human readable form.
3.6.2. Snoopy
Snoopy (Service name: dhcp-snoopy) replaces Sioux’s DHCP snooping capabilities 1:1. It captures any DHCP traffic that
flows through the MPP and sends the captured information to the MPP.
3.6.3. Netmaid
The Netmaid Daemon (Service name: netmaid) is responsible for the whole Kernel communication and provides an
interface to configure various parts of the Linux networking stack such as IPtables, setting IP addresses and alter its
network routes.
3.7. Notifications
MPP has a built-in notification system. It runs various system checks periodically and informs the administrator with a notification if things change from one check to another.
Performing system checks is called monitoring the MPP, while sending notifications is called alarming.
3.7.1. Monitoring
MPP monitors the following things since version 6.9.
-
MPP version check, to determine if a new MPP version is available on the package server
-
DHCP scope check, to determine if a docking network runs out of available IP addresses. Two float threshold values [0.0-1.0] can be set in
application.properties,mpp.dhcp-pool-usage.warningandmpp.dhcp-pool-usage.critical -
VRRP state transitions
-
Sync state transitions
More checks might be added in the future.
3.7.2. Alarming
A notification is produced if the result of a check is different than its previous result. New notifications are indicated in the toolbar.
Clicking on the notification icon opens a view and shows all notifications in chronological order with the newest on top. A notification provides the following details:
-
Source, to display the origin -
Timestamp, to show the creation time -
Severity, which is Information, Warning or Alarming -
Subject, similar as in an email -
Message, to provide more details, if available
Notifications are sent via email to all Backend Users which are Enabled and have Receive System Notifications activated. Please note that the MPP MTA service must be configured and enabled.
Notifications are removed automatically from the MPP if they have reached a certain age. This retention time is configured in the System Constants page.
3.8. Remote Server
If the MPP Remote Server service is enabled and configured, remote peers such as the onway director can communicate over an encrypted connection, which is secured with X.509 certificates.
| The communication uses TCP/IP on port 9011. |
The service can be disabled, if remote peer communication is not required, i.e. if the onway director is not installed.
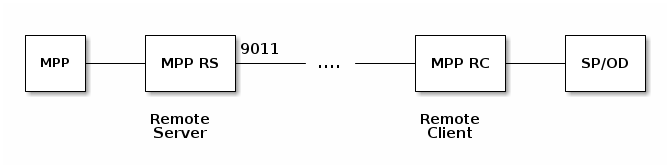
3.8.1. Processes
The following picture illustrates how the processes are connected to each other:
3.8.2. Let onway director connect to MPP
Add a new peer to the MPP by opening Services → Remote Server → Remote Peers.
Add the IP address and the Peer ID of the onway director. The onway director Peer ID
is defined in the onway director in Administration → Remote Client → Service.
Choose which MPP customers are allowed to be accessed. MPP creates the
corresponding firewall rule for this peer.
| The Peer ID corresponds to the Subject Alternative Name (SAN) of the certificate and is equal to the hostname of the system during installation. |
A remote peer is qualified by a State. It provides three values:
-
DISCONNECTED: peer is not reachable, or peer did not trust
-
UNTRUSTED: peer certificate is not trusted by us
-
CONNECTED: goal state, both parties trust each other
The connection will be shown as DISCONNECTED, if the onway director did not add the MPP connection before.
| In MPP a connection is called a Remote Peer while in the onway director it is called MPP connection |
The onway director tries to establish a connection to the MPP for an infinite period of time. The connection is not established as long as the certificates are not trusted. This state is shown as UNTRUSTED. The Peer ID and the SHA-256 fingerprint of the certificate are shown to identify the other party.
To establish a secure communication channel, both parties (onway director and MPP) must trust each other. Trusting is a manual interaction, done by the administrator. A click on the lock button and approval changes the state to DISCONNECTED, if done on one party.
It changes to CONNECTED, if both parties trust each other, and after a successful handshake has been done between onway director and MPP. This is the required final state for secure communication between the peers.
3.8.3. Disconnect onway director from MPP
If one party wants to revoke an established connection for any reason, a click on the unlock icon with approval is enough. The state changes to UNTRUSTED on the MPP and to DISCONNECTED on the onway director. Communication between MPP and onway director is refused. Please note that the onway director keeps trying to establish the connection to the MPP.
A remote peer can be deleted if it is not required anymore by clicking on the delete button.
3.8.4. Renew a certificate
It is possible to renew the built-in certificate in
Services → Remote Server → Service. But be careful. All configured MPP
connections in onway director must trust the new certificate to be able
to communicate with the MPP.
3.8.5. Unknown Peers
The MPP can discover a remote peer connection attempt, if the firewall allows connections from the onway director. Such peers are displayed below the remote peer table as Unknown Peers. Please verify its certificate details before adding it.
3.8.6. MPP data stream services
Use the following settings to stream data from the MPP to the onway director. Please note that the onway director must enable the corresponding data stream services on its MPP connections.
-
SMS Accounting: enable this service to stream the SMS accounting log
-
Session Accounting: enable this service to stream the user session history log
3.8.7. Troubleshooting
Disconnected Peers
If the remote peer state is always DISCONNECTED, please verify that port 9011 is open on your firewall. The remote server must be reachable on this port.
4. Installation
4.1. System requirements
| Component | Minimum | Recommended |
|---|---|---|
Processor |
Quad core with 2 GHz or faster |
Hexa core with 2 GHz or faster |
RAM |
6 GB |
8 GB, no more than 12 GB |
Storage |
120 GB |
>= 260 GB |
NIC |
2x1 Gb/s |
3x1 Gb/s for Uplink, Client networks and Management |
The mpp runs on VMware vSphere 7 or later (Virtual Hardware Version 17+) and on any modern hardware (Bare metal) that is supported by Ubuntu Linux 22.04 LTS with Linux Kernel 5.15.
4.2. Product Dependency
The MPP requires at least the following onway director (Sponsoring Portal) versions.
MPP Version |
onway director (Sponsoring Portal) Version |
9.3.1 |
>= 5.10.0 |
4.3. Example Setup
In this section, you will learn how to install a redundant MPP with the following requirements:
-
Employees authenticate themselves against the company’s LDAP directory during their first use and get an auto session without any authentication afterward.
-
Any other user uses the SMS self-registration process. If the authentication was successful, the registration is valid for 180 days and the user shall visit the welcome back page only once a day.
4.3.1. Network Topology
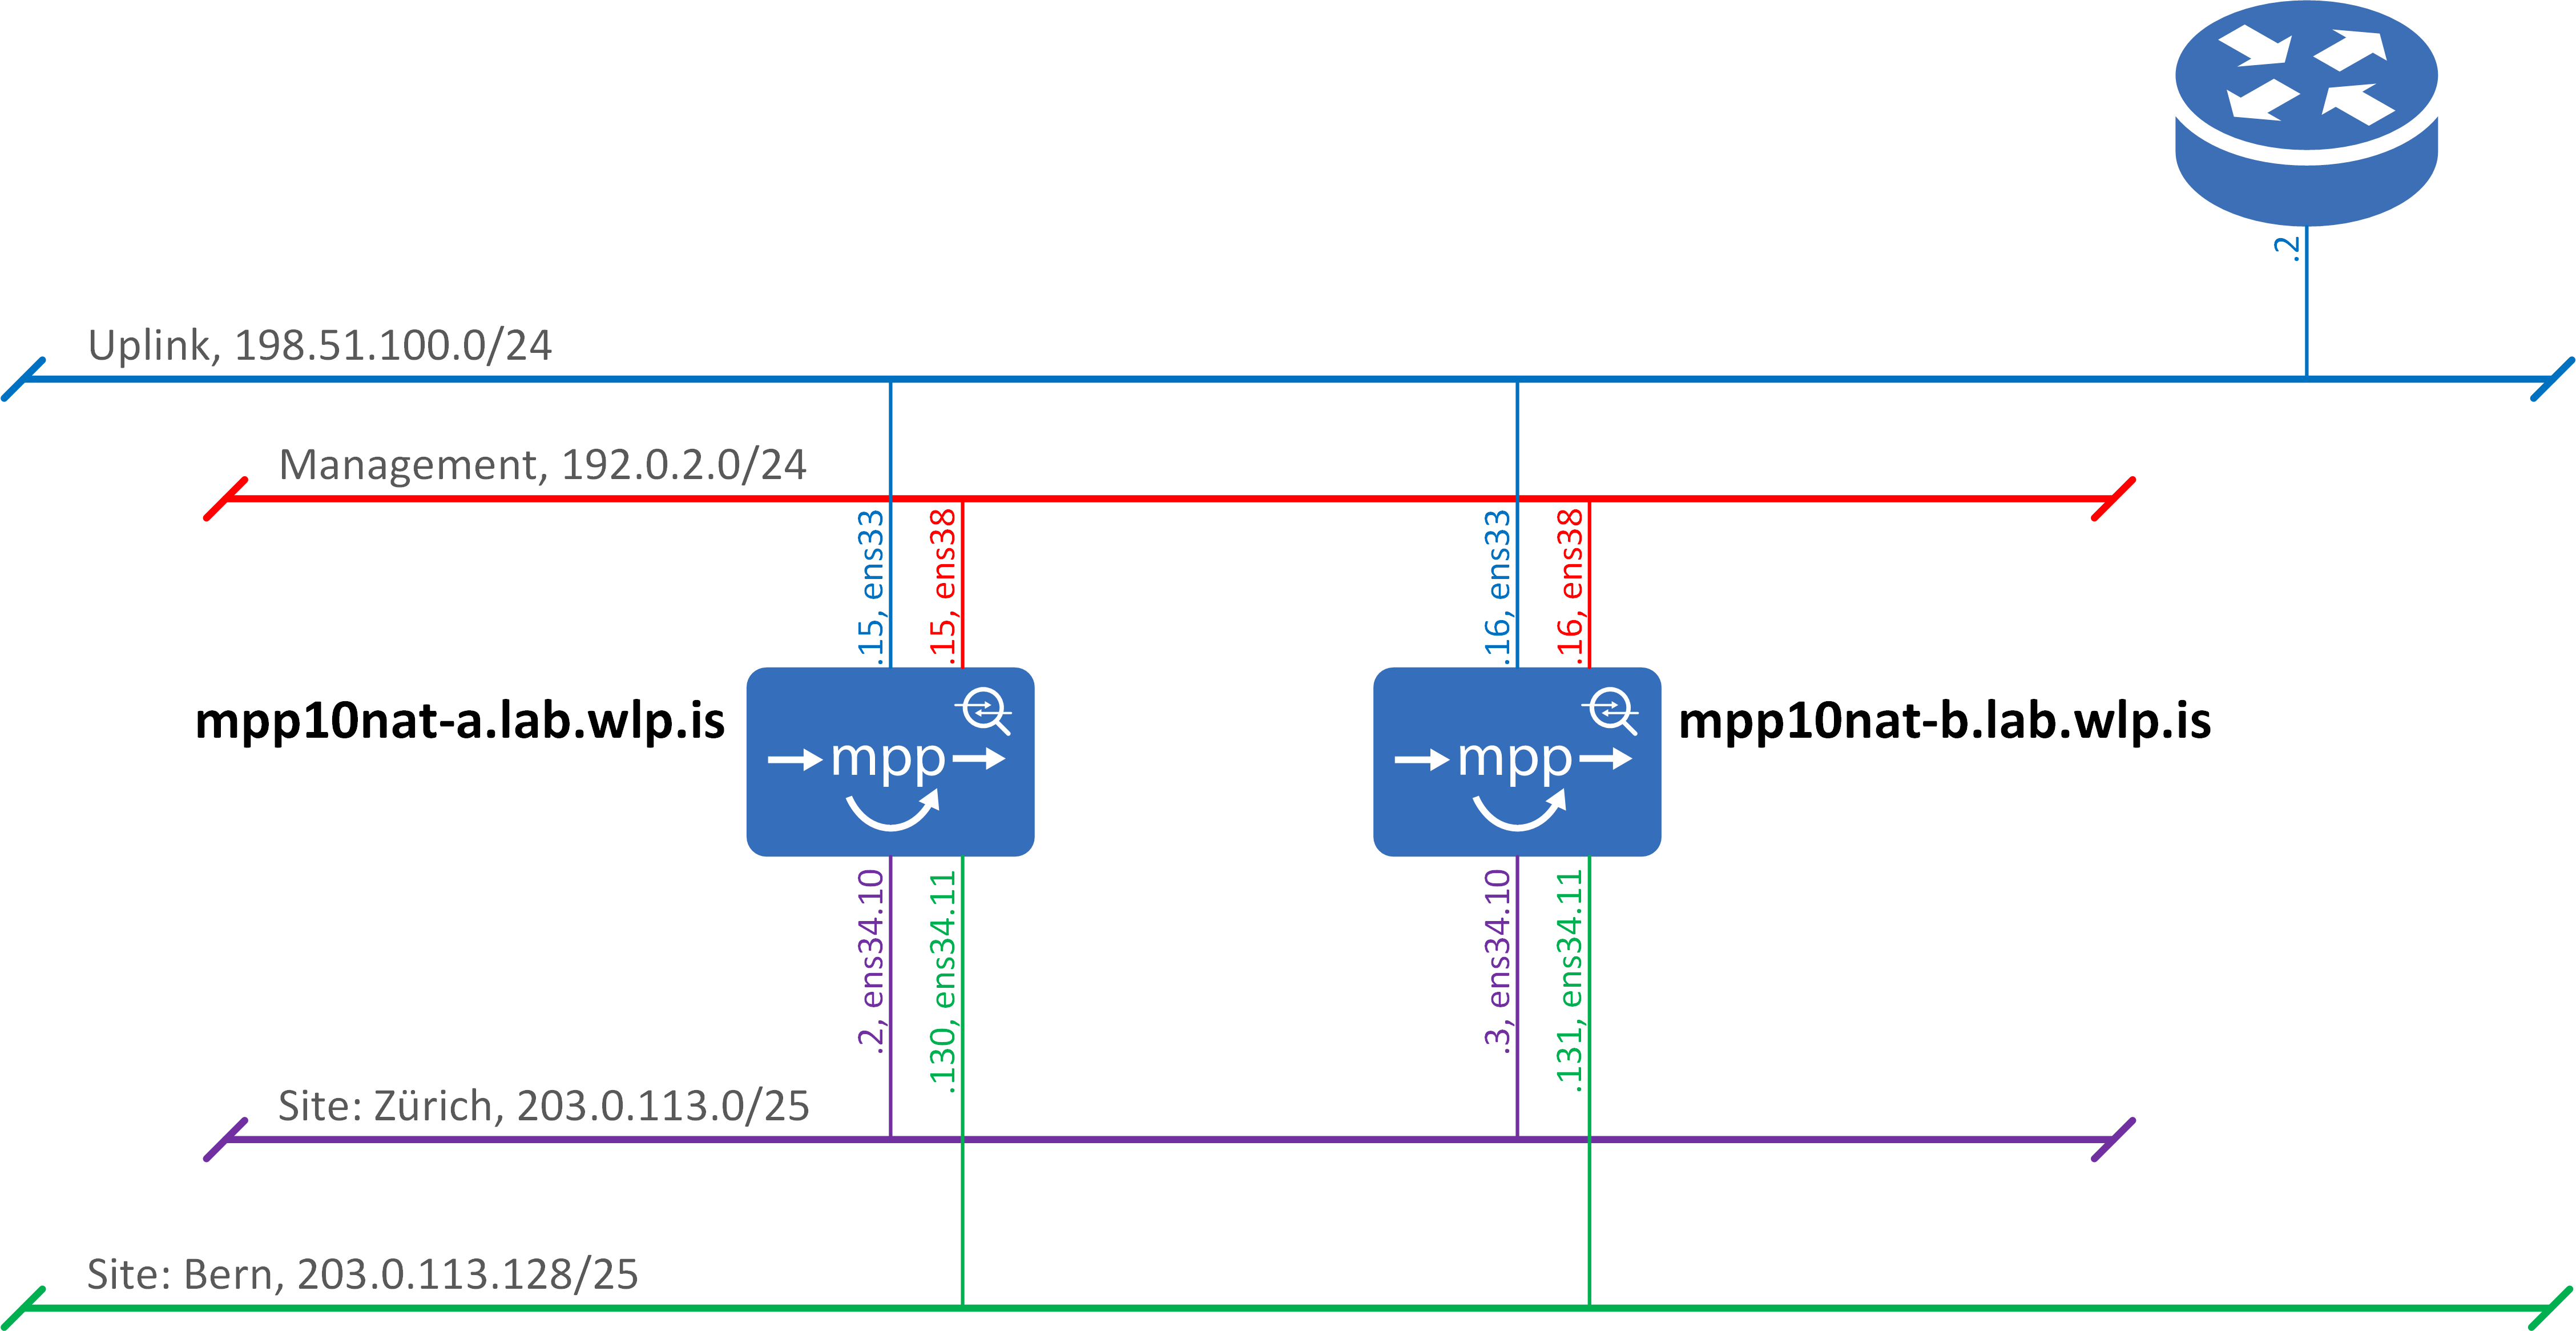
| What | IP address |
|---|---|
Landing-Page URL |
|
Site: Zurich |
203.0.113.1 (VRRP) |
Site: Bern |
203.0.113.129 (VRRP) |
Service IP address (DNS, DHCP Server) |
185.12.129.33 |
External DNS |
8.8.4.4 (primary) |
4.3.2. Boot from image
To install the MPP, we need either a bare metal server or a virtual machine that meets the requirements as specified here.
Download the latest onway ISO from https://packages.onway.ch/iso/.
After you have started from the disk image the following GRUB screen will show up:
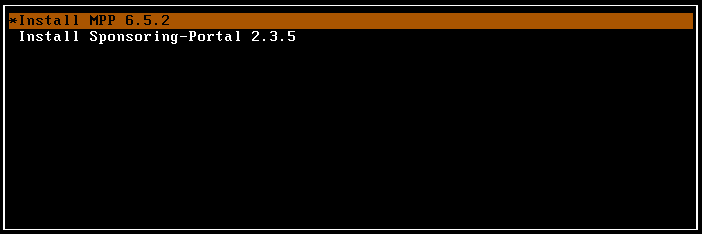
Select Install MPP 9.3.1 and press return. As next, the setup wizard pops up. Follow the instructions and configure the management access. Next, to the wizard, the MPP gets installed on the local disk. This may take five to ten minutes. To finish the installation the server reboots once, and a yellow Linux prompt appears.
During the first start of the MPP, the system gets initialized. This can take up to another five minutes, so be patient. Once the MPP was started successfully the management console should be accessible via https://mpp01.example.org:1443/. The username and password of the admin user are mpp-admin. If you cannot log in to the Linux console, the initialization process may not have finished yet. Just wait a moment and try again.
| After a successful installation, there will be a message in the top right-hand corner, saying that a system restart would be required. Just ignore this advice for now. |
After accepting the End-user license agreement (EULA), you will be asked if you either want to run the MPP as MPP Cluster Coordinator (MPP CC) or as standalone MPP. If you have no clue what an MPP CC does, it would be wise not to select the checkbox.
4.3.3. Customer setup and login
Every MPP installation needs at minimum one customer as shown below:
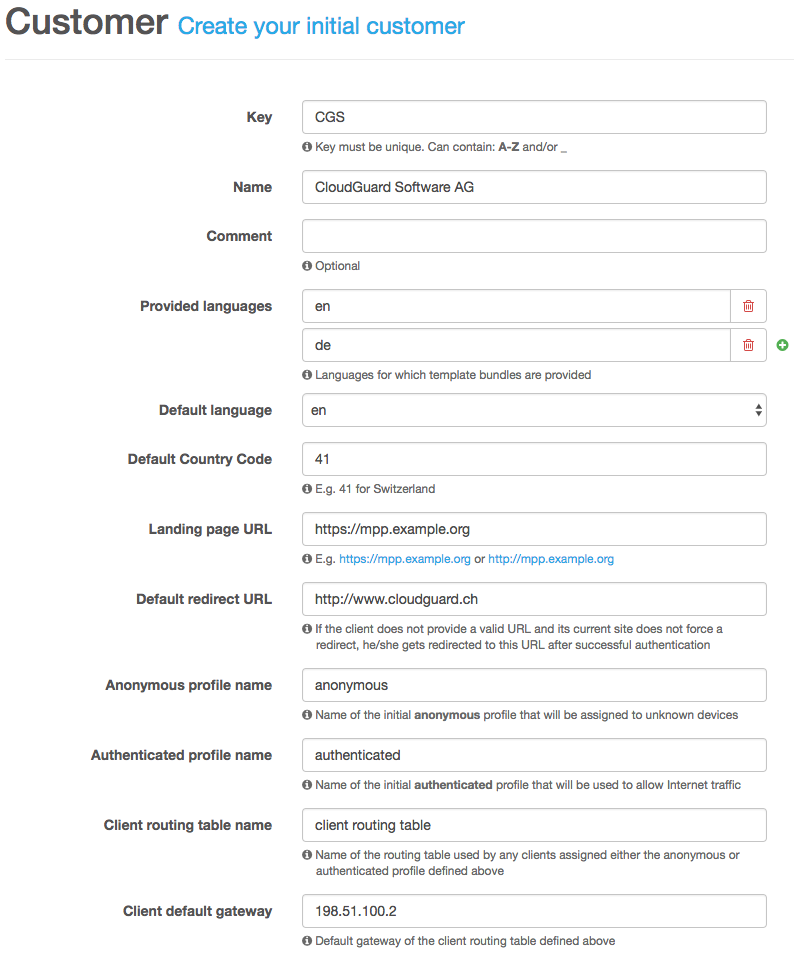
Finally, after you have configured your customer, the MPP web console login screen shows up. Login with the default credentials mpp-admin/mpp-admin.
4.3.4. Navigation
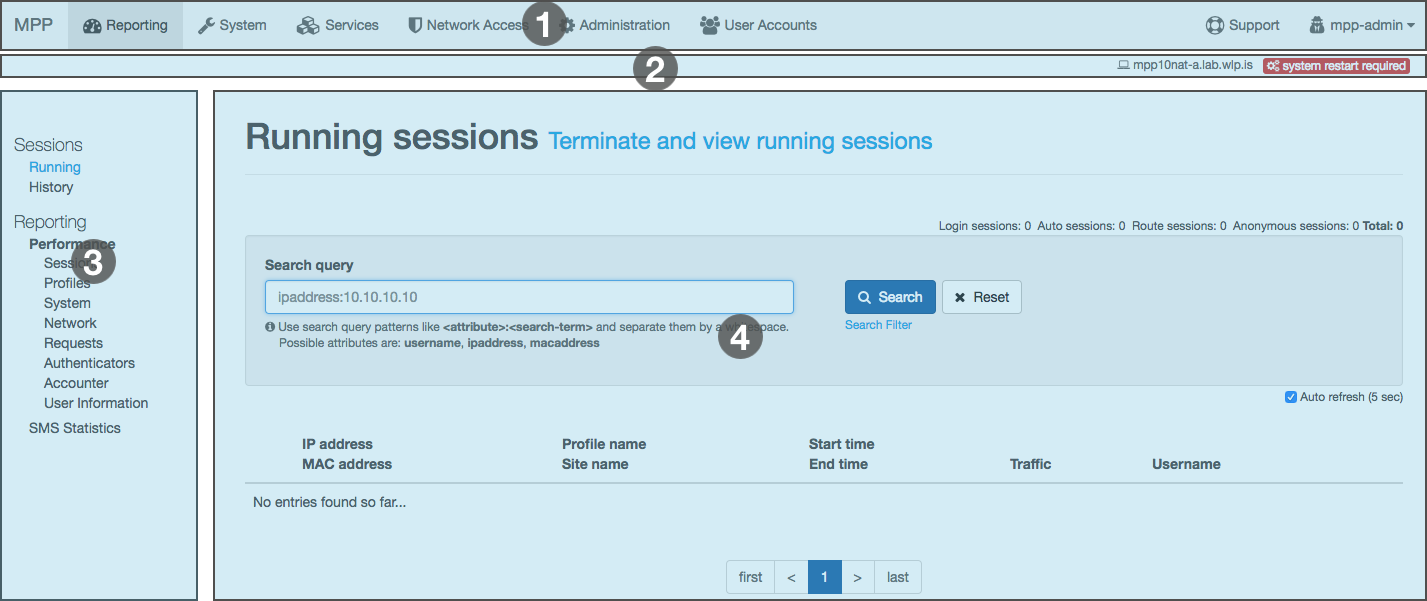
The MPP console is divided into four different sections:
- Main Navigation (1)
-
The main navigation is always visible and sticks to the top of the page. In the top right corner, the currently logged-in username is displayed. If you click on its name, you can either change the password or log out and leave the administration console.
- Meta Bar (2)
-
Relevant information, such as the hostname, the current configuration state, the sync state, the VRRP state, etc. is placed inside the meta bar and thus always available.
- Side Navigation (3)
-
If necessary, a second navigation will be shown on the left-hand side. With this navigation, you can navigate within the currently active section of the main navigation.
- Content (4)
-
This is the main part of the page and here you will see the content.
Usually, the configuration is done from left to right (main navigation) and from top to bottom (side navigation).
4.3.5. Connectivity
One of the essential parts of a networking device like the MPP is connectivity. Therefore, we need to configure our local IP addresses and routes. The MPP supports physical, VLAN (IEEE 802.1Q) and GRE interfaces.
Interfaces
Navigation: System | Network | Interfaces
Configure the physical interfaces according to the network topology as shown above. Once you have done this, continue with the VLAN interfaces.
| The loopback address 185.12.129.33 is a reserved address that belongs to our AS and is not routed. You can use it without a doubt. |
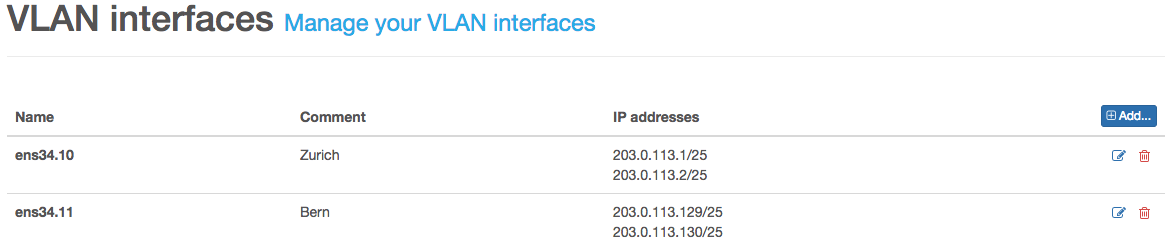
| If you plan to run your system in cluster mode, it may be helpful to enable the VRRP service first rather than to enable it afterward and reconfigure the virtual IP addresses once the initial configuration is done. |
Routing
Navigation: System | Network | Routing
The MPP maintains at least two different routing tables. The routes entered under System are mainly used by the system itself. It’s not necessary to configure layer two attached networks.
Change the default route gateway to use the uplink router.

4.3.6. System Firewall
Navigation: System | Network | System Firewall
| As long as no firewall input rule is configured, the MPP management (TCP/22 SSH and TCP/1443 Web Console) is accessible from anywhere. So we highly recommend that you configure your management source IP addresses. |
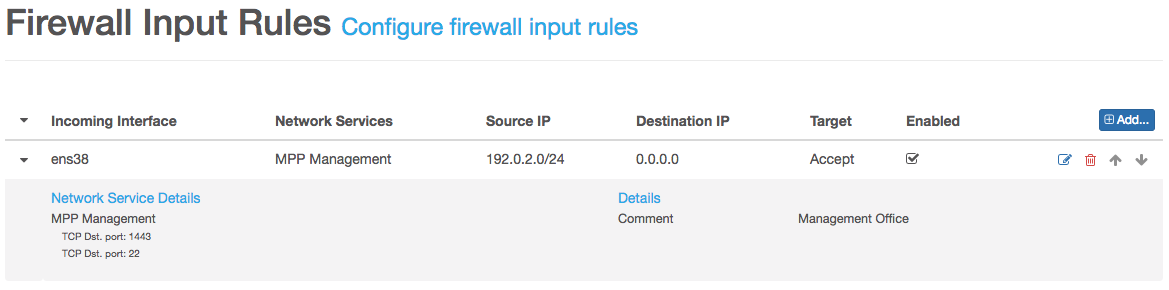
With this configuration the MPP is only accessible from IPs within the network 192.0.2.0/24 received on the management interface ens38.
In our setup we need to NAT/PAT any client traffic. The easiest way to achieve this is to configure a Post-Routing Firewall Rule as shown below.
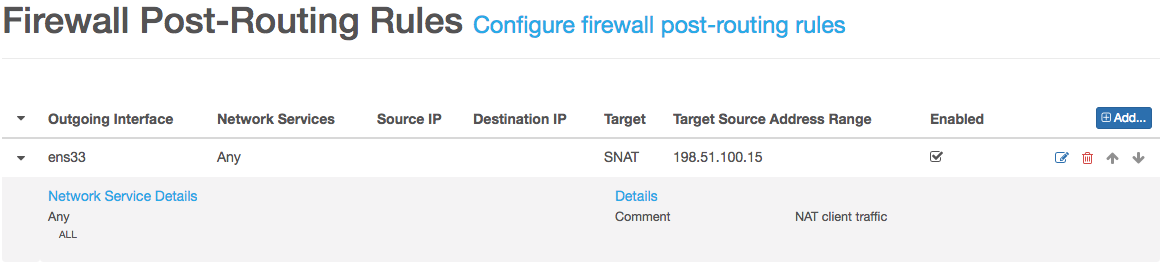
| After we’ve configured the basic connectivity parameters, it’s a good idea to save the changes we’ve made so far. |
4.3.7. Services
Navigation: Services
Any stuff related to Linux Daemons managed by the MPP is configured in this section. First of all, we need a DHCP service that assigns IP addresses to our clients. This can be done by using the existing DHCP server of the company with or without DHCP relay enabled. The easiest way is to run the DHCP server right on the MPP as we will do during this setup.
DHCP
Navigation: Services | Configuration | DHCP
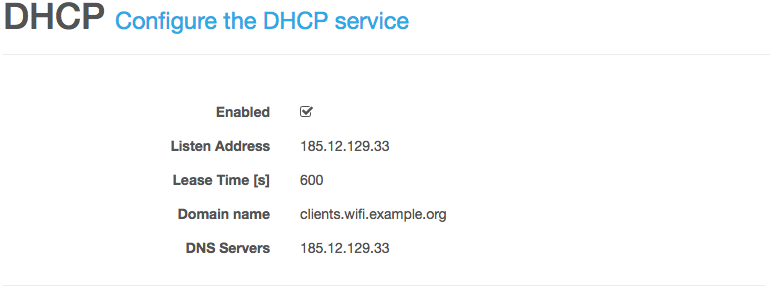
| Generally it’s a good idea to use a relatively small lease time such as 600 seconds. Keep in mind that any client that connects to your open wifi infrastructure requests an IP address. If you choose a common lease time of at least 24 hours you might run out of IP addresses pretty fast. |
DNS
Navigation: Services | Configuration | DNS
The DNS configuration is split into two views Services and Zones. First we need to configure the server service settings.
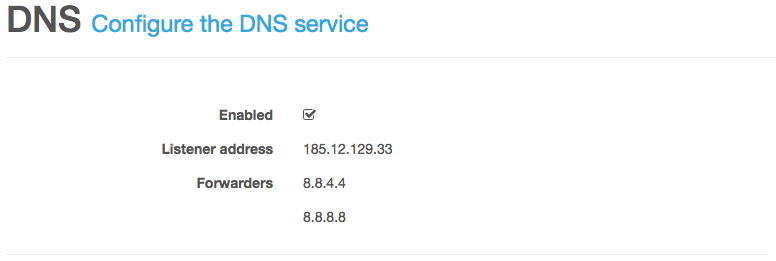
| As with the DHCP service it’s possible to use your external DNS server if you want. |
To create a new DNS zone we need to configure some meta data followed by the actual zone definition.
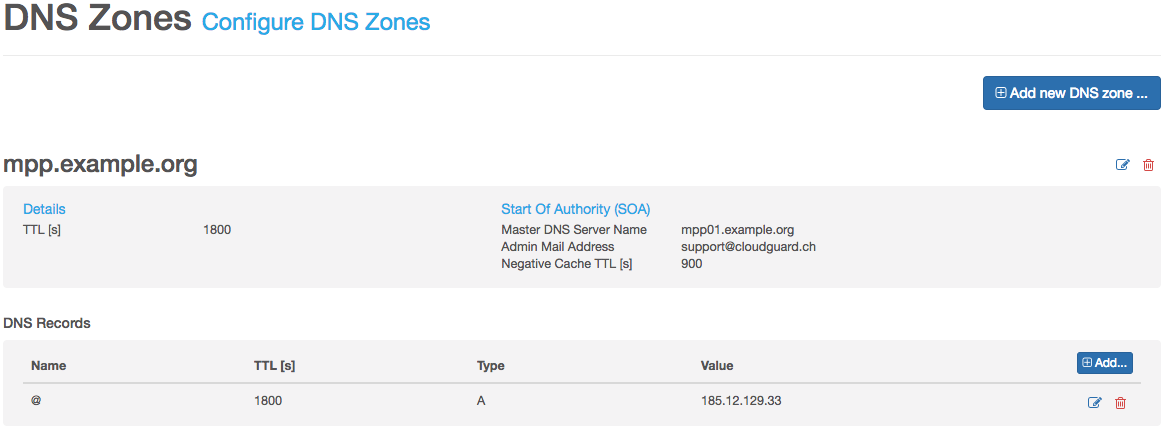
If you want that the name of your DNS record refers to the zone itself, use the @ sign as in this example.
| If you’re not a DNS expert it would be wise to use the default values recommended by the system. Therefore, read the provided help text carefully. If you want to use the default value just leave the field empty. |
NTP
Navigation: Services | Configuration | NTP
It’s always a good idea to run the MPP with time synchronization enabled. Otherwise reading log files can become really cumbersome.
You can configure your own list of NTP servers, or keep the list empty to use the system internal fallback NTP server.
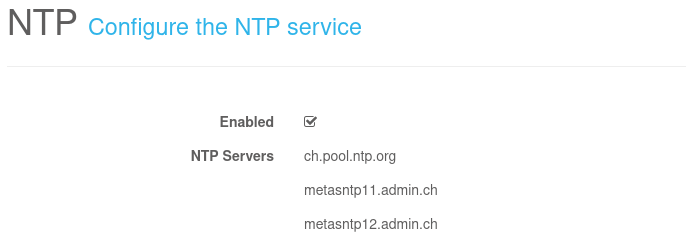
Save & Activate the configuration we did so far.
4.3.8. Network Services
So far we’ve configured our network connectivity parameters and the Linux Daemons we use. In this section we go a step further an configure the business logic of our installation.
Page Assets
Navigation: Network Access | Page Assets
With MPP 5.0 we’ve introduced a new concept to handling template assets like CSS, images, etc. and the templates themselves. You can download the current assets by clicking the Download button and upload the new assets by select the ZIP archive and press Upload.
| During the upload process, any existing data will be removed or overridden. Therefore the ZIP archive must include any assets needed by your setup. |
For our example we use the sample assets. Download and upload the sample assets.
More information about the template engine can be found here.
Template Bundles
Navigation: Network Access | Template Bundles
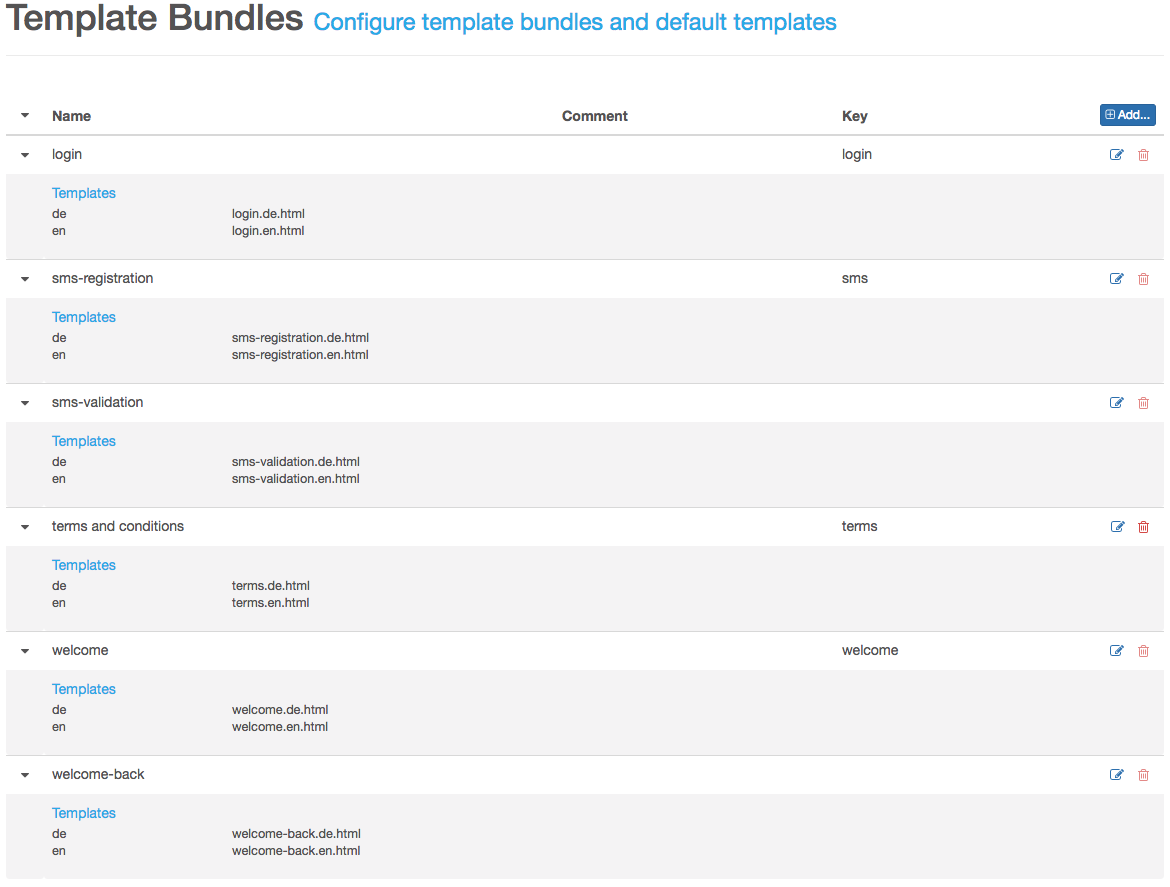
Working directly with templates is cumbersome and error-prone. Therefore, we offer template bundles to bundle different templates into a single logical unit. Any template bundle you want to navigate to needs a Key as identifier. In our example, the template bundles sms-registration, login and welcome need such a key. Otherwise, it would not be possible to navigate from the welcome page to the login or SMS registration page and vice versa.
Routing Tables
Navigation: Network Access | Routing Tables
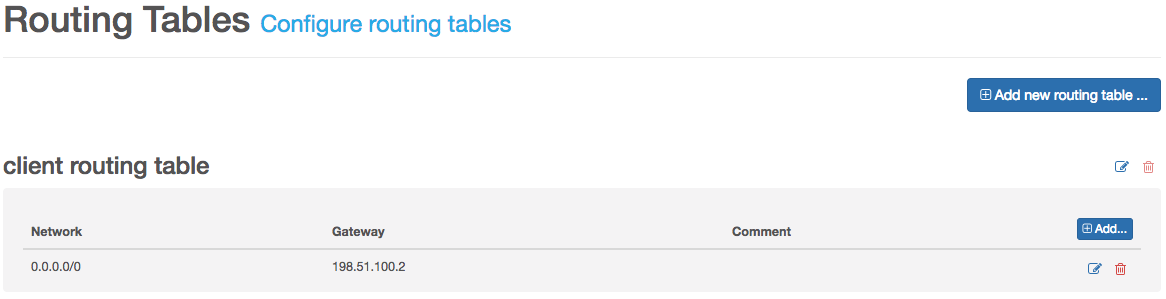
The MPP requires at least one client routing table per customer. Any traffic received from a docking network first queries this table. If no configured route matches, the system’s routing table is used. Incoming traffic does not use this routing table. Therefore, it is not necessary to configure directly attached or routed docking networks in this table.
| For safety reasons you should configure at least the default route 0.0.0.0/0. Otherwise, it would still be possible to query the system’s routing table. |
SMS Gateways
Navigation: Network Access | SMS Gateways
To send SMS the MPP offers three different gateway types:
-
onway SMS
-
Mail to SMS
-
HTTP-GET
In this tutorial we go with the CloudGaurd SMS gateway as this is our preferred one. If you need an Application Token do not hesitate and contact your account manager.
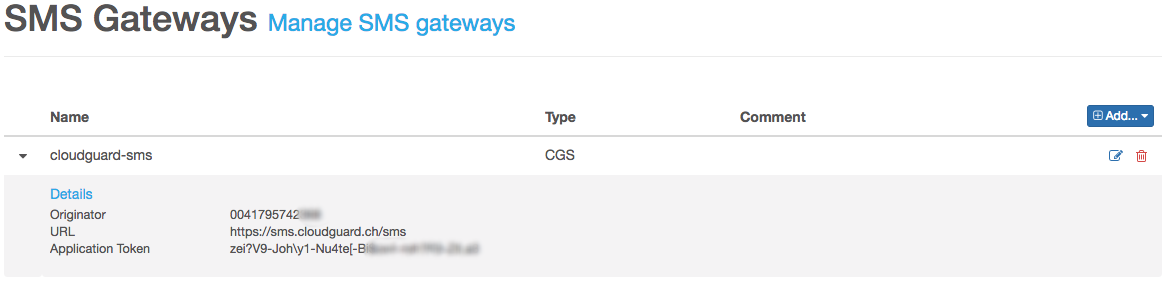
| We recommend that you use a valid phone number as originator, as many international operators do not allow alphanumeric phone numbers. |
Since MPP 5.0, we support multiple SMS gateway configurations per customer. Therefore, it is possible that you use different application tokens for different authentication scenarios and thus receive different invoices.
Open Garden Schemes
Navigation: Network Access | Open Garden Schemes
If you want to allow to access one or multiple dedicated IPs, networks or FQDNs without authentication, you are in the right place. The open garden scheme Certificates is built-in and managed by the MPP itself. When you upload a new certificate and select the Certificate Open Garden checkbox, the MPP inserts each defined CRL (Certificate Revocation List) and OCSP (Online Certificate Status Protocol) resource here.
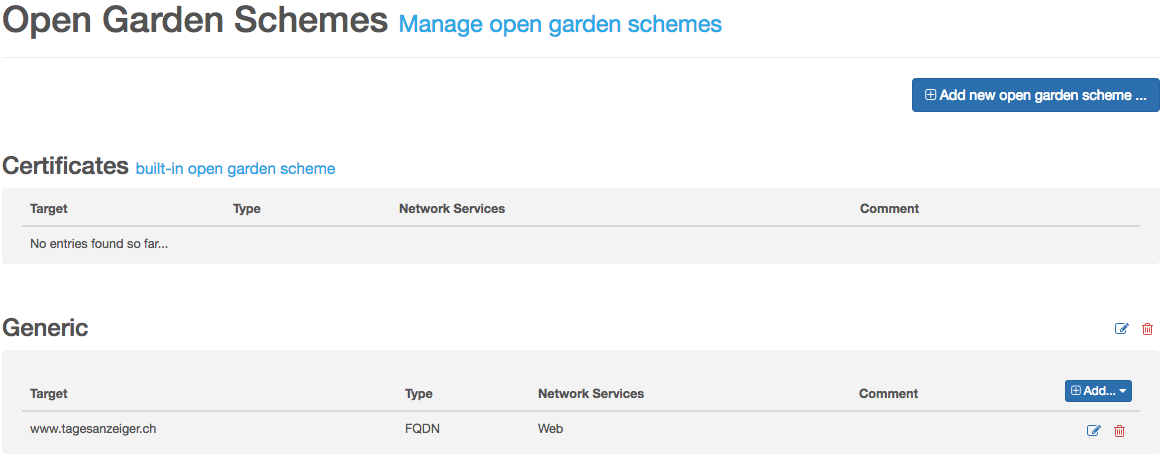
| To use FQDN based open gardens, the local DNS service must be configured and running. The MPP queries the local DNS every minute and updates the firewall rules as needed. If the DNS response provides multiple IP addresses, the MPP tracks each one of them. |
Profiles
Navigation: Network Access | Profiles
At any time, each client session has a profile assigned. A profile defines what authentication mechanisms, which open garden schemes and which client routing table is used for such a profile. In addition, any profile can provide its firewall pre-routing, forward and post-routing rules. A profile can run in three different modes: Allow Any Traffic, Show Landing Page and Use Manual Configuration.
- Allow Any Traffic
-
If a profile run in this mode, all traffic is allowed an nothing is filtered.
- Show Landing Page
-
If you select this mode, the MPP redirects each HTTP and HTTPS request to the configured landing page URL.
- Use Manual Configuration
-
Use this mode with caution, as you need to configure the redirect behavior by yourself.
In most cases, you will need at least two profiles: one for the anonymous devices and one for the authenticated devices.
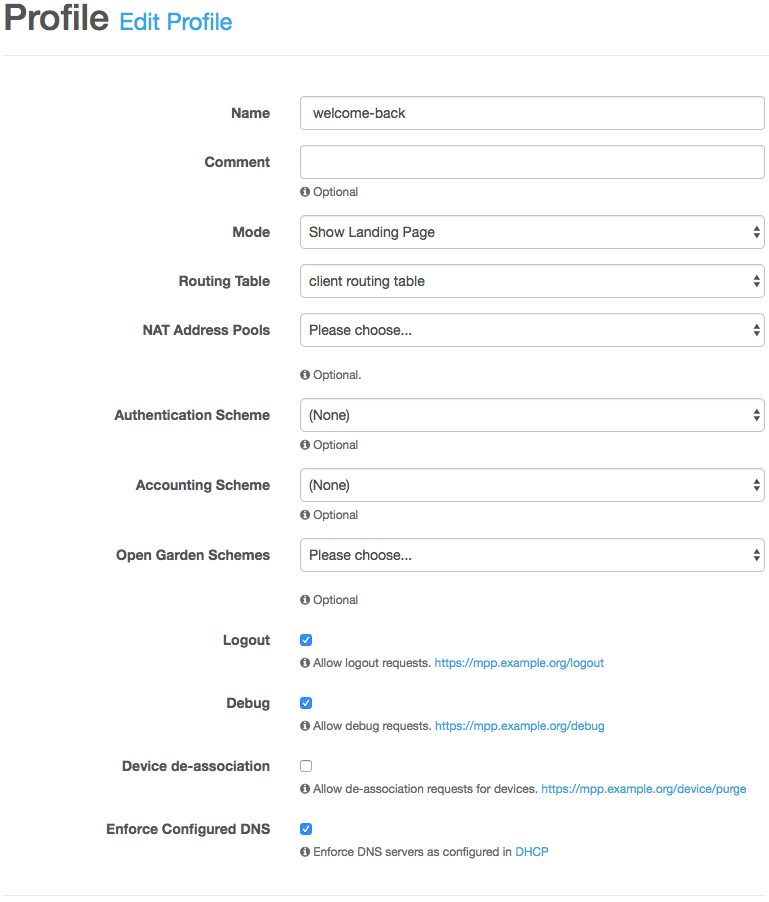
For our tutorial we need an additional profile to display a welcome back page. Create a new profile named welcome-back. Also, enable the Logout, Debug and Enforce Configured DNS feature for each profile.
- Logout
-
When enabled, the user can end their session by calling the URL
https://mpp.example.org/logout. - Debug
-
If this option is enabled, the user can view their session information by requesting the URL
https://mpp.example.org/debug. - Enforce Configured DNS
-
With this function in place, every DNS request is forwarded to the locally running DNS server.
Sites
Navigation: Network Access | Sites
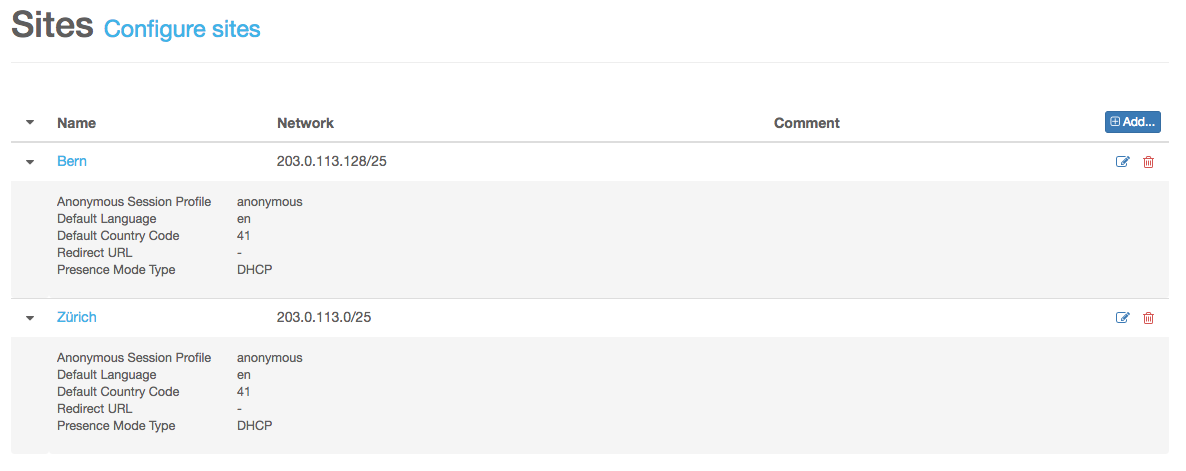
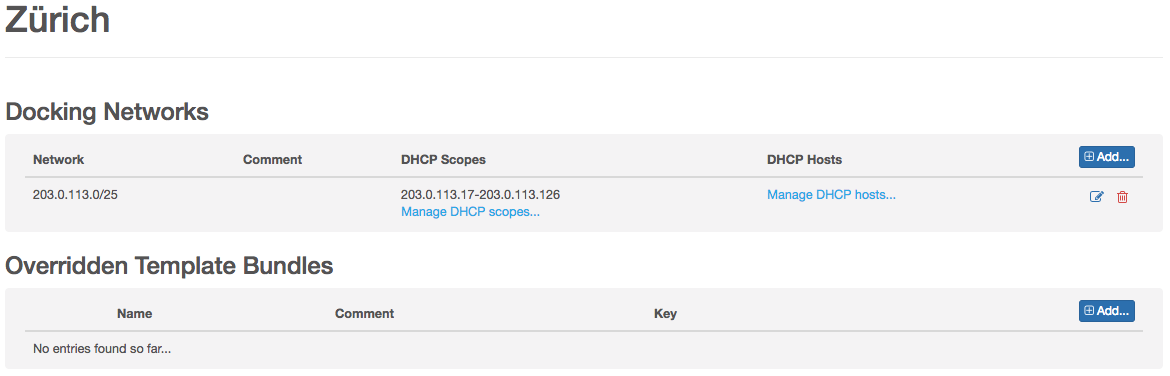
Configure the two sites Bern and Zurich and their DHCP scopes. You can leave the optional fields blank.
User Groups
Navigation: User Accounts | User Groups
Before we can start configuring our authentication schemes, we need to create the user groups. Create a user group called Self-registered Users with the key SRU and one with the name Employees and the key EMPL.

Authentication Schemes
Navigation: Network Access | Authentication Schemes
First, create an authentication scheme named login and one named welcome-back.
We start with the simple one. Configure the authentication scheme welcome-back as follows:
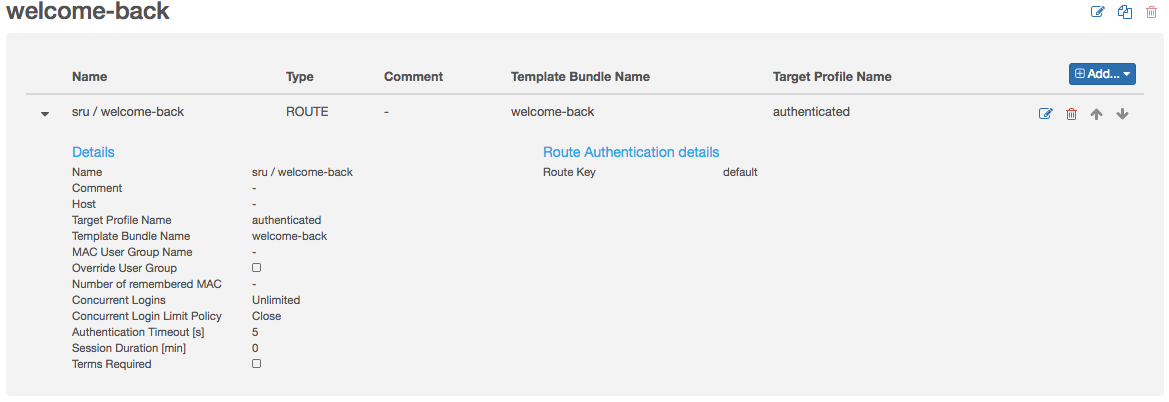
In this authentication scheme, we use only a Route Authenticator.
The scheme login is a little more complicated as shown in the following overview:
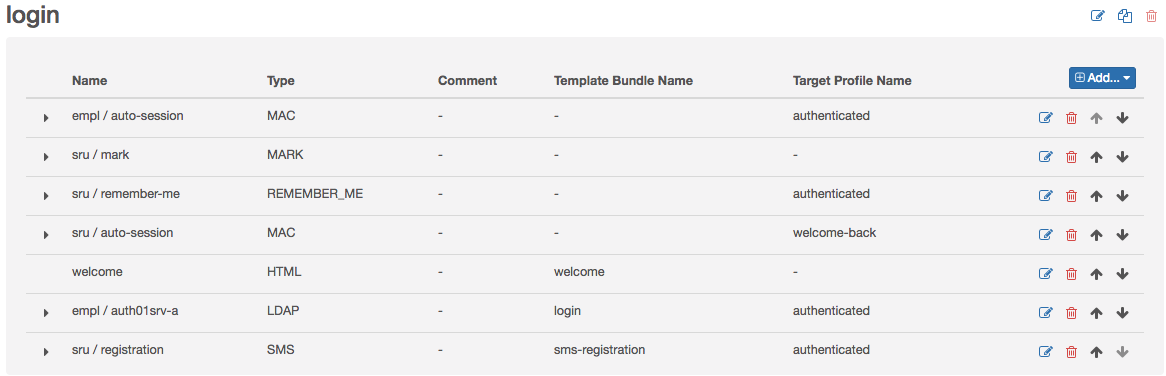
-
Configure a MAC Authenticator to start an auto-session for our employees
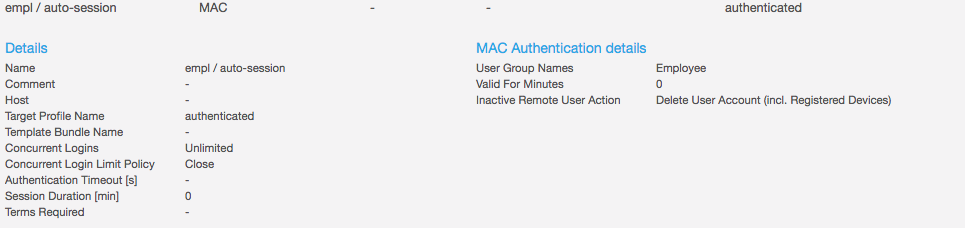 Figure 31. MAC Authenticator empl / auto-session
Make sure, that you set the option Inactive Remote User Action to Delete User Account (incl. Registered Devices) to ensure, that the user account is removed, when the user is removed on the LDAP server. -
In order to remember the authentication token of our self-registered users, you will have to configure two authenticators.
Configure a Mark Authenticator, to mark self-registered users that need to be remembered
 Figure 32. Mark Authenticator sru / mark
Configure a Remember Me Authenticator to check if a self-registered user should be remembered, based on the marks that were set
 Figure 33. Remember Me Authenticator sru / remember-me
With this configuration, each remembered authentication token is removed at midnight.
-
Configure a MAC Authenticator to start a welcome-back session for our self-registered users
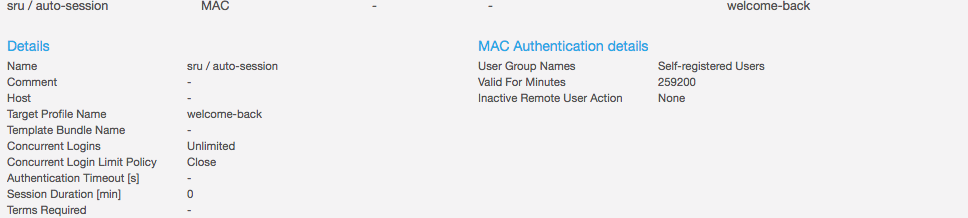 Figure 34. MAC Authenticator sru / auto-session
If the MAC address is known by the MPP, a welcome-back session is started and assigned to device.
In contrast to the empl / auto-session configuration, it is not necessary to set the option Delete User Account (incl. Registered Devices) as the MPP cannot know whether the account is still valid or not. Therefore, this option would have no effect. -
Configure a HTML Template to display the welcome page
 Figure 35. HTML Template welcome
On this page the user can choose between LDAP login or SMS registration.
-
Configure a MAC Authenticator to allow employees to login
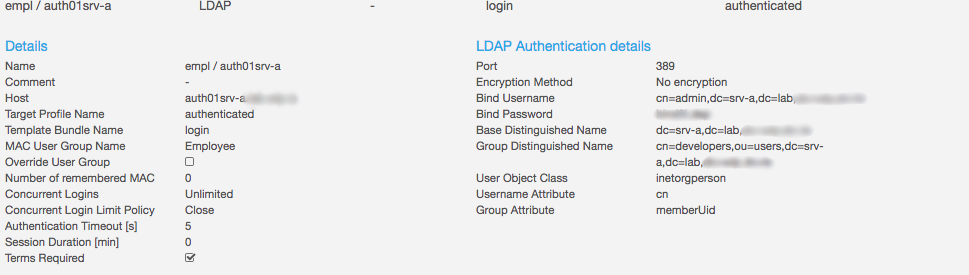 Figure 36. LDAP Authenticator empl / auth01srv-a
 -
Configure an SMS Authenticator to allow users to register
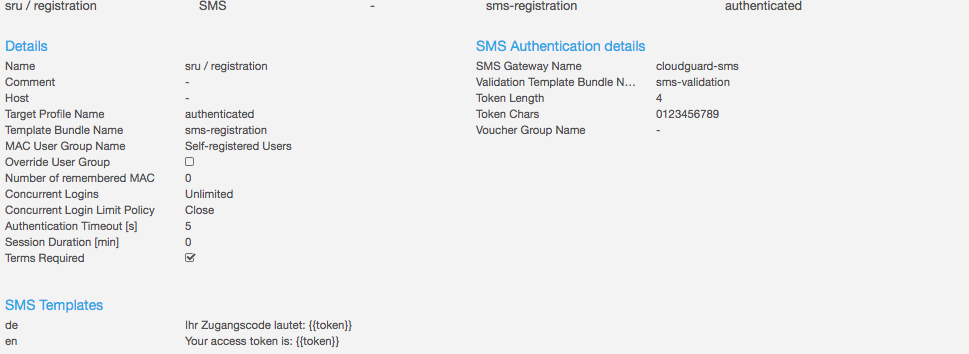 Figure 37. SMS Authenticator sru / registration
Update Profile
Navigation: Network Access | Profiles
Go back to the profiles page and edit the profile anonymous. Assign the authentication scheme login and the open garden scheme generic.
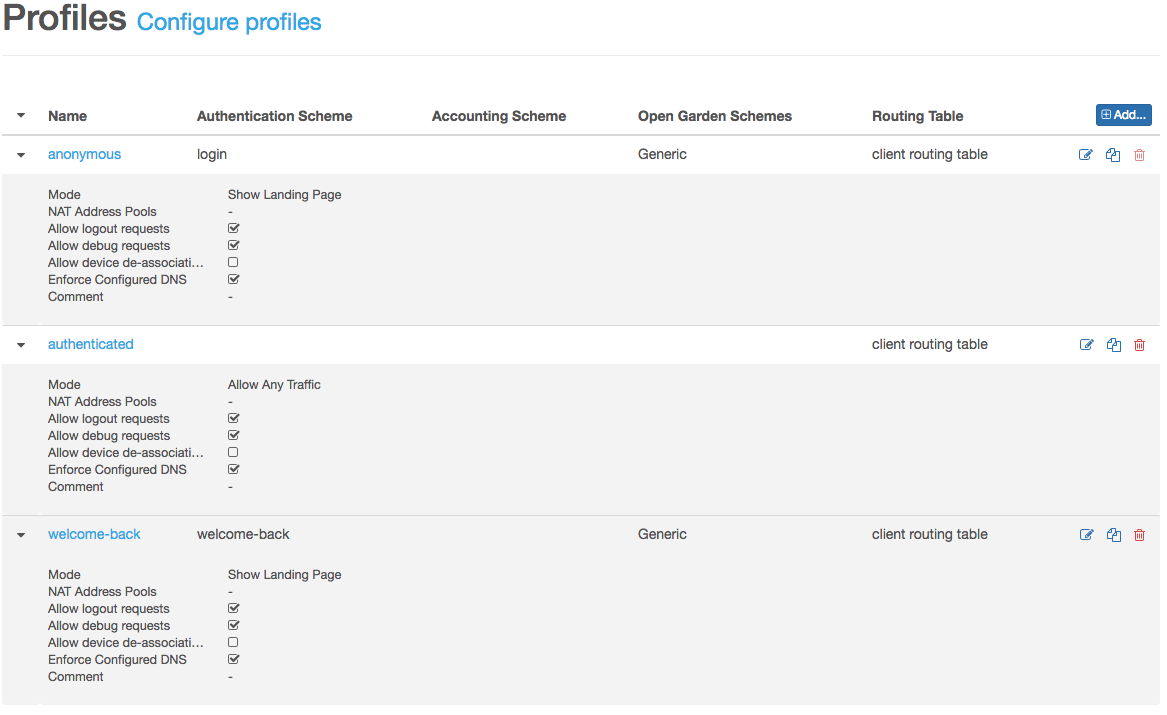
4.3.9. Finish setup
If you are running the MPP in a VMware virtual environment, we recommend that you install the open VM tools.
Before we can start testing our configuration, we need to Save & Activate the current configuration. Save the configuration and then restart the MPP by navigating to Administration | System Admin and clicking Reboot.
| Do not reload the browser window manually because the MPP Console automatically checks if the MPP is available. |
4.3.10. Setup backup system
In this step, we are going to transform our installation into a redundant setup. First we install the backup system and configure its network connection:
-
Install Backup System from ISO Image
-
Accept the end-user license agreement
-
Do not run the MPP in the cluster coordinator mode
-
Configure an initial customer
It does not matter what you enter here as we will load the configuration from mpp01 later. -
Configure IP addresses
Configure the IP addresses as shown in the network topology diagram above. However, do not configure the VRRP addresses.
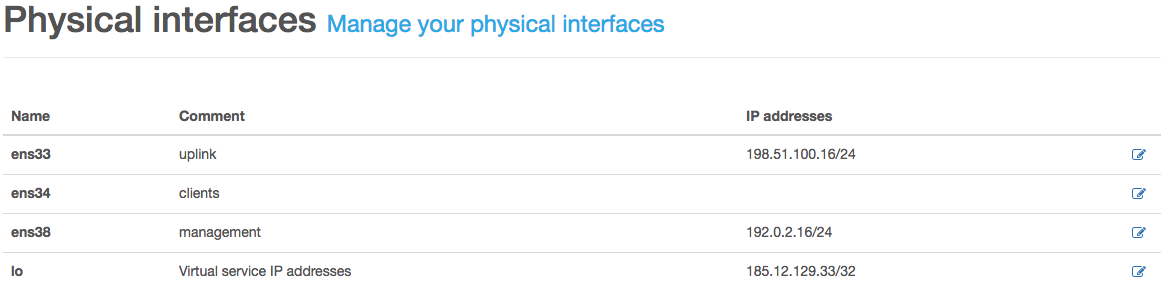 Figure 39. Physical Network Interfaces on mpp02.example.org
 Figure 40. VLAN Network Interfaces on mpp02.example.org
 -
Configure Peer
Navigate to Services | Configuration | Sync | Peer & Federation and configure mpp01 as your peer. We will synchronize via the management network. The field Peer System ID refers to the system ID of mpp01. Copy the ID of mpp01 at System | General | Settings.
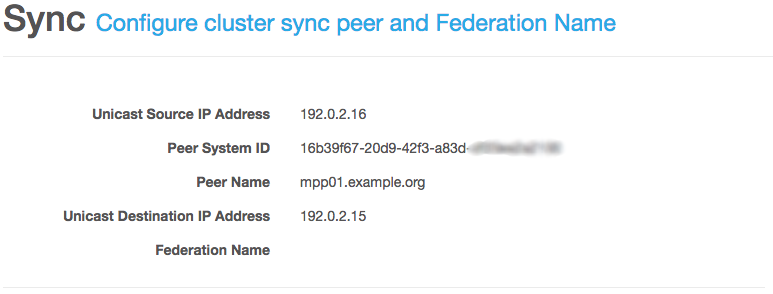 Figure 41. Peer & Federation Configuration on mpp02.example.org
 -
Save and activate the new configuration
Now it’s time to go back to mpp01.example.org.
-
Configure Peer
Configure mpp02 as the mpp01 peer as we did before with mpp02.
-
Configure VRRP
Navigate to Services | Configuration | VRRP | Service and configure the VRRP daemon.
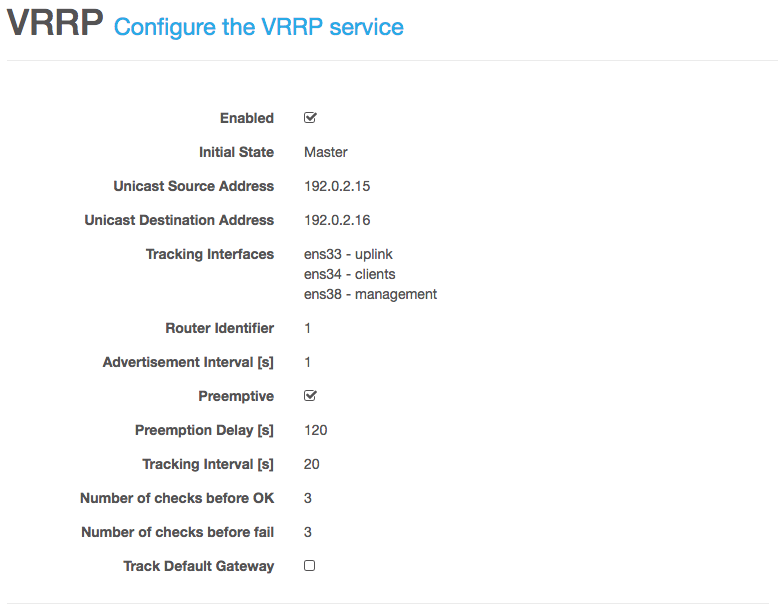 Figure 42. VRRP Configuration
 -
Re-Configure IP addresses
Head over to System | Network | Interfaces | VLAN and reconfigure the interfaces as follows:
 Figure 43. VLAN Configuration on mpp01 with VRRP enabled
 -
Save and activate the new configuration
-
Restart mpp01
Go back to mpp02.example.org and finish its configuration.
-
Load synchronized configuration
Navigate to Administration | Manage Config and click Load on the latest synchronized configuration. Verify that the configuration of the VLAN interfaces has been successfully updated.
-
Enable and configure each service
Navigate through each service and carefully update the fields annotated with the broken chain
 symbol. In general, you only need to enable the service itself and configure its
listening IP address. The remaining settings should be ok. There is an exception. At the VRRP daemon you have to add the
tracking interfaces manually.
symbol. In general, you only need to enable the service itself and configure its
listening IP address. The remaining settings should be ok. There is an exception. At the VRRP daemon you have to add the
tracking interfaces manually. -
Save and activate the new configuration
-
Restart mpp02
-
Trigger seed
Go to Services | Overview | Sync Neighbors an click Trigger seed next to the hostname mpp01.example.org.
5. What’s New Archive
5.1. MPP 9.2
- Content-Security-Policy
-
It is now possible to set a customised content security policy header to increase user security.
MPP 9.1
- Configure NTP server during installation
-
With this version it is now possible to configure the NTP servers during the installation.
MPP 9.0
- Upgrade to the latest Ubuntu LTS version
-
If you upgrade to this release, the mpp will run on Ubuntu 22.04 (Jammy Jellyfish)
MPP 8.10
- HiMed Authenticator
-
The format of the birthday date is now configurable.
MPP 8.9
- New constant for user account retention
-
With this release we introduce a constant to define the retention time for expired user accounts. By default, this constant is set to 7 days.
MPP 8.8
- Improvements in data backup
-
In this release we have improved our backup so that overridden daemon templates are part of the backup and are restored as such.
MPP 8.7
- Trusted Root Certificates
-
Since this version, we not only trust the user-defined certificates, but also use the Certificate Authority Root Certificates from Java itself. Thus, globally trusted certificates no longer need to be added manually.
MPP 8.6
- Captive Portal Architecture
-
With this release, we introduce support for Captive Portal Architecture (RFC 8952), Captive Portal API (RFC 8908) and Captive-Portal Identification in DHCP and Router Advertisements (RFC 8910).
MPP 8.5
- OpenID Connect Authenticator
-
Add support for Proof Key for Code Exchange (PKCE) Refer to Section 2.2.5.1, “OpenID Connect Authenticator” for more information.
MPP 8.4
- OpenID Connect Authenticator
-
Claim
mpp_target_profileandmpp_session_durationin the UserInfo Response allows the authorization server to define the target profile and session duration for the authenticated user. Refer to Section 2.2.5.1, “OpenID Connect Authenticator” for more information.
MPP 8.3
- Miscellaneous
-
In this version, several bugs were fixed and an upgrade to PostgreSQL 14 and Java 17 was performed.
MPP 8.2
- OpenID Connect Authenticator
-
Added the ability to define custom claims required for login.
MPP 8.1
- HTTP/2
-
MPP 8.1 now supports HTTP/2 for receiving landing pages.
- Disable legacy TLS protocols
-
With this version, TLS 1.0 and 1.1 have been disabled.
MPP 8.0
- Upgrade to the latest Ubuntu LTS version
-
If you upgrade to this release, the MPP will run on Ubuntu 20.04 (Focal Fossa)
5.2. MPP 7.4 - MPP 7.6
- Extensions for statistics in onway director
-
Under the hood a lot of improvements were made for more statistics in the onway director.
5.3. MPP 7.3
- QoS per Site
-
QoS configuration has be enhanced to support QoS per site. Refer to Section 2.2.6, “QoS” for more information.
- BGP Service
-
MPP was extended with the BGP service. The service is configured and controlled by the MPP.
- User session statistics
-
User session history accounting was added as a Remote Server service. The service streams session accounting history data to the onway director.
5.4. MPP 7.2
- OpenID Connect Authenticator
-
We added a OpenID Connect authenticator that allows you to authenticate against an OpenID Connect backend using the Authorization Code Flow. Refer to Section 2.2.5.1, “OpenID Connect Authenticator” for more information.
- DHCP Option 82, Relay Agent Information Option Support
-
Site and docking networks are now independent of each other. Target site to be assigned for a certain docking network, may be configured within the docking network itself. As a second site assignment method, the DHCP relay agent information is configurable for each customer. Pattern for circuit and remote ID may be configured to assign different sites according to the DHCP option 82 identifier match. Refer to Section 2.2.4, “DHCP Option 82 Matches” for more information.
- Remote Server
-
MPP is able to stream data to the onway director, such as SMS accounting. See Section 3.8, “Remote Server” how and when this service is activated.
5.5. MPP 7.1
- Session re-validation
-
The MPP is now able to re-validate ongoing sessions. Thus it is now possible to terminate a running session, e.g. if the user has been locked in the LDAP directory.
- HiMed Authenticator
-
We added a HiMed authenticator that allows you to authenticate against Siemens HiMed. This authenticator must be enabled in
application.properties.
5.6. MPP 7.0
- Upgrade to the latest Ubuntu LTS version
-
If you upgrade to this release, the MPP will run on Ubuntu 18.04 (Bionic)
5.7. MPP 6.9
- Execute script after applying network configuration
-
Customer may provide a Bash script under
/etc/mpp/after-network-config, which is executed between network and daemon configuration. - Local consumer status
-
It is now possible to manage local consumers in the manner already known from synchronization consumers.
- DHCP pool usage statistics
-
DHCP pool usage statistics view shows the current number of available and used IP addresses for each docking network.
- Notifications
-
MPP now has a built-in notification system. A new toolbar icon opens the notifications view and informs the administrator of important system events. Notifications can be sent as emails via the MTA.
- LDAP/ADS authenticators
-
Configuration of multiple group distinguished names is possible now. This leads to simpler configurations.
5.8. MPP 6.8
- Improve StartTLS security
-
Peer verification algorithms have been improved to make StartTLS connections more robust.
| There may be situations where some authenticators that were previously able to successfully connect to an LDAP or AD server may no longer be able to do so. In most cases, this is the reason because an IP has been specified instead of the fully qualified domain name. |
- SMS Flood Prevention
-
A defined time window preset to 1 minute, in which the MPP prevents an SMS from being sent multiple times to the same number and IP address.
5.9. MPP 6.7
- API Access
-
API access is now configurable for each customer in "Network Access" section. Refer to Section 2.2.7, “API Access” for more information.
- Device Information
-
We added a new MPP Client API to gather device information.
- Mark Authenticator
-
We added a Mark authenticator that allows you to set and reset marks for a RememberMe authenticator. A RememberMe authenticator will no longer work, without having a Mark authenticator configured.
5.10. MPP 6.6
- Client API
-
We added a new MPP Client API to manually start and stop user sessions.
- Presence Mode
-
Each site has now a presence mode (DHCP or Traffic) that differentiates whether sessions are managed automatically via DHCP lease or manually via MPP Client API. Refer to Section 2.2.2.1, “Presence Mode” for more information.
5.11. MPP 6.5
- RADIUS class attribute
-
If present the RADIUS authenticator will read and evaluate the RADIUS attribute class (Type 25). Besides, the assigned profile name is signaled via the class attribute during RADIUS accounting.
5.12. MPP 6.4
- Network configuration
-
The systems' network configuration will be written every time you modify the MPP’s network configuration. Thus the server should be reachable even if the MPP is unable to start.
- Restrict supported SSL ciphers
-
With this release, we have dropped some legacy SSL ciphers to protect the MPP against newer SSL attacks.
- Synchronization
-
We did a lot of work to make the MPP synchronization even more reliable.
- User session history
-
We have re-written large parts of the user session history to handle huge repositories with over 30 million entries.
5.13. MPP 6.3
- Dashboard
-
Under Reporting | Dashboard you get a quick overview of the current state of your MPP setup.
- Maintenance Mode
-
It’s now possible to put the MPP into maintenance mode Administration | System Admin. If the system runs in this mode, it won’t handle any DHCP or HTTP client requests. If the MPP runs in a cluster setup, this mode prevents the system from becoming VRRP master. To exit the maintenance mode, you must explicitly deactivate it.
- Show current session count via CLI
-
Call
mpp-sessions.pyon the MPP CLI, and it will show you the currently active user count. - Copy profile or authentication scheme
-
Till now it was cumbersome to create a similar authentication scheme. With this release, we introduce a copy functionality for profiles and authentication schemes.
- Enforce configured DNS server
-
If you create or edit a profile, you get a new option called Enforce Configured DNS. If you enable this option the MPP will automatically redirect any TCP and UDP traffic on port 53 to the first DNS configured in your DHCP settings. This feature is only available if the local DHCP server is configured and enabled.
5.14. MPP 6.2
| With this version, we introduce a new backup format. Therefore it’s mandatory to create a new backup after a successful upgrade. In addition, you can schedule backup jobs, so you only have to download them but do not need to wait until the backup is ready. |
For systems with higher security requirements we support CSRF prevention for any landing page action like login, route, logout, debug and device de-association.
5.15. MPP 6.1
- Remember-me authenticator
-
With this release, we introduce the remember-me authenticator. This authenticator can remember an authentication done by another authenticator. So it’s possible to configure authentication chains where a user needs to authenticate only once a day for example.
5.16. MPP 6.0
SMS Gateway: We’ve switched to our new redundant SMS gateway. To use the new gateway, you have to order credentials for the new one and re-configure any existing SMS configuration.
Open garden scheme: Define open gardens in a scheme and reference that scheme from any profile you want.
Initial seed: Get the initial data like user session history, user account et cetera from you neighbor MPP.
- MPP Cluster Coordinator
-
If you ever wanted to span the same MPP user database over several MPP Clusters our new MPP Cluster Coordinator will be your friend.
- Certificates
-
Support for certificates without a common name
5.17. MPP 5.6
- SMS Statistics
-
We’ve added a new view that shows how many SMS have been sent by which gateway to which country.
- Failed Retries Authenticator
-
The Failed Retries Authenticator now counts sent SMS and block if the limit gets reached.
- Expand/Collapse Firewall Rules
-
Add ability to expand/collapse all firewall rules with one click.
- Authentication Endpoints per FQDN
-
It is now possible to configure authentication endpoints like LDAP servers by its FQDN instead of its IP address.
- DHCP hosts
-
It’s now possible to configure static IP assignments per site.
- SMS statistics
-
We introduced detailed SMS statistics per SMS gateway. You’ll find the report at Reporting | SMS Statistics.
5.18. MPP 5.5
Since version 5.5.0 the MPP runs on the Ubuntu LTS 16.04 release with Linux Kernel 4.4.
- QoS
-
With this release, it’s possible to rate a client by Customer, Profile or MAC address.
- Kernel Subsystem
-
With this release we retired the Sioux Daemon and replaced its functionality with three new Daemons: Lawful Interception, Snoopy and Netmaid
- Metered Device Authenticator
-
In addition to the existing metering mode Time we’ve added the new mode Traffic. This mode allows you to terminate a session if the client hits either the download limit or the upload limit.
- KeepaliveD
-
Upgrade to version 1.3.4
6. Changelog
6.1. MPP 9.3.1
Release: February 8, 2025
Bug
-
MPP-2159 Unable to remove a physical interface from the mpp config
-
MPP-2162 Docking networks without target site are not present in DsiSiteConfigService GET_SITE_INFOS request
6.2. MPP 9.3.0
Release: January 7, 2025
Bug
-
MPP-2147 DOMPurify sanitizes the search example in the help text of the search component
-
MPP-2150 Disabled base button with message causes runtime error
-
MPP-2151 Some customer aware widgets do not reload on customer change
-
MPP-2154 mpp views can be edited even if they are not in edit mode
-
MPP-2155 Optional DB fields are treated as mandatory fields
-
MPP-2156 CSP blocks Redocly script
Story
-
MPP-2148 DSI service to manage sites
-
MPP-2153 DSI service to fetch customer information
-
MPP-2157 Send configuration change notifications
6.3. MPP 9.2.4
Release: March 10, 2024
Bug
-
MPP-2145 Unable to map certificate key field error
-
MPP-2146 SNMPd crashes when NFS-like systems hang
6.4. MPP 9.2.3
Release: January 30, 2024
Bug
-
MPP-2141 Fix NTP reachability check
6.5. MPP 9.2.2
Release: January 29, 2024
Bug
-
MPP-2140 Default CSP blocks the mpp redirect after successful login
6.6. MPP 9.2.1
Release: January 15, 2024
Bug
-
MPP-2137 OCSP stapling check is not good enough
-
MPP-2138 Offset reported by timedatectl timesync-status cannot be parsed
-
MPP-2139 MPP release upgrade documentation from 18.04 to 20.04 is wrong/outdated
6.7. MPP 9.2.0
Release: December 19, 2023
Story
-
MPP-2128 Enhance debug template service to show remaining traffic
-
MPP-2132 Security Headers
-
MPP-2135 Custom content security policies for landing pages
Bug
-
MPP-2129 mpp DSI instance health collector still reports error when remote server disabled
-
MPP-2131 client_id property is missing when a new refresh token is requested
-
MPP-2133 Restore of the backup fails
6.8. MPP 9.1.3
Release: September 4, 2023
Bug
-
MPP-2125 New session is terminated when the DHCP lease of the previous session has expired
-
MPP-2126 Handle lazy DHCP clients more relaxed
-
MPP-2127 Store time when the session was terminated
6.9. MPP 9.1.2
Release: August 23, 2023
Bug
-
MPP-2101 Certificate name clash
-
MPP-2115 Header checks do not rewrite the envelope sender address
-
MPP-2117 Route authenticator sets route key as user name
-
MPP-2118 Relax mpp’s language settings
-
MPP-2119 mpp DSI instance health collector reports error when remote server disabled
-
MPP-2122 VRRP state "STOPPED" is missing in MetaDataWidget
-
MPP-2123 Drop traffic from client networks to sync peer
-
MPP-2124 "With duration" toggle action truncates ms of "Valid to" on user account edit view
Story
-
MPP-2080 Align the handling of certificates with that of the onway director
6.10. MPP 9.1.1
Release: May 26, 2023
Bug
-
MPP-2113 X-Real-IP contains wrong IP address when running behind a reverse proxy
-
MPP-2114 Read age information from HiMed as date
6.11. MPP 9.1.0
Release: April 13, 2023
Story
-
MPP-2073 Extend setup file initializer to support NTP servers
Task
-
MPP-2111 Format MAC address in log files with colons
Bug
-
MPP-2104 Race condition in mpp app startup and shutdown procedure
-
MPP-2106 Fix Wi-Fi etc in SMS templates
-
MPP-2107 DSI deregisters services even if the connection was never authenticated
-
MPP-2112 Backup restore broken
6.12. MPP 9.0.0
Release: Februry 11, 2023
Story
-
MPP-2102 Upgrade to Ubuntu 22.04 Jammy Jellyfish
-
MPP-2103 Migrate from Jetty to Tomcat
6.13. MPP 8.10.0
Release: November 11, 2022
Story
-
MPP-2096 Reduce batch size from 10'000 to lower value
-
MPP-2097 Make HiMed Date-Format configurable
6.14. MPP 8.9.1
Release: October 13, 2022
Bug
-
[MPP-2095] - Fix config load error from neighbour
6.15. MPP 8.9.0
Release: October 3, 2022
Story
-
[MPP-2090] Dedicated constant for setting the retention time for expired user accounts
-
[MPP-2094] Remove originator field from onway SMS gateway configuration
Bug
-
[MPP-2093] MPP config sync error
6.16. MPP 8.8.1
Release: August 29, 2022
Bug
-
[MPP-2092] - Set correct permission for the daemon-templates folder
6.17. MPP 8.8.0
Release: August 22, 2022
Story
-
[MPP-2078] - Include overridden daemon templates and exclude health report in the backup
6.18. Bug
-
[MPP-2086] - Page assets are not restored correctly when loading an old revision
-
[MPP-2087] - HiMed Authenticator consumes all file discriptors
-
[MPP-2088] - Changed Page Assets don’t show up as unsaved changes
-
[MPP-2089] - DsiExecutor insufficient queue capacity
6.19. MPP 8.7.1
Release: July 18, 2022
Bug
-
[MPP-2084] - DSI frames are dropped as the channel is not writable
-
[MPP-2085] - ID token verification failes
6.20. MPP 8.7.0
Release: July 8, 2022
Story
-
[MPP-2077] - Allow '@' in username
-
[MPP-2079] - Download certificates
-
[MPP-2082] - Also check the certificates against the Java truststore
Bug
-
[MPP-2076] - Short living sessions when "valid from" field is different
-
[MPP-2081] - Concurrent modification exception in core auth state
-
[MPP-2083] - Kafka streams may crash
6.21. MPP 8.6.0
Release: May 30, 2022
Story
-
[MPP-2051] - Use timedatectl for time synchronization
-
[MPP-2064] - Replace LifecycleHandler mpprs
-
[MPP-2065] - Replace LifecycleHandler mpprc
-
[MPP-2066] - Implement captive portal API
-
[MPP-2067] - Integrate Captive-Portal Identification in DHCP
-
[MPP-2071] - Integrate health service and desired collectors
-
[MPP-2072] - Integrate health service and desired collectors
Bug
-
[MPP-2055] - Handle concurrent session close-policy in session processor
-
[MPP-2068] - Not all mission critical services trigger a failover if they are not running
-
[MPP-2070] - Creation of list with empty last entry results in an error
-
[MPP-2074] - Unable to interpolate EL expression
-
[MPP-2075] - Health service SYNC warning for single type MPP systems
6.22. MPP 8.5.3
Release: April 25, 2022
Bug
-
[MPP-2069] - Linked user information is not updated
6.23. MPP 8.5.2
Release: April 18, 2022
Bug
-
[MPP-2056] - Avoid ignore Ant pattern in Spring Web Security
-
[MPP-2057] - Last seen not updated
-
[MPP-2059] - LocaldatabaseAuthenticator does not always update linked user data
-
[MPP-2060] - Valid from is not always set during first login
-
[MPP-2061] - MacAuthenticator cannot re-validate local db accounts if no linked user id is set
-
[MPP-2062] - User Account last seen is not set to terminatedAt when a session ends
-
[MPP-2063] - Handle NullPointerException when adding a new remote peer
6.24. MPP 8.5.1
Release: March 7, 2022
Bug
-
[MPP-2052] - LinkedUserInfo is not backwards compatible
-
[MPP-2053] - Unable to authenticate multiple OIDC devices with same account at same time
-
[MPP-2054] - Consider own session in concurrent login limit calculation
6.25. MPP 8.5.0
Release: February 22, 2022
Story
-
[MPP-2039] - Validate nonce claim in ID token
-
[MPP-2040] - Support PKCE
-
[MPP-2045] - Remove linked data when OpenID refresh token is invalid
Bug
-
[MPP-2038] - Linked information not updated
-
[MPP-2043] - Many user_session with duration = 0
-
[MPP-2044] - Seed of sms_gateway_statistic fails
-
[MPP-2046] - MPP may not be restarted after Kafka upgrade
-
[MPP-2050] - Postgres commands must not use more connections than configured
Task
-
[MPP-2042] - Use new favicon
6.26. MPP 8.4.0
Release: December 6, 2021
Story
-
[MPP-2030] - OpenID Connect Claim to define target profile
-
[MPP-2031] - OpenID Connect Claim to define session duration
Task
-
[MPP-2035] - Allow rejection of an inactive remote user
Bug
-
[MPP-2032] - Shutdown keepalived on status failures
-
[MPP-2033] - Dynamic selection of the verification algorithm
-
[MPP-2034] - Netmaid configuration is not updated
6.27. MPP 8.3.0
Release: November 16, 2021
Story
-
[MPP-2025] - Document API to save and activate a new configuration
Bug
-
[MPP-2021] - Broken backup status (de-)serialization of AsyncTaskServiceStatus
-
[MPP-2022] - Unable to create or update a customer
-
[MPP-2023] - Footer overlaps select option
-
[MPP-2026] - Restart snmpd service on failure
-
[MPP-2027] - Allow trailing slash in MPP URL class
Task
-
[MPP-2024] - mpp-remote-server should depend on kafka
-
[MPP-2028] - Upgrade to PostgreSQL 14
-
[MPP-2029] - Upgrade to Java 17
6.28. MPP 8.2.0
Release: August 30, 2021
Story
-
[MPP-2016] - Allow definition of user-defined required claims
Bug
-
[MPP-2018] - Prevent DHCP messages from being processed multiple times
-
[MPP-2019] - Broken MPP backup restore
6.29. MPP 8.1.0
Release: May 18, 2021
Task
-
[MPP-2007] - Disable TLS 1.0 and TLS 1.1 in Nginx configuration
-
[MPP-2008] - Enable HTTP/2 in Nginx configuration
Bug
-
[MPP-2006] - Keepalived requires at least one virtual IP
-
[MPP-2009] - Expired sessions are not cleaned up
-
[MPP-2011] - Running session is not stopped when device is created via sync handler
-
[MPP-2013] - Unable to install certificate without common name
6.30. MPP 8.0.1
Release: April 20, 2021
Bug
-
[MPP-2012] - Broken user account linked data serialization
6.31. MPP 8.0.0
Release: March 7, 2021
Story
-
[MPP-1999] - Extend DHCP lease with optional gateway attribute
-
[MPP-2000] - Log OpenID Connect requests
-
[MPP-2001] - Stop running session when the device is created
-
[MPP-2003] - Ubuntu 20.04 upgrade
Bug
-
[MPP-2004] - Session log is flooded when inserting sessions
Task
-
[MPP-1981] - Upgrade to keepalived 2.1.5
-
[MPP-1982] - Remove deprecated HelloSyncMessageHandler