1. What’s New
| Please refer to the upgrade instructions if you want to upgrade your onway director (Sponsoring Portal) installation to the latest version. The upgrade instructions can be found here. |
onway director 4.11
- NAS Identifier
-
On the NAS client, the NAS identifier can now be configured as a regular expression.
- MAB Failure VLAN
-
A failure VLAN can be configured in the network access group view. This VLAN is returned if an MAB request does not find an account.
The what’s new archive can be found here.
2. Configuration
Only users with the role Admin, such as the default user sp-admin are allowed to configure the Sponsoring Portal.
2.1. Certificates
All certificates are handled by the external Java trust store. Therefore you must import any SSL certificate that is in place in your environment like MPP, Macman or external User Directory.
2.1.1. How to import a certificate into the Java trust store
In order to verify a remote peer the Sponsoring Portal has to be able to verify the remote host’s certificate. Either you have the certificate already or you have to fetch it from the server.
remote_host=ldap.exmaple.com
remote_port=636
keytool -printcert -sslserver ${remote_host}:${remote_port} -rfc > ${remote_host}.crtremote_host=ldap.exmaple.com
keytool -import -file ${remote_host}.crt -alias ${remote_host} -keystore /usr/lib/sponsoring-portal/truststore.p12
The password of the trust store must be password
|
The Sponsoring Portal reads the truststore during startup.
After the custom trust store has been modified, do not forget to restart the Sponsoring Portal
systemctl restart sponsoring-portal.
2.2. Organizational Unit
An organizational unit (shortened to org unit) is defined with a name and an optional comment. Multiple organizational units can be structured as parent-child relations.
2.2.1. Configure Organizational Unit
The behavior of an org unit (and its children) is configured through its Permissions & Settings view.
Permissions & Settings
New permissions & settings of an org unit are applied to a particular Group. Such a group must be configured beforehand. The Org Unit - Group relation owns the permissions & settings.
Permissions & settings are applied to these general types of entities:
-
Guest User (MPP user)
-
MPP Device
-
MPP Voucher
-
Macman User
-
Macman Device
Permissions are read, create, edit and delete, while settings are entity type specific. Both permissons & settings are inherited within org units.
Any configuration issue is shown either as an error or as a warning. Errors indicate a configuration issue which must be corrected by the administrator of the Sponsoring Portal.
The optional field Delete After relates to an Input Template field. If it is defined here, make sure is is visible or enabled on the input template, and vice versa.
Guest User
Guest user specific settings are applied here.
User groups are retrieved from MPP MPP Configuration. These settings need to be configured, and are used to create a guest user.
MPP Device
MPP device specific settings are applied here.
User groups are retrieved from MPP MPP Configuration. These settings need to be configured, and are used to create a MPP device.
MPP Voucher
MPP voucher specific settings are applied here.
Voucher groups are retrieved from MPP MPP Configuration. These settings need to be configured, and are used to create a MPP voucher.
Macman User
Macman user specific settings are applied here.
Device groups are retrieved from Macman through Macman Configuration. These settings need to be configured, and are used to create a Macman user.
Macman Device
Macman device specific settings are applied here.
Device type, device groups and organizational units are retrieved from Macman through Macman Configuration. These settings need to be configured, and are used to create a Macman device.
2.3. Group
A group is a container. It is used for Organizational Unit - Group relation, and to limit My Device approval.
Any synchronized user of a User Directory can be assigned to a group. This helps to easily identify remote users on the Sponsoring Portal.
A group that is used by the onway director for reporting permissions can’t be deleted.
2.3.1. Configure Group
A group has a unique name, an optional comment, and a max. my devices field. It specifies how much devices a user can approve.
2.4. User Account
User accounts are either created locally, or synchronized from a user directory.
If a user account belongs to the Local Directory, it can be assigned to zero, one or more Groups.
If a user account is synchronized from a LDAP Directory, the user is assigned to a standard group. The standard group is configured in the User Directory general administration.
2.5. User Directory
Two types of user directories can be configured:
-
Local Database
-
LDAP Directory
You can manage the users locally on the Sponsoring Portal or connect it to several LDAP directories including Microsoft’s Active Directory. The user chooses the directory on the login page.
2.5.1. LDAP Directory
Four sections of a LDAP directory can be configured:
-
General
-
Connection
-
User account LDAP attributes
-
Group LDAP attributes
General
A remote user is assigned to a local Standard Group, if it is synchronized. A standard group is like any other Group, with this exception: a synchronized User Account can not unmap itself from the standard group. The LDAP directory is the authority of this user account, and the standard group defines the mapping to the Sponsoring Portal.
A standard group can be remapped to another group, nevertheless.
To remove all users from a directory on the Sponsoring Portal, the standard group can be set to (None).
Connection
This section defines basic connection settings and some synchronization related configuration options.
The LDAP time limit in seconds defines how long one request can go. Synchronization of a large directory uses multiple requests.
The LDAP count limit of 0 means that all entries are synchronized. This should be the default. For a general connection test run, the value can be set to i.e. 10, to limit the amount of transferred entries.
The LDAP sync intervall in minutes defines how often the whole(!) data is transferred from the directory to the Sponsoring Portal for synchronization.
The LDAP page size specifies the batch size of one result, which is transferred from the directory to the Sponsoring Portal.
Active Directory Attribute Mapping
| Field | Attribute |
|---|---|
User account ID attribute |
|
Display name attribute |
|
First name attribute |
|
Last name attribute |
|
Username attribute |
|
User group attribute |
|
Email attribute |
|
Phone number attribute |
|
User object class |
|
| Field | Attribute |
|---|---|
Unique group id attribute |
|
Display name attribute |
|
Group description attribute |
|
Group member attribute |
|
Group member of attribute |
|
Group object class |
|
Synchronization
| Sponsoring Portal synchronization goes one way, from remote to local. The remote directory is the authority of the data, and the Sponsoring Portal consumes the data. |
LDAP directory synchronization is done on configuration Save, is triggered automatically, or can be activated by pressing the Synchronize button.
Directory Service Groups
All available Directory Service Groups are shown here. It is possible to assign a directory service group to one or more local Groups.
A remote group is assigned to a Local Group, if it is synchronized. All users within the remote group are assigned to this local group. Like with the standard group, a synchronized User Account can not unmap itself from such a group. The LDAP directory is the authority, and the local group defines the mapping to the Sponsoring Portal.
Local groups are optional. If none is chosen, just the standard group is used.
2.6. MPP Configuration
The MPP configuration is required to connect the Sponsoring Portal with the MPP.
2.6.1. Connection
Configure the MPP host and port and preferably use HTTPS, if configured. Set credentials, i.e. mpp-admin with the corresponding password.
The connection timeout defines how long the Sponsoring Portal tries to establish a connection to the MPP. The sync interval specifies the interval in which the Sponsoring Portal fetches data from the MPP.
2.6.2. Guest User Template Settings
The Sponsoring Portal lets you display or download the data of a created Guest User.
The template settings define how the data shall be rendered. The data is shown as PDF or plain TXT. Please see the supported fields information box for all available fields.
The file download time limit defines after how many minutes the template data shall be deleted. It must be deleted as it contains sensitive information.
2.6.3. MPP Voucher Template Settings
The Sponsoring Portal lets you display or download the data of a created MPP Voucher.
The template settings define how the data shall be rendered. The data is shown as PDF or plain TXT. Please see the supported fields information box for all available fields.
2.7. Macman Configuration
The Macman configuration is required to connect the Sponsoring Portal with the Macman.
2.7.1. Connection
Configure the Macman host and port and preferably use HTTPS, if configured. Set credentials, i.e. BYOD with the corresponding password.
The connection timeout defines how long the Sponsoring Portal tries to establish a connection to the Macman. The sync interval specifies the interval in which the Sponsoring Portal fetches data from the Macman.
2.7.2. Macman User Template Settings
The Sponsoring Portal lets you display or download the data of a created Macman User.
The template settings define how the data shall be rendered. The data is shown as PDF or plain TXT. Please see the supported fields information box for all available fields.
The file download time limit defines after how many minutes the template shall be deleted. It must be deleted as it contains sensitive information.
2.8. My Device Configuration
2.9. Custom Fields
Custom fields can be defined to enhance Input Templates with additional input fields.
A custom field consists of a unique name and has a type. Based on the type, additional fields such as values or regular expression can be defined.
The following types are available:
-
List: defines a list with values; a value can be selected
-
Text: any text is possible, supports a regular expression to validate the text
-
Yes/No: offers a simple yes-or-no checkbox
An ID is assigned to a custom field, if it is added to the Sponsoring Portal. The ID can be used to identify a custom field from the MPP configuration, for TXT or PDF export.
2.10. Input Template
An input template can be defined to configure which fields are visible on an input form. In addition, static or generated values can be assigned to an input field of a template. The purpose is to simplify and automate user input. The user requires less time to fill out the form. Some input templates can be enhanced with Custom Fields or support a factory.
Input templates exist for the following forms:
-
New Guest User (supports custom fields)
-
New MPP Device (supports custom fields)
-
New MPP Voucher (supports factory)
-
New Macman User (supports custom fields)
-
New Macman Device (supports custom fields)
2.10.1. Configure Input Template
An input template has a unique name, an optional comment, and a priority. It is referenced from the Permissions & Settings of an Organizational Unit.
| The input template with the highest permission is presented to a Guest User, if he is member of multiple groups. |
A collection of field settings define how the input template looks and behaves. Each field is defined with a field name, if it is visible, if a value provider is enabled, and with a default value.
| Visible | Enabled | Value | Result |
|---|---|---|---|
True |
True |
A value must be configured |
Field is visible and has read-only value |
True |
False |
Value is ignored |
Field is visible and uses user-input |
False |
True |
A value must be configured |
Field is invisible and has value |
False |
False |
No value |
This combination is not allowed for mandatory fields! |
Two types of value providers do exist:
-
Static value. A default value is defined in the input template and is applied to the form; example: Valid For 1440 minutes, Enabled: true
-
Generated value. A value generator produces a value for the form; example: Valid From First Login, Voucher Code: 5313
Some value providers, such as the username-, password- or vouchercode-provider require additional configuration.
The MPP Device field MAC Addresses can’t be modified. It is shown for completeness.
The field Delete After (not available in MPP Voucher) needs to be visible or enabled if it is configured within Permissions & Settings. Adding this field to an input template without setting the permissions & settings doesn’t have any effect.
Custom Fields
Some input templates can be extended with Custom Fields. A custom field of an input template supports the same configuration options. An additional optional field can be configured. It specifies if the field requires an input value or not.
Factory
The MPP voucher input template can be configured to create multiple vouchers instead of just one. An optional field Count must be configured to do so. It behaves like any other input template field and supports the visible and enable flags. The code field must be enabled and configured, as each MPP voucher code must be unique.
The factory input template can be added to any Organizational Unit.
2.11. FTP Servers
The Sponsoring Portal uses one or multiple FTP servers to download CSV files for import tasks.
2.12. Import Tasks
Import tasks are used to automatically download files from an FTP server and create or update entities via CSV Import. They can be created for Guest Users, MPP Devices, Macman Users and Macman Devices using the CSV dropdown button on the Organizational Unit view.
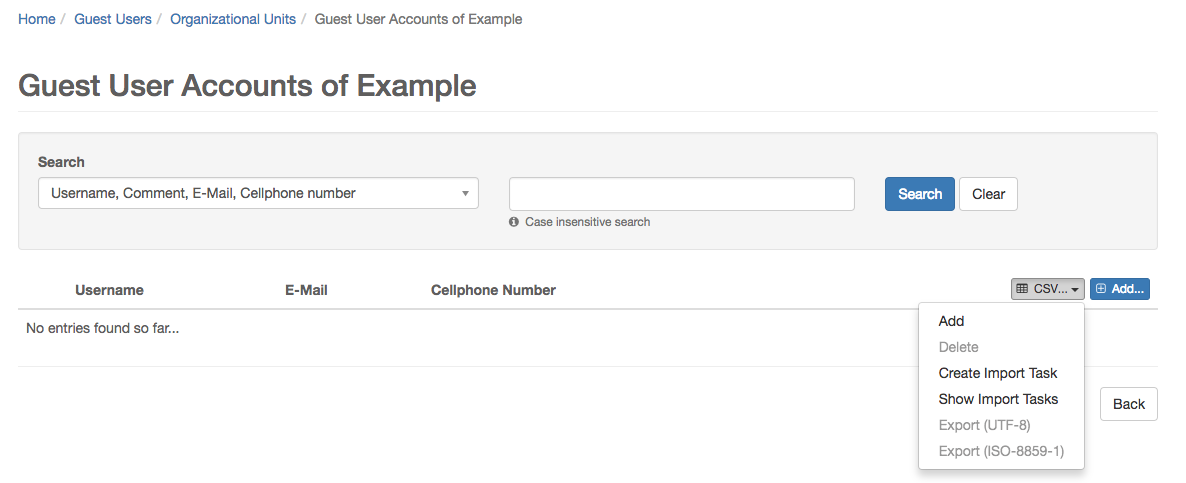
Existing import tasks can be managed in the Administration / Import Tasks view.
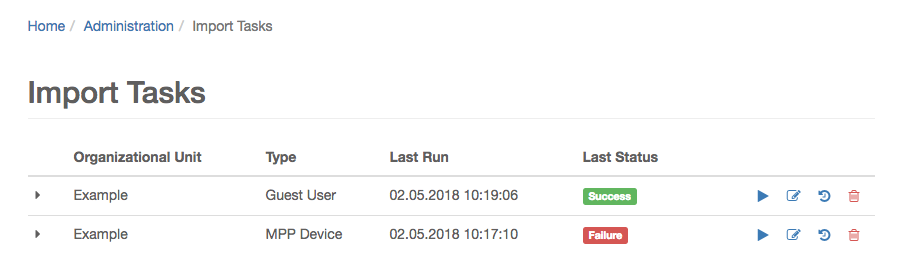
The Import task history view shows the status of the executions of a task. The number of task executions that are stored can be configured.
2.12.1. Configuration
| An import task runs with the permissions and settings of the user that last edited it. If you want to use a specific input template you can create a new user and change the settings accordingly. |
An import task is configured in the following 4 steps:
Step 1: General Settings
Source
The FTP server used to download files. At least one server must be configured in order to create an import task.
Import Strategy
-
Full: Creates or updates all entities that are in the downloaded file and deletes all existing entities that are not.
-
Cumulative: Creates or updates all entities that are in the downloaded file. No entities are deleted.
Step 2: Information Settings
Email Notification
E-mail notifications can be sent after a task execution. The SMTP server settings must be defined in the application.properties file.
One of the following notification types can be used:
-
Always: A notification is sent after each task execution.
-
Failure: A notification is sent after a failed task execution.
-
Success: A notification is sent after a successful task execution.
-
Never: No notifications are sent.
Step 3: File Settings
File Retention Policy
-
None: No action is performed.
-
Delete File: The downloaded file will be deleted from the FTP server after a successful task execution.
File Pattern
The file pattern is a regular expression that defines which file should be downloaded.
| If no pattern is defined, or if multiple files match the pattern, the newest file (ordered by last modified) will be used. |
Directory
The directory specifies the path on the FTP server used to download files.
File Selection
In order to reach the next step, a CSV file is required. Use the load button to get a list of all files that match the current settings. The file highlighted in green will be used for the field mapping in step 4.
Step 4: Field Mapping
The CSV field mapping is configured in the same way as for a manual CSV import. Please refer to CSV Field Mapping for more information.
3. Administration
3.1. Guest User
Manage user accounts on the MPP, in order to grant network access to guests.
A guest user is related to an Organizational Unit. Given the user has the required Permissions & Settings, three options to manage guest users are provided here.
-
To fill out the input form
-
To use the CSV Import / Export tool
-
To use the Import Task tool
The first option is interactive and can add / delete one device, while the second option offers bulk actions.
3.2. MPP Device
Manage user devices on the MPP, in order to grant headless or special devices network access.
A MPP device is related to an Organizational Unit. Given the user has the required Permissions & Settings, three options to manage MPP devices are provided here.
-
To fill out the input form
-
To use the CSV Import / Export tool
-
To use the Import Task tool
The first option is interactive and can add / delete one device, while the second option offers bulk actions.
3.3. MPP Voucher
Manage vouchers on the MPP, in order to grant network access to guests, by using voucher codes. The voucher code must be unique.
A MPP voucher is related to an Organizational Unit. Given the user has the required Permissions & Settings, two options to manage MPP vouchers are provided here.
-
To fill out the input form
-
To create multiple vouchers with a factory
3.3.1. MPP Voucher Factory
To generate multiple vouchers at once, the administrator must configure an MPP Voucher Input Template. An additional field Count defines the number of vouchers to be created. The generated vouchers can be downloaded as a CSV file afterwards.
| If you import the CSV file in a spreadsheet application, please define the code column type as Text (not as type Standard), if your code can contain 0, to prevent that 0123 is transformed to 123. |
3.4. Macman User
Manage user accounts on the Macman, in order to grant network access with WPA2 encryption into a dedicated network (VLAN, …).
A Macman user is related to an Organizational Unit. Given the user has the required Permissions & Settings, three options to manage Macman users are provided here.
-
To fill out the input form
-
To use the CSV Import / Export tool
-
To use the Import Task tool
The first option is interactive and can add / delete one device, while the second option offers bulk actions.
3.5. Macman Device
Manage user accounts on the Macman, in order to grant network access with Layer 2 filtering.
A Macman device is related to an Organizational Unit and to a Macman Device Type setting. The device type defines which MAC addresses of a device are available. Given the user has the required Permissions & Settings, three options to manage Macman devices are provided here.
-
To fill out the input form
-
To use the CSV Import / Export tool
-
To use the Import Task tool
The first option is interactive and can add / delete one device, while the second option offers bulk actions.
3.6. My Device
Connect personal devices to the corporate network by using WPA2 encryption, in order to use this device at work.
3.7. CSV Import / Export
The tool can add or delete a number of entities (Guest Users, MPP Devices, Macman Users or Macman Devices) to the Sponsoring Portal at once. The input data is a comma (,) or semicolon (;) separated file, encoded with UTF-8 or ISO-8859-1, also called Latin 1. Former Microsoft Excel versions use this encoding, typically, when exporting to a CSV file.
CSV files can be imported manually, or by an import task. The import task allows to update entities.
3.7.1. Manual Import
Importing a CSV file is done in three steps:
-
Uploading the file by choosing the file, encoding and separator
-
Mapping the column fields
-
Executing the import
| Click on the Download sample file link to get a template which contains the required header fields before uploading. |
CSV Field Mapping
First of all, it must be defined on which row the import shall start.
Then, each column of the CSV file must be mapped to a field name of the Sponsoring Portal. This is done in the Column-Field Name Mapping table. If a field is provided by an Input Template, it cannot be mapped. The sponsoring portal tries to guess the correct mapping by reading the first line of the file.
The first few lines of the uploaded file are shown in a Preview below, to support the mapping decision.
| It is not needed to map all fields to delete entities. An information box shows which fields are required. |
| For Macman devices, it is not possible to map MAC addresses to particular device slots. MAC addresses are mapped to slots in ascending slot number order. |
Import
If the mapping is set, the uploaded file is imported by clicking Add or Delete. Based on the number of lines that are imported, it might take some time. The Sponsoring Portal connects to remote systems such as MPP or Macman, and does several validation checks to assure data integrity over all involved systems.
A success message is shown at the end, if no errors are detected.
| Updated entries are just counted for MPP and Macman Devices with multiple MAC addresses. A device is updated if some (not all) MAC addresses were deleted. |
Errors
If errors occur, a Summary page with Failed Lines appears. The summary shows deleted, updated and failed entries. Failed lines can be downloaded (as CSV), for correction. The error causes are added in a separate column. The whole import process can start over with the corrected CSV file.
3.7.2. Automatic import
A CSV import can be automated using an import Task. Please refer to Section 2.12, “Import Tasks” for more information.
3.7.3. Export
The entities of an organizational unit can be exported as CSV. The encoding is chosen, while the field separator (typically comma or semicolon) is determined automatically by the underlying locale. A header line is added to show the field names.
4. Installation
4.1. System requirements
| Component | Minimum | Recommended |
|---|---|---|
Processor |
Dual core with 2 GHz or faster |
Quad core with 2 GHz or faster |
RAM |
4 GB |
8 GB |
Storage |
60 GB |
>= 240 GB |
4.2. Product Dependency
The Sponsoring Portal requires at least the following MPP and / or Macman product versions.
Sponsoring Portal |
MPP Version |
Macman Version |
Macman Legacy Version |
onway controller Version |
4.11.0 |
>= 8.5.0 |
>= 3.6.0 |
>= 2.6.11 |
>= 2.0.0 |
4.3. Install
To install the Sponsoring Portal, we need either a bare metal server or a virtual machine that meets the requirements as specified above.
Download the latest onway ISO from https://packages.onway.ch/iso/.
After you have started from the disk image a similar GRUB screen will show up:
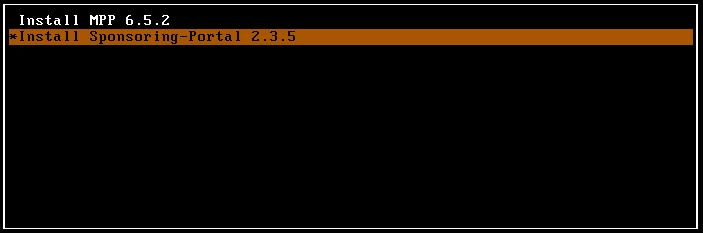
Select Install Sponsoring-Portal 4.11.0 and press return. As next, the setup wizard pops up. Follow the instructions. Next, to the wizard, the Sponsoring Portal gets installed on the local disk. This may take some minutes. To finish the installation the server reboots once, and a yellow Linux prompt appears.
4.3.1. VMware Tools
If you are running the Sponsoring Portal in a VMware virtual environment, we recommend that you install the open VM tools.
apt update
apt install open-vm-tools
4.3.2. Configure Reverse Proxy (Nginx)
With the default configuration the reverse proxy uses the self-signed certificates of the base system. In order to use
your own certificates you have to put the certificate key into the directory /etc/ssl/private/ and the certificate
combined with the intermediate certificate into the directory /etc/ssl/certs/. After that, edit the Nginx configuration
file /etc/nginx/sites-available/sponsoring-portal and set the value of the properties ssl_certificate_key and
ssl_certificate to match your setup.
To put the certificate with the intermediate within one file you can simply call
cat cert.crt intermediate.crt > cert-chain.crt on the CLI.
|
If the fully qualified domain name of the system does not match the URL pointing to the Sponsoring Portal, you have to modify the server_name property as well.
Check Nginx’s configuration with nginx -t and restart the Linux Daemon if everything is ok by issuing
systemctl restart nginx.
4.4. Access the Web Console
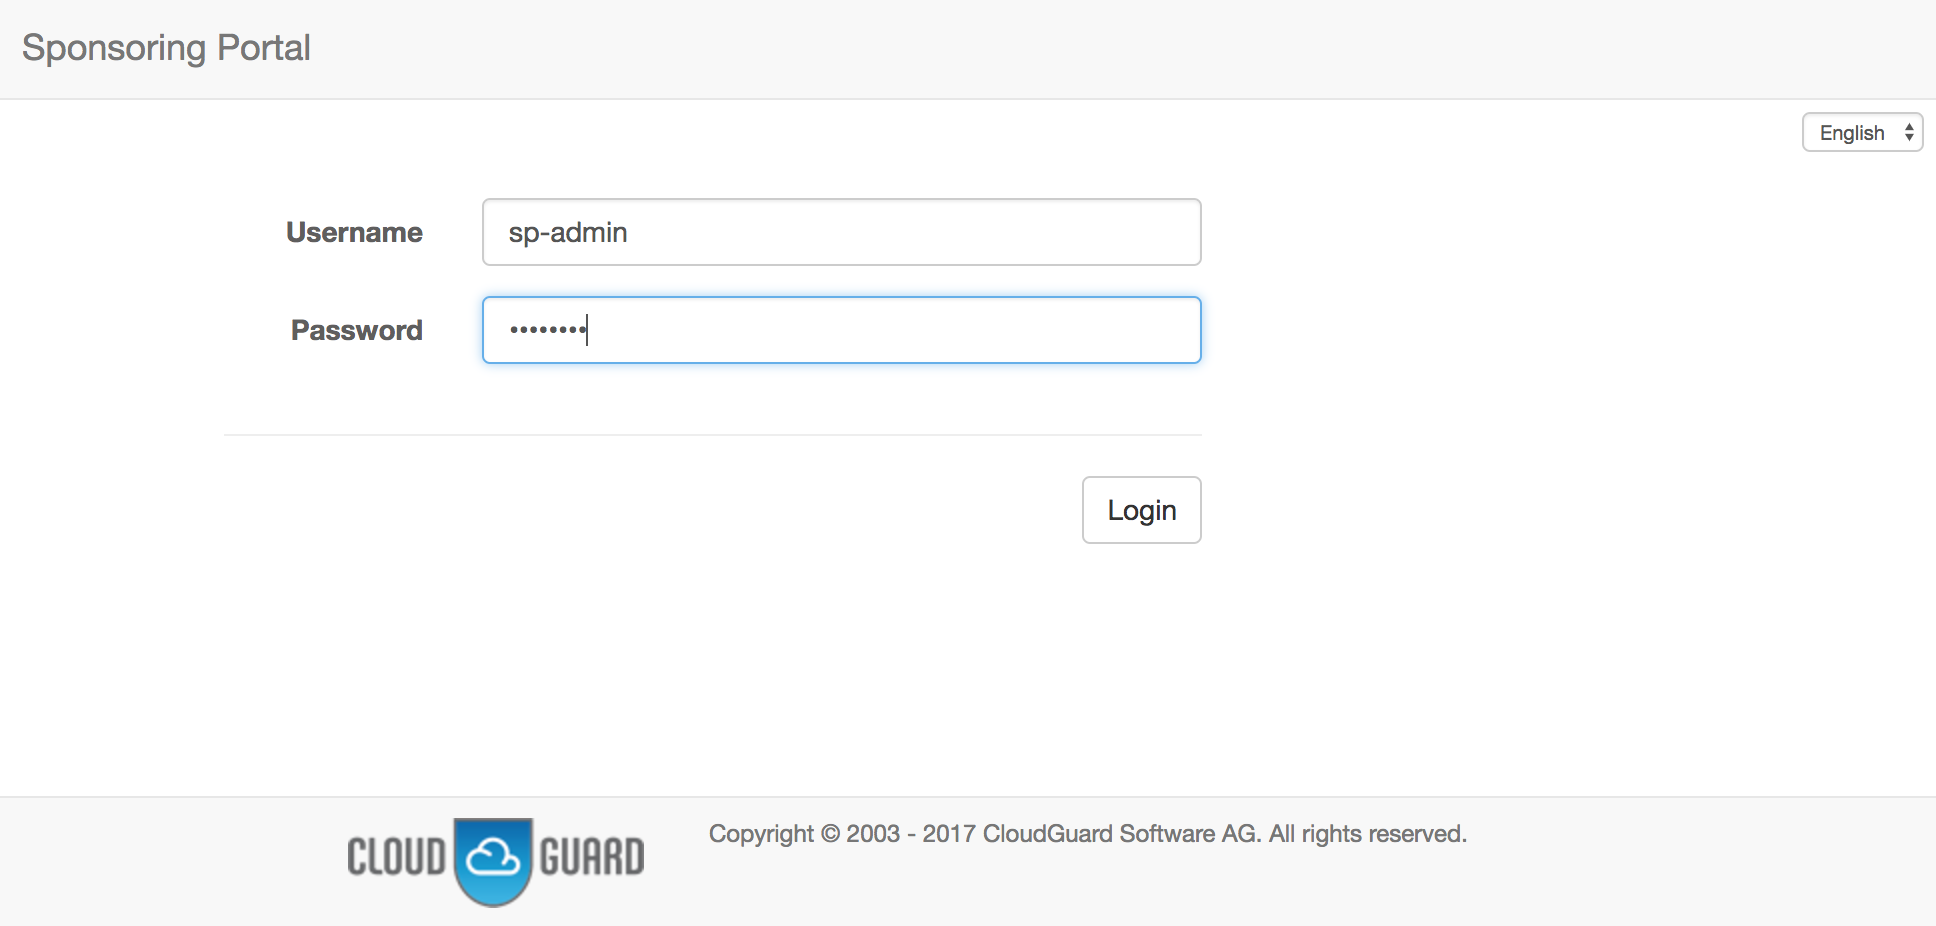
If nothing went wrong, you should now be able to access the web console by https://<server_name>/. Use sp-admin as username and password to login as administrator. This user has been created automatically during the package’s installation process.
5. Upgrade
| Perform backup before upgrade! It is recommended to backup the database before upgrading. You can do so, by either taking a snapshot of the VM or by performing a pg_dumpall. You can find more information about pg_dumpall on the following page: https://www.postgresql.org/docs/current/app-pg-dumpall.html. If you want to continue without creating a backup, please be aware that you are doing it at your own risk. |
5.1. onway director (Former Sponsoring Portal) < 4.0.0
onway director 4.0.0 is the first version that runs on Ubuntu 20.04 (Focal).
5.1.1. Upgrade all packages on Ubuntu 18.04
apt update (1)
apt upgrade (2)
apt autoremove --purge (3)
dpkg-reconfigure grub-pc (4)| 1 | Update the local package information database |
| 2 | Install all available upgrades of all packages currently installed on the onway director |
| 3 | Remove packages that are no longer needed by the system |
| 4 | Configure GRUB installation |
5.1.2. Release Upgrade
-
Update sources.list file to new resources
sed -i 's/bionic/focal/g' /etc/apt/sources.list.d/packages-onway.list
Do not call apt update after you changed the sources.list until the release upgrade is finished.
|
-
Perform Ubuntu release upgrade from 18.04 to 20.04
systemctl stop sponsoring-portal.service (1)
do-release-upgrade (2)
apt purge postgresql-12 postgresql-client-12 (3)
apt autoremove --purge (4)
shutdown -r now (5)
1 Shutdown Sponsoring Portal before upgrade 2 Perform the release upgrade from Ubuntu 18.04 to 20.04. This will take some time 3 Remove previously used packages 4 Remove packages that were automatically installed to satisfy dependencies for other packages and are now no longer needed 5 Restart system
5.2. Sponsoring Portal ⇐ 3.3.0
| From onway director (Sponsoring Portal) 3.4 upwards the MPP 7.5 or higher is required. Otherwise, the communication between these two will not work! |
5.3. Sponsoring Portal from 3.0.0 to 3.1.0
| With the release 3.1.0 we update the PostgreSQL database from version 10 to 12. For this purpose a complete export of the current database has to be done and the whole database has to be imported into PostgreSQL 12. Depending on your hardware configuration and the size of your database, the upgrade may take up to 2 hours. Usually the upgrade process does not take longer than 30 minutes. |
Sponsoring Portal 3.1.0 introduces a new package: sponsoring-portal-console.
apt update (1)
apt dist-upgrade (2)
apt purge postgresql-10 postgresql-client-10 (3)
apt autoremove --purge (4)| 1 | Update the local package information database |
| 2 | Install all available upgrades of all packages and handle changing dependencies |
| 3 | Remove PostgreSQL 10 packages and configuration |
| 4 | Remove packages that are no longer needed by the system |
We made changes to the NGINX configuration file /etc/nginx/sites-available/sponsoring-portal.
If you kept your version of the file during the upgrade process, please ensure the configuration looks like the
corresponding template with your server_name:
server {
    listen                          80;
#    server_name                    my.example.org;
    return                          301 https://$server_name$request_uri;
}

server {
    listen                          443 ssl;
#    server_name                    my.example.org;

    ssl_certificate                 /etc/ssl/certs/ssl-cert-snakeoil.pem;
    ssl_certificate_key             /etc/ssl/private/ssl-cert-snakeoil.key;

    ssl_session_cache               shared:ssl-session-cache:10m;
    ssl_session_timeout             10m;

    include                         snippets/sponsoring-portal-console.conf;

    location / {
        include                     snippets/sponsoring-portal.conf;
        proxy_read_timeout          3m;
    }

    location ~* /download/aup/(.*) {
        root                        /var/lib/sponsoring-portal/aup;
        try_files                   /$1 =404;
    }

    location ~* /internal/console-events {
        include                     snippets/sponsoring-portal.conf;
        include                     snippets/sponsoring-portal-console-events.conf;
    }
}
5.4. Sponsoring Portal < 3.0.0
Sponsoring Portal 3.0.0 is the first version that runs on Ubuntu 18.04 (Bionic).
5.4.1. Upgrade all packages on Ubuntu 16.04
apt update (1)
apt upgrade (2)
apt autoremove --purge (3)| 1 | Update the local package information database |
| 2 | Install all available upgrades of all packages currently installed on the Sponsoring-Portal |
| 3 | Remove packages that are no longer needed by the system |
5.4.2. Release Upgrade
-
Perform backup before upgrade
It is recommended to backup the database before upgrading. You can do so, by either taking a snapshot of the VM or by performing a pg_dumpall. You can find more information about pg_dumpall on the following page: https://www.postgresql.org/docs/9.5/app-pg-dumpall.html. If you want to continue without creating a backup, please be aware that you are doing it at your own risk.
-
Update sources.list file to new resources
cat <<EOF >>/etc/apt/auth.conf
machine packages.onway.ch/system login system password <password>
machine packages.onway.ch/onway/stable login onway password <password>
EOF
chmod 600 /etc/apt/auth.conf

cat <<EOF >/etc/apt/sources.list
deb https://packages.onway.ch/system/ bionic main
deb https://packages.onway.ch/onway/stable/ bionic main
EOF
Do not call apt updateafter you changed the sources.list until the release upgrade is finished. -
Perform Ubuntu release upgrade from 16.04 to 18.04
do-release-upgrade (1)
  Continue running under SSH? → Yes
  No valid mirror server found. Do you want to rewrite your 'sources.list' file anyway? → Yes
  Do you want to start the upgrade? → Yes
  Configuring libc6: Do you want to upgrade glibc now? → Yes
  Configure grub-pc: New version of /etc/default/grub is available, but the installed version
  has been changed. How do you wish to proceed? -> install package maintainer's version
  Configuration file /etc/nginx/sites-available/sponsoring-portal → No
  Remove obsolete packages? → Yes
  System restart required. Do you want to restart? → Yes
1 Perform the release upgrade from Ubuntu 16.04 to 18.04 -
Cleanup new system and finish release upgrade
apt purge postgresql postgresql-9.5 postgresql-contrib-9.5 postgresql-client-9.5 (1)
apt autoremove --purge (2)
1 Remove previously used Postgres packages 2 Remove packages that were automatically installed to satisfy dependencies for other packages and are now no longer needed -
Update the NGINX sites-available file
cd /etc/nginx/sites-available/ (1)
vi sponsoring-portal (2)
systemctl restart nginx (3)
1 Go to the source folder 2 Change the entry client_max_body_sizefrom20Mto80M3 Restart NGINX
6. onway director
The onway director is a business application of the onway provisioning and monitoring platform. It provides a reactive user interface and is configured through the Administration section. The GUI runs on any device such as desktop, tablet or mobile phone.
The onway director GUI follows a customer-centric approach. It is able to manage a single customer or multiple customers. The customer selection is done on the entry page, if more than one customer is configured.
Every enterprise application needs access permissions. So does onway director. It always supports the configuration of permissions where they are needed. The administrator keeps the focus while configuring the application in terms of permissions.
The navigation is supported by a breadcrumb on top. It shows the path to the current page and it is clickable. This helps to navigate back or to get to a higher hierarchy quickly.
Click on the top navigation bar to switch between the onway director and the former Sponsoring Portal, if required.
6.1. User Menu
The user menu is on top right and can always be accessed.
6.1.1. Settings
Settings are configured by clicking on top right. They allow to customize such things as user language and date or number format.
English is used as a fallback language for untranslated content.
You can configure your session timeout for the application. This determines how long you stay logged in.
You can define the CSV separator, if you don’t want to use the default, which is derived from your language.
6.1.2. Change Password
Users of onway director change their password here.
6.1.3. About
Information about software version
6.1.4. Logout
Logout from onway director.
6.2. Administration
Only users with the role Admin, such as the default user sp-admin are allowed to administer the onway director.
The configuration is split into a general and a customer specific part. The general part defines the setup of the whole system, and how it communicates with other components such as MPP, macman or onway controller.
The customer part contains all required settings for a particular customer.
Let’s start with the customer.
6.2.1. Customers
onway director customers must be added manually.
| The customer key must match with the MPP for identification, so check twice. |
A customer has one or more groups. Groups are managed in the
Sponsoring Portal Administration → Groups.
Customer permissions are derived from such groups. Choose as many groups as you need. Upcoming parts of the customer configuration will have access exactly to these groups. A permission is granted to all members of a group.
The following list shows examples of where permissions are required:
-
Access to a reporting category is not possible without customer permissions
-
Tags have an assign permission
-
Network Access Groups have permissions
-
Device Groups have permissions
-
My Device has a permission
-
Other places with permissions…
As you can see, these permissions are a central part of the customer configuration.
| A group can’t be deleted in the Sponsoring Portal if it is assigned in the onway director. |
The following sections are accessed by clicking on a customer card. A new main navigation on the left side opens for customer specific configuration.
Reporting
Permissions and settings must be configured to be able to access reports or log data such as the SMS registration log.
Permissions
First of all, one or more group(s) must be assigned to a customer. You can choose groups which were defined in customer permissions.
For these (Sponsoring Portal) groups, report categories are enabled or disabled. This means that reports or logs of a customer can either be accessed or not.
Settings
Specific settings such as retention time for data logs can be configured, too. The retention time defines how long data is retained. If the log contains sensitive fields such as MAC addresses or phone numbers, it is anonymized after an anonymization time. Such fields are not available earlier than the anonymization time.
If a customer is deleted, all reporting configuration and data of this customer is deleted, too.
Tags
A tag has a name and assign permissions. Assign permissions are defined for groups that are allowed to assign tags.
Tags are used to group components within onway director. Tags can be added to network access groups or device groups. Tags are assigned to all network access accounts which belong to a particular group with tags. The same applies for onway devices and device groups.
A search filter for such accounts or devices helps to find the requested items more easy.
macman
The most important macman settings are defined here.
General Settings
General settings such as retention time of deleted network access accounts and network access account sessions, and other session related settings.
Network Access Groups
A network access group (NA Group) is a container for accounts or devices. Such items must be unique within a NA Group. A NA Group is assigned to a customer and to a VLAN. A customer can have multiple NA Group’s. The following network access groups are available:
-
PEAP - Protected Extensible Authentication Protocol
-
iPSK - Identity Pre Shared Key
-
MAB - MAC Authentication Bypass
-
My Device - Also known as BYOD, "Bring Your Own Device"
All NA Groups except My Device are extended with access permissions. The permissions are defined for a customer group and have the following modes:
-
Account Read
-
Account Create
-
Account Edit
-
Account Delete
A higher permission includes a lower permission automatically. It is possible to combine network access groups into a network access group view.
PEAP, iPSK and MAB NA Groups can be extended with tags and with a custom input template.
Opening a NA Group opens a new main navigation on the left side.
A PEAP network access group has a unique name. A realm is optional, as long as a single NA Group is in use. It must define a realm if more than one NA Group is defined, to distinguish user accounts.
An iPSK network access group has a unique name and needs a Pairing VLAN in addition to the VLAN.
A MAB network access group has a unique name.
A My Device network access group has a unique name and needs a Pairing VLAN in addition to the VLAN. A realm is optional, as long as a single NA Group is in use. It must define a realm if more than one NA Group is defined, to distinguish user accounts.
iPSK QR Codes
A QR code are generated to simplify the pairing of iPSK devices.
An iPSK NA Group for the known devices is required. That’s the group where paired devices will be stored.
Other parameters are required for this configuration such as MPP Route Key, SSID and Tags. A Cron Expression defines when a PSK is replaced by a new PSK. A Transition Duration defines a period (in seconds) between the old and the new PSK. The PSK is not visible in the onway director during this period, to make sure that all processes are ready to process the new PSK.
The route key must match the configured authentication scheme’s route key on the MPP. The SSID must be named like the broadcast SSID. Tags can be assigned to new devices automatically.
The remaining fields define the appearance and behavior of the PSK.
My Device Settings
My Device settings specify how a new user device is handled by the onway director.
As the settings are quite detailed, they are separated into the following sections:
-
Network Options - defines NA Group, SSID and more
-
Acceptable Use Policy (AUP) Options - AUP files can be uploaded
-
Permissions - defines who can use My Device
-
User Options - defines username/password characters and more
onway controller
This is the main section to configure onway controllers.
General Settings
General settings such as retention time of deleted onway devices and onway device sessions, and other session related settings.
Device Groups
A device group is a container for onway devices. The permissions are defined for a customer group.
All device groups are extended with access permissions. The permissions are defined for a customer group and have the following modes:
-
Device Read
-
Device Create
-
Device Edit
-
Device Delete
A higher permission includes a lower permission automatically.
All device groups can be extended with tags.
Permissions
onway controller permissions define onway device configuration- and SIM card management permissions.
Input Templates
Input templates are used to extend an input sidebar with custom fields. An input template is identified by its unique name and its type.
The administrator can define as many input templates per customer as she needs. An input template extends an input sidebar, such as in network access groups. It allows the administrator to query for custom data.
Custom Fields are language aware. The administrator can but does not have to define the custom field name in english, german, french and italian. At least one language must be provided. onway director will show the field in the user defined language (see settings), or fallback to the language in this order en→de→fr→it.
Type
As of now, three input template types are available:
-
Text - text field
-
Yes/No - choose field
-
List - selection field
Text
A text field to read any character. A regular expression can be defined to validate user input.
Yes/No
A simple option to choose either yes or no.
List
Define a list of items and choose one or some.
6.2.2. System
One important aspect of the onway director is its distributed service infrastructure. See how clients and servers are connected.
The configuration is system-wide and independent of a particular customer.
Remote Client
The onway director uses the Remote Client to connect to one or to multiple MPP’s, macman’s or onway controllers. Remote Clients are applications which are automatically started together with the Sponsoring Portal. Such application are called remote peers.
| How do we reach remote peers? For MPP, the communication uses TCP/IP on port 9011; macman uses port 9013; onway controller uses port 9015 |
The communication between the onway director and the remote peer’s
is encrypted and uses X.509 certificates for authentication. Client details
are shown in the Administration → System → Remote Client sub-menu.
Connections must be configured on both parties but can be done independently, even if one party is offline. Connections are configured in:
-
MPP
Administration → MPP → Connections -
macman
Administration → macman → Nodes -
onway controller
Administration → onway controller → Nodes
Server details are shown in the corresponding sub-menus.
| In MPP a connection is called a Remote Peer while in the onway director it is called MPP connection. A connection to a macman or onway controller is called a connection to a Node |
Processes
The following picture illustrates how the processes are connected to each other. The remote servers listen to a fixed TCP/IP port.
Remote Server port usage:
-
MPP - 9011
-
macman - 9013
-
onway controller - 9015
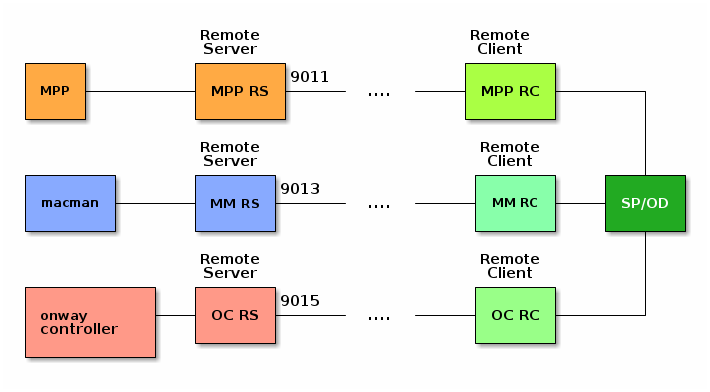
Connection State
A connection to a remote peer qualified by a State. It provides three values:
-
DISCONNECTED - peer is not reachable, or peer did not trust
-
UNTRUSTED - peer certificate is not trusted by us
-
CONNECTED - goal state, both parties trusted each other
The state will be shown as DISCONNECTED, if the remote peer did not add the onway director as its remote peer before.
The onway director tries to establish a connection to the remote peer for an infinite period of time. The connection is not established as long as the certificates are not trusted. This state is shown as UNTRUSTED. The Peer ID and the SHA-256 fingerprint of the certificate are shown to identify the other party.
| The Peer ID corresponds to the Subject Alternative Name (SAN) of the certificate and is equal to the hostname of the system during installation |
To establish a secure communication channel, both parties (onway director and remote peer) must trust each other. Trusting is a manual interaction, done by the administrator. A click on the lock button and approval changes the state to DISCONNECTED if done on one party.
It changes to CONNECTED, if both parties trust each other, and after a successful handshake has been done between onway director and the remote peer. This is the required final state for secure communication between the parties.
Disconnect onway director from a peer
If one party wants to revoke an established connection for any reason, a click on the unlock icon with approval is enough. The state changes to UNTRUSTED on the onway director and to DISCONNECTED on the remote peer. Communication between onway director and remote peer is refused. Please note that the onway director keeps trying to establish the connection to the remote peer.
A connection can be deleted if it is not required any more by clicking on the delete button.
Renew a certificate
It is possible to renew the built-in certificate in
Administration → System → Remote Client. But be careful. All
configured remote peers must trust the new certificate to be able
to communicate with the onway director!
Click on the button Generate New Certificate to re-create a new remote client certificate.

If you changed the hostname before creating the new certificate, the new certificate will have the new hostname as the Peer ID.

If you did not change anything, the new certificate will keep the original Peer ID.
Troubleshooting
Peer ID mismatch
As mentioned earlier, the Peer ID must be unique and is bound to the SAN. It is a configuration error if more than one connection to the same server is configured (i.e. by using the IP address and FQDN). Such a connection can never be trusted.
Remove the duplicate connection entry, and make sure to use the correct Peer ID.
Certificates
Certificates can easily be uploaded in the Administration → System → Certificates
page. Such certificates will be added to i.e. a macman configuration later.
Host Configuration
The host configuration made during the installation of the onway director can be overwritten in the
Administration → System → Host Configuration page.
Be aware that certain changes will require you to reconfigure parts of your macman, onway controller or MPP’s. You will therefore need administration rights on all these systems.
Hostname change
When changing the hostname, you must also perform the following steps on each configured MPP.
-
Log in to the MPP and go to
Services → Configuration → Remote Server → Remote Peers -
Add the unknown peer whose Peer ID matches the new Peer ID of the onway director
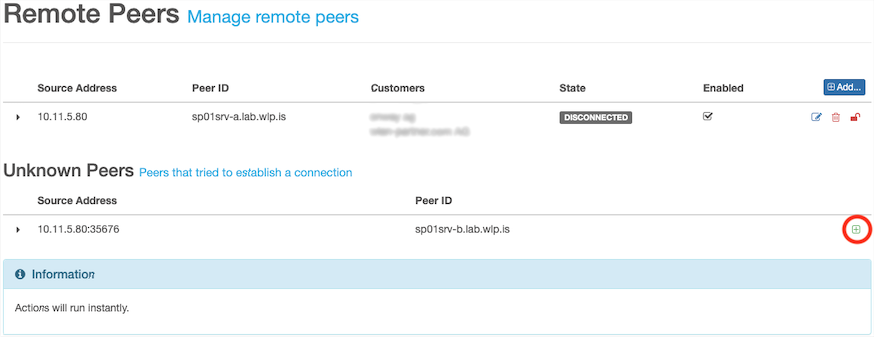
-
Trust the certificate of the new remote peer
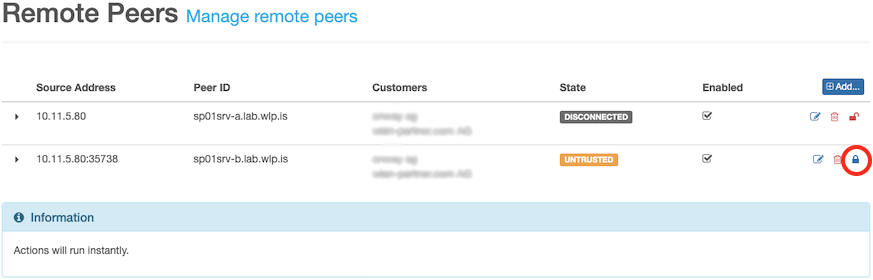
-
Delete the old remote peer
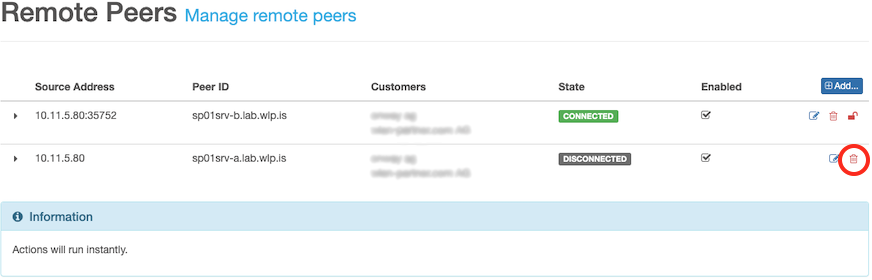
IP address change
When changing the IP address, you must also perform the following steps on each configured MPP, macman- and onway controller node.
-
Log in to the MPP and go to
Services → Configuration → Remote Server → Remote Peers -
Change the source address of the remote peer whose Peer ID matches the Peer ID of the onway director
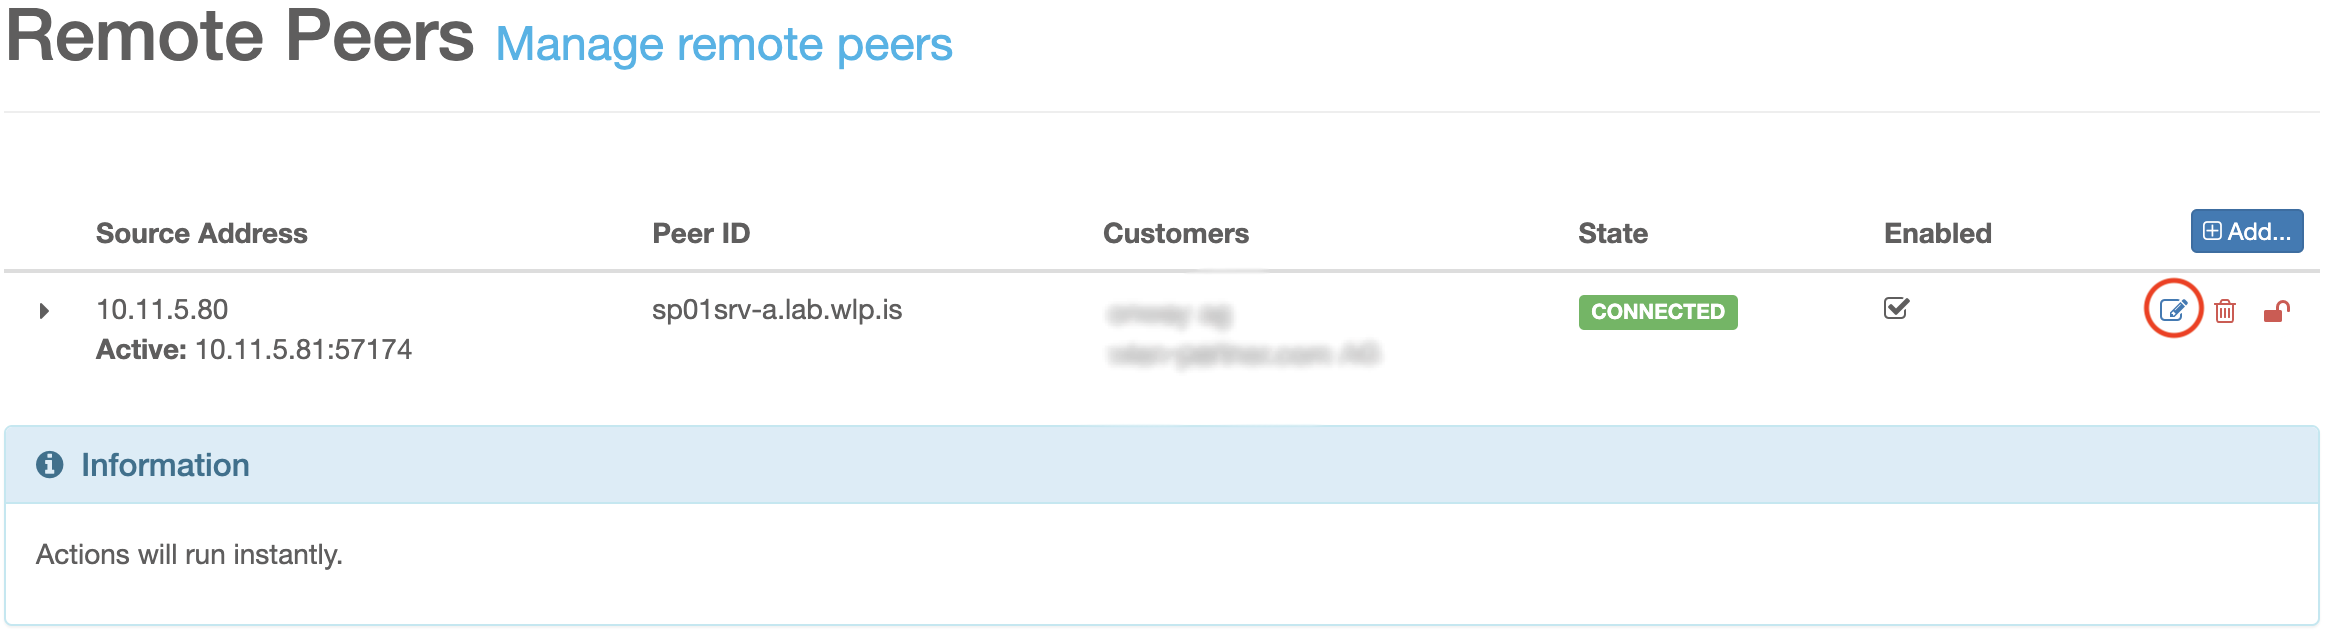
-
Log in to a macman node / onway controller node via SSH
-
Reconfigure the remote server package with the new IP of the onway director
Mail Configuration
Mail configuration of the local postfix can be created or uploaded in the
Administration → System → Mail Configuration page.
6.2.3. Users
Logged in Users
The table shows users which are currently logged in to onway director.
6.2.4. MPP
See how to connect onway director with MPP.
Connect onway director with MPP
First, add a MPP connection by adding the IP address or FQDN, and
the Peer ID of the MPP server. The MPP Peer ID is defined in the MPP in
Services → Remote Server → Service. It is the hostname of the MPP.
It is unique and can be configured for exactly one MPP connection.
On the MPP, add the remote peer by adding the Source address and
Peer ID of the onway director. The onway director Peer ID is defined
in the onway director in Administration → System → Remote Client.
It is the hostname of the onway director.
On the MPP, add the remote peer by adding the Source address and
Peer ID of the onway director. The onway director Peer ID is defined
in the onway director in Administration → System → Remote Client.
It is the hostname of the onway director.
Trust the connection and check the connection state.
Disconnect onway director from MPP
See disconnect peer.
MPP data stream services
Reports are created with log data which is streamed from MPP over a remote client connection.
Enable the following settings to stream data from the MPP to the onway director. Please note that the MPP must enable the corresponding data stream services on its remote server services.
-
User Session: enable this service to store the user session history log
-
SMS Accounting: enable this service to store the SMS accounting log
The log data which is provided by these services, is used to create various reports.
6.2.5. macman
See how to connect onway director with a macman node.
Connect onway director with macman
Macman nodes are configured in Administration → macman → Nodes.
Add a macman node by adding the server IP address or FQDN, and
the Peer ID of the macman node. The macman Peer ID is the hostname of the
macman node. It is unique and can be configured for exactly one macman
connection.
The macman remote peer is added during installation of the
macman-remote-server package. The od_ip field of the configuration file
/var/lib/macman-remote-server/config/host.json defines the onway director as
its peer.
Trust the node and check the connection state.
Node Details
A click on a macman node card shows many details of that remote node, such as its configuration, connection state, connection certificate details and more.
Disconnect onway director from macman
See disconnect peer.
Configurations
The onway director supports multiple macman configurations. For example, you can imagine defining a laboratory configuration, a test configuration and a production configuration. The configuration acts as a container. A configuration has a unique name. It contains the macman revisions. A revision is a particular configuration at a time.
Instead of configuring node by node, the configuration workflow is the other way round:
-
Change the working configuration
-
Create a config revision
-
Assign the revision to one or many nodes
-
(Back to 1.)
This allows to update nodes quite fast, and even supports offline configuration.
NA Group Views
A network access group view is a container for network access groups. It is used if multiple NA Group’s are part of the authentication chain. This chain specifies the processing order for authentication. It is configured per NA Group View.
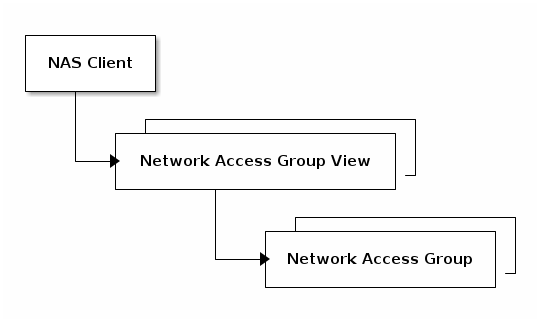
NAS Clients
Network Access Server Clients have a unique name, IP/Network, a shared secret with the RADIUS server (https://freeradius.org/) and reference at least one NAS Identifier.
The NAS identifier links to a network access group view.
The Big Picture
This graph shows how these components are connected to each other:
RADIUS
A previously uploaded certificate can be added to the RADIUS configuration.
Revisions
A revision is a snapshot of a particular configuration at a time. It is identified by an ascending revision ID. A new revision can be created by the administrator at any time, if the working configuration has been changed. All revisions are kept in a revision log table. Select a revision to show its details.
Any revision can be loaded as working configuration. It can be deleted to remove it from the log, too. All referenced items of a revision must be removed, too. A revision can’t be removed otherwise.
| A revision is immutable and can’t be changed; create a new revision instead, if you want to make configuration changes |
Distribute new Revision
This is a two-step action: assign → apply.
A revision can be assigned to one or many nodes. If more than one node is
selected, the configuration revision is applied to one node after another.
It is persisted in /var/lib/macman-remote-server/config/macman-config.json
on the node. If a revision can’t be applied, a rollback to the previously
applied revision is done automatically. The assigned and applied revision
of a node is shown in the node details.
A macman revision can be assigned to a macman node, even if the node is disconnected. The distributed service infrastructure will try to make sure that all nodes have the assigned revision. A pending configuration update message might be shown. The node details provide all important information of a node.
Revision Cleanup
It is possible to remove unused revisions in one step.
6.2.6. onway controller
See how to connect onway director with an onway controller node.
Connect onway director with onway controller
onway controller nodes are configured in Administration → onway controller → Nodes.
Add a onway controller node by adding the server IP address or FQDN, and
the Peer ID of the onway controller node. The onway controller Peer ID is the hostname of the
onway controller node. It is unique and can be configured for exactly one onway controller
connection.
The onway controller remote peer is added during installation of the
bastard-remote-server package. The od_ip field of the configuration file
/var/lib/bastard-remote-server/config/host.json defines the onway director as
its peer.
Trust the node and check the connection state.
Node Details
A click on a onway controller node card shows many details of that remote node, such as its configuration, connection state, connection certificate details and more.
Disconnect onway director from onway controller
See disconnect peer.
Configurations
The onway controller needs a configuration which is defined here. It consists of the customer entry point CEP FQDN up to now. This configuration is used by onway device configurations.
Device Types
onway controller device types are periodically retrieved from the onway ag support website: https://support.onway.ch/onway-director/device-type.json
These types are required in various places, mostly for configuration outside the administration level, i.e. device configurations and devices.
A manual sync of these types can also be triggered here.
6.3. Reporting
onway director is a reporting platform, too. It is connected to the remote client for this purpose. The remote client receives raw data from its peers continuously. This data is the basis for various reports.
All reports belong to a report category. The categories are used to group reports of the same topic. The following categories do exist:
-
User Session Reports: user session history data
-
SMS Reports: SMS accounting data
Users with reporting permissions are allowed to work with reports. The administrator doesn’t need special access right. He has access to all reports.
6.3.1. Report Overview
In this chapter you will find all currently supported reports:
User Session - Count
Shows the number of sessions.
User Session - Returning Users
Shows the number of users, grouped by their number of sessions. The report is divided into the following categories:
-
1 session
-
2-4 sessions
-
5-9 sessions
-
More than 9 sessions
User Session - Traffic
Shows the data traffic of users, grouped by download and upload of sessions. The report is divided into the following categories:
-
Incoming user traffic in the positive range of the y-axis
-
Outgoing user traffic in the negative range of the y-axis
User Session - Duration Distribution
Shows the distribution of sessions, grouped by their duration. The duration of a session is divided into the following categories:
-
0-5 minutes
-
5-15 minutes
-
15-30 minutes
-
30-60 minutes
-
1-2 hours
-
More than 2 hours
User Session - Total Duration
Shows the total duration of sessions.
User Session - Hourly Distribution
Shows the average number of sessions by hour of day.
User Session - Weekday Distribution
Shows the average number of sessions by weekday.
User Session - Tourism
Shows the number of sessions, grouped by users that have a phone number as their username. The report is divided into the following categories:
-
Sessions with domestic phone numbers
-
Sessions with foreign phone numbers
-
Sessions without phone numbers
User Session - User Registration
Shows the number of sessions, with newly registered users and others. The user report is divided into the following categories:
-
Sessions for which a new local user was created
-
Session with already known or anonymous users
User Session - Device Registration
Shows the number of sessions with new or updated user devices. The report is divided into the following categories:
-
Sessions for which a new device was registered
-
Sessions for which a registered device was updated
-
Sessions for which a registered device changed the user
-
Sessions for which no device was registered or updated
User Session - Authenticator
Shows the number of sessions per authenticator.
User Session - Profile
Shows the number of sessions per profile.
User Session - Type
Shows the number of users, grouped by the type of sessions. The session type is divided into the following categories:
-
Unauthenticated sessions
-
Login sessions
-
Auto sessions
-
Route sessions
SMS - Count
Shows the number of sent SMS as chart.
SMS - Country Distribution
Shows the number of sent SMS by country as table.
6.3.2. Create Report
There are two ways to create a report:
-
Periodic Report: schedule reports for continuous execution
-
Report: trigger an immediate or delayed report execution
Both types consist of two parts, a report configuration and the resulting report.
If a configuration is saved, it is listed within the reporting category.
A generated report is chosen from this list by clicking on its name. A configuration can be edited, or deleted. If a configuration is deleted, the derived report is deleted, too.
Report Configuration
A report configuration is defined for a category. All charts within the category use the same configuration. This makes it easy to compare the charts. It is possible to add multiple report configurations for the same category. A report configuration can be edited and reused. It must be removed manually.
It is possible to create multiple report configurations.
Example: adding a report configuration for the user session category will produce all available charts of that category.
A report configuration defines main aspects of the report, such as data filters, time period or data retention, execution and report permissions. The following sections explain this in more detail.
Data Retention (periodic report)
A periodic report is configured once, but runs every night. You can configure how many daily or monthly reports shall be kept, and if data from the past (earlier than now) shall be used or not.
Time Period (report)
Choose a time period. The From field is limited by the main data retention, which is configured by the administrator in the reporting settings. The To field can be any time after from.
Data Filter
A filter is added to limit the data of the report. A site filter can limit the number of involved sites for a session report, for example.
Tip: a filter can be configured as a regular expression in the advanced filter mode. Expressions can be tested immediately on existing data. A regular expression simplifies the filtering of sites that follow a naming convention.
Execution
Generation of a periodic report and a report is almost similar.
Run a report configuration immediately, or run it delayed or within a user
defined interval. Generation of a periodic report can be turned on/off.
All reports are scheduled on an application.properties cron entry of
the remote client.
Permissions
Access permission can be added to the report configuration, typically to limit access:
-
Read: defines groups with just read access
-
Edit: defines groups with read, create, edit and delete access
The edit permission includes the read permission.
Access is defined by the administrator. The administrator doesn’t need special access permissions.
6.3.3. Analyse Reports
After a report configuration was executed, multiple charts are generated and persisted on the remote client for analysis. The list of available reports is shown in the onway director. The charts open by a single click on the report name. In case of user session, a huge page of charts shows up.
You’re able to open report details, edit or delete the configuration which led to this report. You’re even able to regenerate the report in case of a periodic report. Of course you need the permissions for such actions.
Filter
Right on top, you’re able to adjust the filter, which is based on the underlying data. This allows you to analyze the data further. You can change the duration or the time range, and the sampling rate. The sampling rate shows the report as a time series over day or month. Reports have an additional sampling rate called aggregated.
Chart
The report chart provides additional features. A small info box explains the chart for better understanding.
Each chart has a status which shows details about its generation. In case of an error during the generation, it is possible to restart the generation.
Some charts offer to switch between percent and absolute values. Use percent to easily compare charts. Use count to see the amount of underlying data that led to this chart. Average/Total which is used, too, behaves similar.
Finally, click on the labels in the legend and turn values on/off to focus only on the data you want.
6.4. Logging
onway director offers access to logging data, too. It is connected to the remote client for this purpose. The remote client receives raw data from its peers continuously. This data can be accessed.
Users with reporting permissions are allowed to use logging. The administrator doesn’t need special access right. He has access to logging.
6.4.1. Logging Overview
In this chapter you will find all currently supported logs:
SMS Log
SMS Log offers access to the raw log data. SMS registrations can be searched and filtered.
It is possible to enable auto refresh, to see incoming registrations continuously.
6.5. Network Access Account
A network access account (NA Account) belongs to a Network Access Group. Four main types of NA accounts exist:
-
PEAP (Users/Devices)
-
iPSK Devices
-
MAB Devices
-
My Devices (Users/Devices)
NA Accounts can be added manually, or imported/exported as CSV.
All PEAP, iPSK and MAB accounts can be defined with a validity. It defines a start / end date for the account. Tags can be assigned to group accounts.
An account can also be deleted. It is marked as deleted in fact, and remains for a configurable retention time within onway director. If the retention time is exceeded, it is removed permanently.
The Search/Filter component on top offers many ways to find specific accounts. It can be used in combination with the CSV export, to limit the number of accounts. Or it allows finding deleted accounts, accounts with specific tags and much more.
6.5.1. PEAP Users
A PEAP user can be configured with the onway director. Search and manage PEAP users who can connect on a dedicated network via macman. Access is granted using a username and a password.
6.5.2. iPSK Devices
An iPSK device can be configured with the onway director. Search and manage iPSK devices that can connect to a dedicated network via macman. Access is granted using the MAC address and a WLAN Password (PSK). Alternatively, these devices can also be created via QR code.
The device is added manually or more comfortable by scanning the QR code from a phone.
Add via QR code
An iPSK QR code is generated automatically from a iPSK QR code configuration.
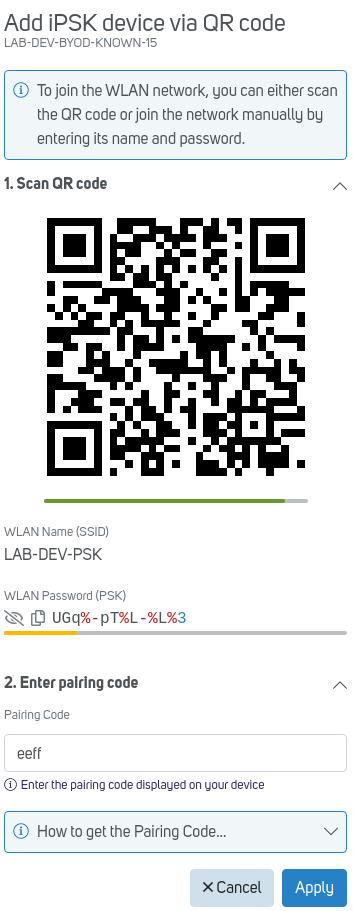
-
Open the sidebar by choosing the wanted NA Group
-
Scan the QR code with a phone
-
Enter the pairing code which is displayed on the phone and click apply
The device’s additional parameters such as its validity and tags can then be adjusted and saved in the next step. The validity defines a starting and ending date (or a duration) for the account.
Add manually
An iPSK device can also be added manually by filling in the fields.
-
Open the sidebar by choosing 'Add manually'
-
Fill in the fields and save the form
The device’s additional parameters can then be adjusted and saved in the next step.
6.5.3. MAB Devices
A MAB device can be configured with the onway director. Search and manage MAB devices devices that can connect to a dedicated network via macman. Access is granted using the MAC address only.
6.5.4. My Devices
A My Device (also known as Bring Your Own Device) can be configured with the onway director. Manage your My Devices to connect them to a corporate network via macman. Access is granted via the credentials provided.
To access My Devices, the Use My Device permission must be granted in My Device settings.
6.5.5. CSV
Accounts of type PEAP, iPSK and MAB are supported.
Export
CSV export downloads the complete list of network access accounts. Such accounts can be opened in a spreadsheet application. The character encoding is UTF-8, and the separator is derived from the language or defined by your settings.
The export respects the filter settings. This allows to export accounts of a specific network access group, for example.
Passwords are not exported.
Import
CSV import consists of three steps:
-
Prepare and upload CSV file
-
Map columns to network access account fields and run the import
-
Analyze import result summary, any maybe redo CSV import with failed accounts
Accounts which are already stored in the onway director are updated if they appear in the import.
Preparation and upload
Make sure that your CSV file contains all relevant fields. PEAP users need a username and a password, while iPSK devices need a MAC address and a PSK, and MAB devices need a MAC address.
Please do not mix accounts of different network access groups. All uploaded accounts must belong to the same group.
An exported CSV file is UTF-8 encoded. This is the default encoding. The alternative encoding ISO-8859-1 (Latin 1) is supported, too.
The locale defines the separator, typically ',' or ';'. You can define your own separator.
| Use the header line of a CSV export. onway director will try to map columns automatically if a header line is available. A header line can be marked with a #, but does not have to |
onway director supports several formats for time values, according to ISO-8601, or to our custom format:
-
custom format, 03.12.2011 10:15:30
-
ISO date-time format, i.e. 2011-12-03T10:15:30+01:00
-
ISO instant format, i.e. 2011-12-03T10:15:30Z
Column mapping and import
Columns are mapped automatically if the uploaded file has a header line with the correct names.
Examples:
-
usernameis mapped to the Username field -
mac_addressis mapped to the MAC Address field -
password→ Password -
psk→ PSK -
valid_from→ Valid from -
tag→ Tags -
and so on…
All available columns from the CSV file are presented in select boxes for all NA account fields. Two consecutive lines of the uploaded file are previewed in the select boxes. The preview shows the spreadsheet application column ([A1]..[Z99]) in order to keep the overview.
The mapping shows entries such as [A1] my cell text. This
defines a cell on the first column (A) and the first row (1) of your
input file
|
Increment or decrement Start at CSV row to preview different lines of the file.
If the uploaded file doesn’t provide a header line, you must set the mapping yourself, field by field. So define a header and things go easy.
| Set start at CSV row = 2, if a header line is provided, to skip the header line. Otherwise you’ll see a failed line afterwards. If a header line is marked with #, it is skipped automatically, and you don’t need to start at row 2. |
Start the import if at least all mandatory fields are set.
Import summary
onway director imports the file line by line. A percentage progress is displayed during import. At the end, a summary shows up. Is lists the number of inserted and failed accounts, if an error happened during import.
Errors might happen for various reasons, such as missing data, invalid data or if the header line was not skipped.
All erroneous data can be downloaded as CSV to be corrected in the spreadsheet application. Close the sidebar and redo the import with the failed accounts.
6.5.6. NA Account Details
Click on a specific NA Account to see all its Details.
Sessions
The Sessions tab shows very detailed information about sessions of this NA Account.
Example:
Status |
TERMINATED |
Client IP |
10.11.16.223 |
Client MAC |
00:24:d7:e7:3f:f8 |
Started at |
04.11.2021 13:58:06 |
Ended at |
04.11.2021 14:09:15 |
Acct-Terminate-Cause |
User Request |
Download |
17.22 KB |
Upload |
10.50 KB |
VLAN |
539 |
Called-Station-ID |
68-7d-b4-e7-57-60:LAB-DEV-BYOD |
Acct-Session-ID |
6183d8db/00:24:d7:e7:3f:f8/3956 |
Session ID |
7a75acfdafc7624b02dbbd87ed9d8149ecee5fc4 |
NAS IP |
10.6.9.20 |
NAS Identifier |
wlc01zrh2 |
NAS-Port-ID |
- |
NAS-Port-Type |
Wireless - IEEE 802.11 |
Journal
The Journal tab shows all modifications that were done on this NA Account. It lists the changed fields (before/after), and shows details of the author of the change.
Example:
Action |
EDITED |
Date |
05.11.2021 08:43:23 |
Changed Fields
Comment |
|
onway test user |
→ test user |
Valid For |
|
Unlimited |
→ 2 Days |
Authored by
Username |
local/sp-admin |
SID |
S-U-1 |
6.6. onway Device Configurations and onway Devices
onway devices, often called vehicle routers, are described by a type. They are available in various shapes and have different characteristics, so that they best meet the needs of customers. This section gives an overview of how onway devices, onway device configurations, onway controller configurations and onway controller nodes are connected to each other.
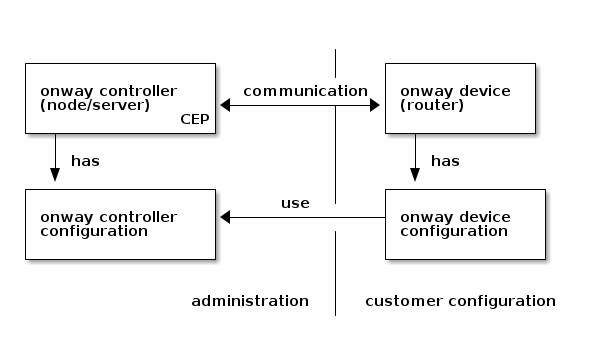
The customer entry point (CEP) is located in the data center typically. It is called onway controller and is technically a node or server. The onway controller configuration defines the public key for the global entry point (GEP) among other specific configuration properties.
The onway device on the other hand is located in the vehicle. The device is identified by a serial number and other properties. The device configuration defines which data is transferred between device and controller. It uses the controller configuration to know its node.
This setup allows to configure the integrated communication platform with just a few clicks. The configurations, which have versions and revisions, can be switched, to offer a maximum of flexibility in remote management.
6.7. onway Device Configurations
See how to manage onway device configurations. Multiple device configurations are supported.
A configuration is assigned to an onway controller configuration.
6.7.1. Device Types and Capabilities
Onway device types act as a container to describe an onway device. It contains information about the model such as name, type and description. Every device type has defined capabilities.
Example: on1500 L-W-Wac-G (LTE Cat 4, 1x WiFi 4, 1x WiFi 5, GNSS)
Capabilities |
1 Modem |
1 Sim slot |
2 WiFi cards |
1 Ethernet port |
0 CAN |
GNSS, no Dead Reckoning |
no Ignition voltage |
A configuration can contain multiple device types. The capabilities are derived from all chosen device types and show the maximal capabilities for this configuration. Such capabilities are supported by the chosen device types. For example, if a device type with 4 Ethernet ports and one with two Ethernet ports are selected, only 2 Ethernet ports can be configured later on. Adding a device type may limit the resulting capabilities. Removing a device type may expand the resulting capabilities.
An onway device configuration contains the telemetry configuration.
If a configuration is updated, and a capability is activated in the telemetry configuration, only device types which are equipped with this capability, are selectable.
Device types of an onway device configuration which are assigned to an onway device can not be deleted.
6.7.2. Telemetry Configuration
Onway devices are able to collect telemetry data. If you’re interested in such data, this configuration has telemetry sources which can be switched on or off. The telemetry sources are derived from the onway device capabilities. Two types of sources do exist.
Event based sources
Such sources contain more static data such as the MAC address of the device, the modem SIM state or IMSI, the OS version and others.
Periodic sources
These sources have more of a dynamic character, as they change over time. This might be link statistics, model signal GPS data and more.
It is possible to specify an interval which defines how often the data shall be collected. A cache size specifies how many intervals shall be kept. This helps to overcome radio holes.
6.7.3. Revisions
A revision is a snapshot of a particular configuration at a time. It is identified by an ascending revision ID. A new revision can be created at any time, if the working configuration has been changed. All revisions are kept in a revision log. The revision details of the log can be accessed.
Suppose that the telemetry configuration was changed. onway director recognizes this and indicates that there are unsaved changes. The revisions are shown in the revision log table. Select a revision to show its details.
Any revision can be loaded as working configuration. It can be deleted to remove it from the log, too. All referenced items of a revision must be removed, too. A revision can’t be removed otherwise.
| A revision is immutable and can’t be changed; create a new revision instead, if you want to make configuration changes |
Default revision
A revision can be defined as default revision. The default revision is immediately rolled out to all onway devices that have been assigned this revision. The default revision helps to keep revision consistent, especially if many devices are in use.
6.8. onway Devices
All devices are listed in this table. A status icon indicates if a device is currently online or offline, or if the online status is unknown. An onway device belongs to a onway controller device group. It is possible to assign tags to group devices. A device belongs to a onway device configuration.
The administrator can manage onway devices (router fleet) via the configured onway controller nodes. A device type is assigned from the available device types.
A device can also be deleted. It is marked as deleted in fact, and remains for a configurable retention time within onway director. If the retention time is exceeded, it is removed permanently.
The Search/Filter component on top offers many ways to find specific devices. It allows finding deleted devices, devices with specific tags and much more.
6.8.1. onway Device Details
Click on a specific onway device to see all its details, which are divided in general details, model specific details and configuration details.
Sessions
The session tab shows information about sessions of this onway device, such as the management connection to the customer entry point CEP, current online status and session time specific data.
Journal
The journal tab shows all modifications that were done on this onway device. It lists the changed fields (before/after), and shows details of the author of the change.
7. What’s New Archive
7.1. onway director 4.10
- Health Report
-
With this version we have integrated a health service that writes the state from the onway director every minute to
/var/lib/sponsoring-portal/health-report.json. This file can be used to monitor the application. If the verdict isok, everything is fine. If the property isvalidUntilafter now, something is wrong and the health report should be ignored and an error returned. - Default Redirect
-
It is now possible to configure the default redirect after the user logs in. In the file
/usr/lib/sponsoring-portal/config/application.propertiesthe propertyod.default-login-redirectcan be set to eitherspfor Sponsoring Portal orodfor the onway director. - Cisco Interface Template
-
It is now possible to configure an interface template for each network access group, which is present in the RADIUS responses (
Cisco-AVPair: interface-template-name=<template name>).
7.2. onway director 4.9
- system agent
-
-
Automatic configuration of local daemons like Kafka, Zookeeper and PostgreSQL
-
- onway director
-
-
Make host configuration (IP, Gateway, Hostname, NTP, …) possible via web console
-
Support secure FTP
-
7.3. onway director 4.8
- onway director
-
-
List logged in users
-
Disable LDAP directory synchronization at startup
-
7.4. onway director 4.7
- onway director
-
-
Configure LDAP synchronization interval as CRON expression
-
Add the possibility to disable LDAP synchronization
-
7.5. onway director 4.6
- onway director
-
-
Allow users to log out directly from onway director
-
Allow local user to change the password directly in onway director
-
Mark synchronized user accounts as deleted
-
Manage carlos powered devices
-
7.6. onway director 4.5
- onway director
-
-
Network access accounts can be filtered by their online status
-
Improved filtering of network access accounts by last seen date
-
Assign tags via network access groups
-
Ability to delete multiple network access accounts at once
-
7.7. onway director 4.4
- onway director
-
-
Passwords are displayed colored for better readability
-
Network access accounts can be filtered by the date they were last seen
-
Realm of the PEAP user is shown in the edit view
-
iPSK QR code rotation time is now configured as cron expression
-
The administrator now sees only configured functions
-
7.8. onway director 4.3
- onway director
-
-
CSV import for network access accounts
-
7.9. onway director 4.2
- onway director
-
-
My Devices (BYOD)
-
Export network access accounts as CSV
-
Introduce a public API for working with network access accounts
-
7.10. onway director 4.1
- onway director
-
-
View status of macman accounts/devices
-
Session history of macman accounts/devices
-
View deleted macman accounts/devices
-
Allow download of MPP report data as JSON or CSV
-
7.11. onway director 4.0
- onway director
-
-
macman 3.0 (PEAP, iPSK, MAB)
-
Ignore empty lines and lines beginning with '#' at CSV import
-
Upgrade to Ubuntu 20.04
-
7.12. Sponsoring Portal 3.4
- sponsoring portal
-
-
LDAP object filter for users and groups
-
- onway director
-
-
Session distribution statistics
-
Device registration report
-
User session duration report
-
User session authentication report
-
User session count report
-
User session tourism report
-
User session type report
-
User session profile report
-
7.13. Sponsoring Portal 3.3
- onway director
-
-
Intermediate MPP accounting updates for more accurate statistics
-
Multi tenancy support
-
Filtering by Regex
-
7.14. Sponsoring Portal 3.2
- onway director
-
-
Stream user session history log from MPP and show duration and quantity reports on the onway director.
-
Improved UI Design
-
7.15. Sponsoring Portal 3.1
- onway director
-
Gather SMS accounting information from the MPP and show them on the onway director.
- PostgreSQL 12
-
The database of the Sponsoring Portal has been migrated to PostgreSQL 12.
7.16. Sponsoring Portal 3.0
- Ubuntu 18.04 Bionic
-
The Sponsoring Portal has been updated to the new Ubuntu 18.04.1 Bionic.
- Java 11
-
The Sponsoring Portal has been upgraded to Java 11.
- PostgreSQL 10
-
The database of the Sponsoring Portal has been migrated to PostgreSQL 10.
7.17. Sponsoring Portal 2.8
- MPP Voucher Factory
-
You can create multiple MPP vouchers at once. The factory is enabled by configuring the field Count in the MPP Voucher Input Template.
- MPP Voucher
-
It is possible to limit the voucher duration in 'Permissions & Settings'.
- Move entities
-
Entities such as guest user, MPP device, MPP voucher, Macman user and Macman device can be moved from one organizational unit to another. Delete permission on the source (old) OU and create permission on the target (new) OU are required.
- Upload CSV File
-
The file upload offers to download a sample CSV file for the chosen entity. This sample file can be used as a template. It contains the required CSV header fields.
7.18. Sponsoring Portal 2.7
- LDAP Directory configuration
-
With this version, you can configure different base DNs for users and groups.
7.19. Sponsoring Portal 2.6
- API
-
We added an API to manage Guest users, MPP devices, MPP vouchers, Macman users and Macman devices. See dedicated client API documentation for more information.
- Improve SSL security
-
Peer verification algorithms have been improved to make SSL connections more robust.
| There may be situations where some user directories that were previously able to successfully connect to an LDAP or AD server may no longer be able to do so. In most cases, this is the reason because an IP has been specified instead of the fully qualified domain name. |
8. Changelog
8.1. onway director 4.11.0
Released: May 17, 2022
Story
-
[OD-1017] - NAS client metric cleanup
-
[OD-1025] - Support MAB failure VLAN configuration
-
[OD-1026] - Configure NAS identifier as regex
8.2. onway director 4.10.0
Released: May 10, 2022
Story
-
[OD-1008] - Notify the user about the consequences of an IP change on the host configuration page
-
[OD-1013] - Integrate health service and desired collectors
-
[OD-1015] - Collect health report exposed on DSI
-
[OD-1016] - Set default redirection to the onway director
-
[OD-1018] - Certificate download
-
[OD-1022] - Add support for Cisco interface templates
Bug
-
[OD-1019] - Handle error in HostConfigurationService.setHostConfiguration
-
[OD-1020] - macman remote client creates a new IPSK catch all account after every start even if a valid account already exists
-
[OD-1023] - Installation of sponsoring-portal-database may fail
-
[OD-1024] - Invalid default LDAP sync cron expression
8.3. onway director 4.9.0
Released: April 18, 2022
Story
-
[OD-931] - Transfer device configuration to bastard remote servers
-
[OD-947] - Install system agent with the onway director
-
[OD-948] - Make host parameters configurable in web console
-
[OD-949] - Apply host configuration
-
[OD-950] - Mail configuration
-
[OD-952] - Transfer devices to bastard remote servers
-
[OD-963] - Collect some metrics from NAS clients
-
[OD-976] - Show public key of bastard in subsection
-
[OD-977] - Consume and store failed RADIUS requests in local database
-
[OD-985] - Filter onway devices by assigned onway device configuration
-
[OD-1001] - Replace legacy lifecycle manager od
-
[OD-1002] - Configure local daemons via system agent
-
[OD-1007] - Support Secure FTP
-
[OD-1011] - Regenerate DSI certificate when hostname changes
Bug
-
[OD-996] - Updating an onway device with a new configuration or revision is not reflected in the journal
-
[OD-998] - Macman configuration is applied too often
-
[OD-1003] - Time zone does not match
-
[OD-1004] - Week does not start on Monday
-
[OD-1005] - Tags enforced by the network access group are not removed when moved
8.4. onway director 4.8.1
Released: February 24, 2022
Bug
-
[OD-992] - Consider user configuration permission for unsaved changes message
-
[OD-995] - ACL DB migration fails
8.5. onway director 4.8.0
Released: February 22, 2022
Story
-
[OD-770] - List logged in users
-
[OD-911] - Manage onway device configurations
-
[OD-924] - Generate bastard key
-
[OD-925] - Configure telemetry service
-
[OD-928] - Save onway device configuration as new revision
-
[OD-929] - Assign onway device configuration
-
[OD-930] - Assign onway device configuration revision
-
[OD-935] - Assign onway controller configuration to nodes
-
[OD-941] - Unique username and user account ID attribute for each LDAP user directory
-
[OD-943] - Show deleted onway devices
-
[OD-944] - Add a device type to a device configuration whose capabilities the device fulfills
-
[OD-945] - Add a device type to a device configuration whose capabilities the device does not fulfill
-
[OD-946] - Remove a device type from a device configuration
-
[OD-951] - Hide bastard main nav entries if bastard is not configured
-
[OD-957] - Improve session distribution report
-
[OD-960] - Do not synchronize LDAP directory at startup
-
[OD-974] - Show creation date of network access account in detail view
-
[OD-983] - Send "sessionRoute" requests only to mpps on which customer exists
-
[OD-986] - The assign permission should have the lower priority over the read permission
-
[OD-987] - Mark onway device configuration revision as default
-
[OD-989] - Assign a revision marked as default to all onway devices that do not yet have a revision
Bug
-
[OD-954] - Sidebar content disappears on page change
-
[OD-958] - A macman node can’t be trusted without configuration
-
[OD-961] - Periodic report is enabled after edit
-
[OD-962] - Pairing VLAN is empty after creation
-
[OD-969] - Show only allowed network access groups
-
[OD-971] - "Default valid for" option should not be visible in the My Device network access group
-
[OD-973] - Show "More" button only when needed
-
[OD-979] - Acl Sid of user account is never deleted
-
[OD-980] - Legacy cleanup tasks may fail
-
[OD-981] - onway device type sync may start before app up and running
-
[OD-982] - DsiGatewayHelper does not handle multicast responses correctly
-
[OD-984] - When removing a permission, only one group is removed
-
[OD-988] - Initialization errors of macman client and mpp client are not handled.
-
[OD-990] - Missing validation of the permissions in backend
-
[OD-991] - RADIUS log processor does not recover
Task
-
[OD-970] - Improve performance of database view "latest_onway_device_session"
-
[OD-972] - Macman-/Bastard-Node improvements
-
[OD-975] - Use new favicon
8.6. onway director 4.7.0
Released: January 3, 2022
Story
-
[OD-817] - Show online status of onway device
-
[OD-893] - Handle deletion of onway devices
-
[OD-894] - Adding meta information to onway devices
-
[OD-895] - Journal for onway devices
-
[OD-896] - Session history per onway device
-
[OD-899] - Filter onway devices by onway group and tags
-
[OD-900] - Show number of displayed onway devices
-
[OD-901] - Filter onway devices by online status
-
[OD-902] - Filter onway devices by last seen date
-
[OD-903] - Filter onway devices by type
-
[OD-906] - Mark onway device as offline
-
[OD-909] - Extend onway device description file
-
[OD-912] - onway device configuration permissions
-
[OD-919] - Configure LDAP sync interval as cron expression
-
[OD-920] - Disable LDAP synchronization
-
[OD-921] - SIM card management permissions
-
[OD-923] - Manage onway controller configurations
-
[OD-939] - Remove device id from session view
-
[OD-940] - Show FQDN of the onway controller the device is connected to
-
[OD-955] - Load PSK from database if possible
Task
-
[OD-937] - Polish onway device details sidebar
Bug
-
[OD-932] - Running sessions with the same MAC
-
[OD-933] - Idle time of non-terminated sessions does not work correctly
-
[OD-953] - iPSK device is not routed on mpp
-
[OD-956] - Wrong device is marked as online
8.7. onway director 4.6.0
Released: November 16, 2021
Story
-
[OD-710] - Delete unassigned revisions
-
[OD-769] - Mark synchronized user accounts as deleted
-
[OD-771] - Add meta information to user accounts
-
[OD-782] - Check the state of the user account during synchronization
-
[OD-815] - Remove "switch to the sponsoring portal" button
-
[OD-816] - Manage onway devices
-
[OD-820] - Allow users to log out directly from onway director
-
[OD-821] - Allow local user to change the password directly in onway director
-
[OD-881] - Remove non-printable characters
-
[OD-892] - Refine displayed navigation entries
-
[OD-897] - Group navigation entries by product
-
[OD-898] - Assign tags via onway groups
-
[OD-905] - Consume onway device status updates
Task
-
[OD-915] - Upgrade to PostgreSQL 14
-
[OD-916] - Upgrade to Java 17
Bug
-
[OD-890] - Missing HTTP session invalidation for deleted user accounts
-
[OD-891] - Tag permissions of existing accounts are not checked during CSV import
8.8. onway director 4.5.0
Released: October 19, 2021
Story
-
[OD-803] - Unify the appearance of the text-input buttons
-
[OD-837] - Ability to delete multiple network access accounts at once
-
[OD-846] - Import data from legacy macman
-
[OD-847] - Assign tags via network access groups
-
[OD-871] - Move section for configuring the network access group to the customer
-
[OD-873] - Configuration of "valid for" for a network access group
-
[OD-874] - Publish signed device-type.json on support.onway.ch
-
[OD-875] - Synchronization of the local device database with the published configuration
-
[OD-876] - Improve filtering of network access accounts by last seen date
-
[OD-877] - Filter network access accounts by their online status
Bug
-
[OD-870] - Missing session termination handler for deleted device NaAccounts
-
[OD-872] - Wrong permission to filter network access groups
-
[OD-889] - Duplicate ID variable in fetch revisions request
8.9. onway director 4.4.0
Released: September 15, 2021
Breaking Change in open director API
-
[OD-828] - NaAccount seek request has a further mandatory field:
seekIdentifier.idused for pagination
Story
-
[OD-683] - Show number of displayed network access accounts
-
[OD-692] - Show version/build information in onway director
-
[OD-796] - Remove BYOD network access accounts when user loses permission
-
[OD-797] - Expiration policy for "My Devices" accounts
-
[OD-813] - Establish a DSI connection to configured onway controller nodes
-
[OD-814] - Introduce device groups
-
[OD-831] - Colorize, format and copy the PSK of the iPSK QR code
-
[OD-833] - Show only deleted network access accounts
-
[OD-834] - Filter network access accounts by last seen date
-
[OD-835] - Show only configured features
-
[OD-836] - Change CSV import column prefix
-
[OD-843] - Show realm in username field
-
[OD-844] - Show navigation entry "iPSK QR code" under "macman settings"
-
[OD-845] - Configure the rotation time of the iPSK QR code as a cron expression
Bug
-
[OD-762] - Add explicit toggle button to expand and collapse the details table
-
[OD-808] - Assign tags to iPSK QR code-registered accounts regardless of tag permission
-
[OD-818] - Mandatory custom text field validation must not depend on provided values
-
[OD-819] - Prevent remote client DBs from being migrated before main DB
-
[OD-827] - Unpaired iPSK device cannot be added manually
-
[OD-828] - Unpredictable NaAccount export/stream order when deletedNaAccountsEnabled
-
[OD-832] - Update default CSV separator when language is changed
-
[OD-848] - Language files are not updated on new releases
-
[OD-849] - Custom fields remain visible when network access group is changed
-
[OD-854] - Date picker view is broken
-
[OD-855] - Link to "Switch to the onway director" sometimes navigates to administration view
-
[OD-856] - Long values in the CardLabel(Block)Value components may cause overflow issues
-
[OD-858] - Field errors may appear multiple times
-
[OD-859] - Network access group ID may be rendered
8.10. onway director 4.3.0
Released: July 13, 2021
Story
-
[OD-773] - Import network access accounts via CSV
-
[OD-786] - Allow the validity of a BYOD user to be changed subsequently
-
[OD-794] - Move customer permission view
-
[OD-795] - Make login redirect page configurable
Bug
-
[OD-807] - NaAccount filter validation errors are not shown on input field
-
[OD-809] - Auto refresh button should not be visible if My Device is not yet configured
8.11. onway director 4.2.0
Released: June 25, 2021
Bug
-
[OD-754] - Terminate sessions of deleted NA accounts
-
[OD-781] - Avoid multiple BYOD network access groups per customer
-
[OD-783] - Main nav and home screen entries should be the same
-
[OD-785] - Missing mmrc_settings after installation/migration
-
[OD-804] - Clean up unknown network access accounts
Story
-
[OD-702] - Macman session history cleanup
-
[OD-703] - Show NAG hint below the network access group name
-
[OD-704] - Show NAG hint in network access account detail view
-
[OD-708] - Show BYOD credentials and devices
-
[OD-709] - Start session on the mpp after the BYOD device has been approved
-
[OD-711] - Delete BYOD account when user is deleted
-
[OD-720] - Redesign/Refactor pagination
-
[OD-721] - Mark expired network access accounts as deleted
-
[OD-722] - Maximum idle time of running sessions
-
[OD-755] - NA account input template configuration
-
[OD-756] - NA account view must include the custom fields
-
[OD-757] - NA account journal must include the custom fields
-
[OD-767] - Button to copy PSK
-
[OD-772] - Export network access accounts as CSV
-
[OD-779] - Extend iPSK PSK length configuration
-
[OD-780] - Document public network access account API
8.12. onway director 4.1.0
Released: May 18, 2021
Story
-
[OD-620] - Show status of network access accounts
-
[OD-677] - Adding meta information to network access accounts
-
[OD-678] - Show running and past sessions of a network access account
-
[OD-679] - Handle deletion of network access accounts
-
[OD-680] - View deleted network access accounts in the web console
-
[OD-684] - Allow download of report data
-
[OD-705] - Add BYOD NAG configuration in NAG view
-
[OD-706] - Configure BYOD
-
[OD-707] - Introduce BYOD network access groups
-
[OD-723] - Move RADIUS log processing from macman remote server to macman remote client
-
[OD-724] - Show mac address in session log
-
[OD-727] - Introduce stable authentication ID
-
[OD-728] - Expand the user information in the journal
-
[OD-729] - Make first, given and display name fields optional
-
[OD-731] - Add additional fields to user account
-
[OD-737] - Add pairing VLAN to an iPSK NaGroup
Bug
-
[OD-693] - Unknown service names
-
[OD-694] - Message source falls back to system locale
-
[OD-712] - Merging NA accounts fails on 10th account
-
[OD-713] - Expired sessions are not cleaned up
-
[OD-730] - Na child accounts must always be in the same nag as their parent
-
[OD-732] - Cannot create new Guest User if language is French
-
[OD-735] - NaGroup realm null check
-
[OD-736] - Guest Users can not be created via API if validForMinutes is not visible
-
[OD-738] - OD DslContext does not have all schemas in search path.
-
[OD-753] - Reveal password in the journal of the PEAP account
-
[OD-763] - Make NA account state transition unpaired to paired visible
-
[OD-764] - Mark children as deleted when their parent is marked as deleted
-
[OD-766] - Unable to load more MAB and iPSK devices
-
[OD-777] - Use the same icon to expand/collapse in all places
-
[OD-778] - Make uploaded AUPs accessible
8.13. onway director 4.0.1
Released: March 10, 2021
Story
-
[OD-681] - Set valid from after first login
Bug
-
[OD-700] - Fix problems with dependencies during ISO installation
8.14. onway director 4.0.0
Released: March 7, 2021
Epic
-
[OD-641] - RADIUS PEAP Authentication
-
[OD-642] - RADIUS iPSK Authentication
-
[OD-643] - RADIUS MAB Authentication
-
[OD-648] - iPSK onboarding via QR code
Story
-
[OD-585] - Establish a DSI connection to configured macman nodes
-
[OD-596] - Introduce labels for customers
-
[OD-597] - Introduce macman radius configuration
-
[OD-598] - Assign macman configuration to macman nodes
-
[OD-605] - NAS Clients
-
[OD-606] - Introduce PEAP Network Access Groups (NAG)
-
[OD-607] - Certificates
-
[OD-608] - Assign certificate to macman configuration
-
[OD-613] - Assign macman configuration when creating/editing node
-
[OD-614] - Introduce Network Access Group Views
-
[OD-615] - PEAP NAG permissions
-
[OD-616] - Introduce Macman User (PEAP User)
-
[OD-617] - Filter macman user by NAG and tags
-
[OD-621] - Add called station id type to the NAS client configuration
-
[OD-622] - Add NAS type to the NAS client configuration
-
[OD-624] - Publish PEAP NAG to a Kafka topic
-
[OD-629] - Add iPSK NAG configuration in NAG view
-
[OD-630] - Introduce iPSK devices
-
[OD-635] - Introduce Network Access Groups (NAG)
-
[OD-636] - Publish NAGs to Kafka
-
[OD-637] - Introduce NAG account
-
[OD-638] - Publish NAG accounts to Kafka
-
[OD-639] - Ignore empty lines or comment lines
-
[OD-640] - Introduce iPSK network access groups
-
[OD-645] - Introduce MAB network access groups
-
[OD-646] - Introduce MAB accounts
-
[OD-647] - Add MAB NAG configuration in NAG view
-
[OD-649] - Configure iPSK QR code
-
[OD-650] - Link iPSK QR code configuration to a NAS identifier
-
[OD-651] - iPSK QR code customer configuration
-
[OD-652] - Publish new PSK for each QR code configuration
-
[OD-654] - Add iPSK device via QR code
-
[OD-655] - Show customer beside NAG
-
[OD-656] - Show comment on NA account pages
-
[OD-659] - Start session on the MPP
-
[OD-664] - Stream NA log to remote client
-
[OD-665] - Make use of password masker
-
[OD-666] - Save unknown NA accounts
-
[OD-669] - Ubuntu 20.04 upgrade
-
[OD-670] - Show user principal name for PEAP user
-
[OD-672] - Do not stream unpaired NA accounts
-
[OD-673] - Give the welcome screen some love
8.15. Sponsoring Portal 3.4.3
Released: August 31, 2020
Bug
-
[OD-604] - Continuous DAILY reporting tasks are not deleted
8.16. Sponsoring Portal 3.4.2
Released: August 28, 2020
Bug
-
[OD-583] - SMS auto-refresh may not work
-
[OD-584] - Labels of user session graphs are sometimes misleading
-
[OD-587] - Wrong mpprc initialization order
-
[OD-592] - Alternating chart and statistic views when reporting tasks are running
Story
-
[OD-586] - Embed Java trust store
-
[OD-593] - Drop yearly sampling rate
-
[OD-594] - Do not calculate current day
8.17. Sponsoring Portal 3.4.1
Released: July 9, 2020
Bug
-
[OD-581] - DB migration fails due to new class names
-
[OD-582] - ACL configuration is not migrated to new class names
8.18. Sponsoring Portal 3.4.0
Released: July 7, 2020
Story
-
[OD-432] - Session distribution statistics
-
[OD-434] - Device Registration Report
-
[OD-467] - Auto refresh SMS log view
-
[OD-526] - User Session Duration Report
-
[OD-527] - User Session Authentication Report
-
[OD-528] - User Session Count Report
-
[OD-529] - User Session Traffic Report
-
[OD-530] - User Session Tourism Report
-
[OD-531] - User Registration Report
-
[OD-553] - User Session Type Report
-
[OD-554] - Refactor user session report view
-
[OD-555] - User Session Profile Report
-
[OD-566] - Define max session timeout
-
[OD-567] - Make report actions available on the detail view
-
[OD-579] - Add user/group object filter
Bug
-
[OD-556] - View of the graph data filter takes a long time to load
-
[OD-557] - Regeneration of reports can lead to a timeout exception
-
[OD-559] - Empty permission leads to an NPE
-
[OD-571] - Wrong card header style of visited links in Safari browser
-
[OD-575] - Service worker is not updated on new release
-
[OD-577] - Invisible data points on a high variance graph
-
[OD-580] - Wrong sidebar alignment in the customer selection view
8.19. Sponsoring Portal 3.3.0
Released: June 3, 2020
Story
-
[OD-460] - Manually start periodic reporting task
-
[OD-461] - Regenerate periodic reports after filter change
-
[OD-465] - onway-database package
-
[OD-468] - Gather customers automatically from MPP
-
[OD-469] - Gather sites from MPP
-
[OD-470] - Gather profiles from MPP
-
[OD-471] - Assign groups to customers
-
[OD-472] - Show customer selection screen as home page
-
[OD-473] - A report belongs to exactly one customer
-
[OD-474] - Combine the individual reporting permissions on one page
-
[OD-475] - Combine the individual reporting settings on a single page
-
[OD-476] - Allow different sampling rates for a report or periodic report
-
[OD-477] - Modify the periodic report view to support a single value or a range of values
-
[OD-478] - Make the PlaceholderWidget customizable so that it can be adapted to its context
-
[OD-479] - Move customer table to SP schema
-
[OD-480] - Import MPP remote server client database as schema into SP database
-
[OD-481] - Admin should always see sms statistics
-
[OD-482] - Use site repository for sms statistics
-
[OD-487] - Add profile as data filter to user session duration report
-
[OD-488] - Add profile as data filter to user session quantity report
-
[OD-489] - Use new report engine for SMS Chart
-
[OD-490] - Use new report engine for SMS Statistic
-
[OD-491] - Allow data filtering by Regex
-
[OD-493] - Gather SMS gateways from MPP
-
[OD-494] - Extend SMS accounting data gathering process
-
[OD-495] - Refactor SMS accounting data log
-
[OD-520] - Remove periodic report retention time
-
[OD-521] - Retry failed or canceled reports in next run
-
[OD-523] - Web console session timeout
-
[OD-524] - Regenerate reports on "save & run"
-
[OD-525] - Group reports on the same topic
-
[OD-545] - Delete sampling rate configuration
-
[OD-546] - Handle intermediate accounting updates
Task
-
[OD-484] - Allow filtering the SMS log by recipient
Bug
-
[OD-459] - Broken SMS reporting views for non-admin users
-
[OD-492] - NPE when handling PSQLException without constraint violation
8.20. Sponsoring Portal 3.2.0
Released: February 19, 2020
Story
-
[OD-367] - Gather session information from MPP
-
[OD-429] - Session quantity statistics
-
[OD-433] - Session duration statistics
-
[OD-455] - Improve UI design
8.21. Sponsoring Portal 3.1.0
Released: December 6, 2019
Task
-
[OD-394] - Create a model class that holds phone numbers
-
[OD-402] - Make ch.onway.shared.commons.model.PhoneNumber comparable
-
[OD-414] - Rename title to Director
-
[OD-415] - Move Customer from OD to MPP Remote Client
-
[OD-416] - Move SMS accounting configuration settings to MPP remote client
-
[OD-419] - Move OAP connection from OD to MPP remote client
-
[OD-426] - Show MPP-RC certificate fingerprint
-
[OD-427] - Create a design for empty states
-
[OD-428] - Refactor MainNav component
-
[OD-435] - Upgrade to Spring Boot 2.2.0
-
[OD-437] - Upgrade to PostgreSQL 12
-
[OD-444] - Try to make it clearer that some SP API calls work asynchronously
-
[OD-451] - Shuffle hosts of LDAP authenticator before authentication
Bug
-
[OD-385] - No meaningful error when deleting OU that is not empty
-
[OD-386] - Valid to not shown
-
[OD-387] - Unable to configure DNS servers during installation
-
[OD-388] - Exported date format can’t be imported
-
[OD-393] - Macman Device input template not applied
-
[OD-395] - SP Voucher Factory DB migration missing
-
[OD-407] - Fix overlapping sidebar with main navbar
-
[OD-411] - Misleading ID field in API doc create and update request samples
-
[OD-436] - Using StartTLS for LDAP/AD authenticator leads to a memory leak
-
[OD-449] - Search on voucher comment field returns all vouchers
-
[OD-452] - Similarity search does not escape special characters
Story
-
[OD-368] - Gather SMS accounting information from the MPP
-
[OD-369] - Introduce customers
-
[OD-370] - Configure MPP connections
-
[OD-379] - Persist user preferences
-
[OD-397] - Kafka consumer client
-
[OD-399] - Visualize SMS log
-
[OD-400] - Administration of SMS statistics
-
[OD-403] - Visualize SMS statistics per GW
-
[OD-404] - Visualize SMS chart
-
[OD-413] - SMS protocol cleanup
-
[OD-420] - Remote DSI instance management
-
[OD-421] - Extend the DSI with streaming capabilities
-
[OD-422] - Allow shorter BYOD password length
8.22. Sponsoring Portal 3.0.0
Released: December 3, 2018
Task
-
[SP-356] - Upgrade to Ubuntu 18.04.1
-
[SP-357] - Upgrade to PostgreSQL 10
-
[SP-358] - Upgrade to Java 11
8.23. Sponsoring Portal 2.8.0
Released: November 22, 2018
Bug
-
[SP-351] - NPE in voucher code generator
-
[SP-352] - Fix voucher and MPP user paging
-
[SP-360] - CSV import of YES/NO custom fields uses string instead of boolean
Story
-
[SP-325] - Limit max voucher duration
-
[SP-339] - MPP Voucher factory
-
[SP-341] - Option to move MPP device from one OU to another
-
[SP-342] - Option to move MPP user account from one OU to another
-
[SP-343] - Option to move Macman device from one OU to another
-
[SP-344] - Option to move Macman user from one OU to another
-
[SP-345] - Option to move MPP voucher from one OU to another
-
[SP-346] - Provide sample CSV file as hint for MPP devices
-
[SP-347] - Provide sample CSV file as hint for MPP users
-
[SP-348] - Provide sample CSV file as hint for Macman devices
-
[SP-349] - Provide sample CSV file as hint for Macman users
8.24. Sponsoring Portal 2.7.0
Released: September 19, 2018
Bug
-
[SP-320] - It may be better to use the same validator for the redirect URL as it is used on the MPP’s side
Story
-
[SP-333] - Provide two base DNs, one for users and one for groups
-
[SP-334] - Show 3rd party licenses on the about page
8.25. Sponsoring Portal 2.6.3
Released: August 14, 2018
Bug
-
[SP-332] - LDAP/AD authenticator does not validate the peer correctly
8.26. Sponsoring Portal 2.6.2
Released: July 31, 2018
Bug
-
[SP-330] - Broken Macman user search for custom type yes-no fields with exact match type
-
Fix two possible null pointer excpetions
8.27. Sponsoring Portal 2.6.1
Released: July 12, 2018
Story
-
[SP-329] - API Search Endpoint for Macman Users
8.28. Sponsoring Portal 2.6
Released: June 27, 2018
Task
-
[SP-317] - Show OU hierarchy in entity list views
-
[SP-324] - Set "Reject" as default on-duplicate strategy
Bug
-
[SP-312] - Broken MPP user account "validForMinutes" validation
-
[SP-314] - Add missing "validForMinutes"-calculation for MPP user accounts
-
[SP-318] - Macman configuration cannot be saved without txt template
-
[SP-321] - Missing PDF template validation
-
[SP-322] - Missing PDF template file deletion on FS
-
[SP-323] - User does not receive an API response if AUP is not accepted
-
[SP-326] - Invalid file patterns lead to a PatternSyntaxException after clicking on "Load" during an import task configuration
Story
-
[SP-252] - API to manage Macman users
-
[SP-278] - API to manage MPP users
-
[SP-279] - API to manage Macman devices
-
[SP-280] - API to manage MPP devices
-
[SP-281] - API to manage MPP vouchers
8.29. Sponsoring Portal 2.5
Released: May 31, 2018
Task
-
[SP-303] - Upgrade to Spring Boot 2
-
[SP-313] - Use csv/text content type for failed csv line download
Bug
-
[SP-297] - MacmanDevice CSV Import
-
[SP-310] - Incorrect rollback handling in TransactionUtil
-
[SP-311] - Store directory ID cookie for the configured amount of time
Story
-
[SP-231] - Fetch CSV files by FTP
-
[SP-276] - Generate PDF and TXT with Macman user details
-
[SP-277] - Generate PDF and TXT with Voucher details
-
[SP-287] - Authentication API
-
[SP-298] - On duplicate strategy for MPP user
-
[SP-299] - On duplicate strategy for Macman user
-
[SP-300] - On duplicate strategy for Macman device
-
[SP-304] - Externalize application.properties
8.30. Sponsoring Portal 2.4.1
Released: April 10, 2018
Bug
-
[SP-293] - Erroneous cleanup ACL object identity DB migration script V7.0
8.31. Sponsoring Portal 2.4
Released: March 29, 2018
Task
-
[SP-262] - Limit OU search results
Bug
-
[SP-189] - Orphaned ACL entries after cleanup task
-
[SP-234] - Moving MPP devices from one customer to another doesn’t work
-
[SP-256] - Hidden language switch in UI on small displays
-
[SP-257] - Incorrect handling of input template 'visible' flag
-
[SP-259] - Macman User Settings overview misses Device Groups
-
[SP-263] - Delete After invisible bug
-
[SP-265] - Do not sync LDAP users with different base DN
-
[SP-268] - MPP sync Interval not configurable in UI
-
[SP-269] - Auto refresh user directory sync view
Story
-
[SP-108] - Show MAC vendor
-
[SP-188] - Extend OU search
-
[SP-205] - An OU may have a responsible person
-
[SP-206] - Additional fields for MPP devices
-
[SP-207] - User must accept platform AUP at first login
-
[SP-209] - Show description field as text area
-
[SP-210] - Additional fields for MPP users
-
[SP-211] - Additional fields for Macman devices
-
[SP-212] - Additional fields for Macman users
-
[SP-213] - CSV Export for MPP devices
-
[SP-221] - Make directory user groups in mapping searchable
-
[SP-241] - Refactor CSV import for MPP devices
-
[SP-242] - Refactor CSV import for Macman devices
-
[SP-243] - CSV import for Macman users
-
[SP-244] - CSV import for MPP users
-
[SP-245] - CSV Export for MPP users
-
[SP-246] - CSV Export for Macman users
-
[SP-247] - CSV Export for Macman devices
-
[SP-253] - Remove Macman Device if MAC is used by a MyDevice
-
[SP-266] - Support high number of directory groups
8.32. Sponsoring Portal 2.3.5
Released: December 14, 2017
Bug
-
[SP-229] - Wrong MPP user and voucher group sync cleanup
-
[SP-248] - TaskService may time out during shutdown
8.33. Sponsoring Portal 2.3.4
Released: December 13, 2017
Bug
-
[SP-220] - TXT guest user templates do not work if no PDF template is provided
-
[SP-228] - Registered User devices created via Sponsoring Portal have the wrong customer key (on MPP)
8.34. Sponsoring Portal 2.3.3
Released: October 26, 2017
Bug
-
[SP-203] - Broken SP React views on IE11
-
[SP-204] - Reject authentication tokens with empty credentials
8.35. Sponsoring Portal 2.3.2
Released: October 18, 2017
Bug
-
[SP-201] - Broken tooltip on "My Devices" view
8.36. Sponsoring Portal 2.3.1
Released: October 6, 2017
Bug
-
[SP-195] - HTTP not found when trying show MPP vouchers
-
[SP-196] - New permissions / settings cannot be created
-
[SP-197] - Directory standard group can not be removed anymore
-
[SP-199] - Missing valid from/to validation in voucher form
8.37. Sponsoring Portal 2.3
Released: September 13, 2017
Task
-
[SP-194] - Broken spring-web 4.3.10 PUT request handlers
Bug
-
[SP-181] - MPPDeviceAccountServiceImpl doesn’t update comment correctly
-
[SP-182] - Possible NPE on NewGuestUserAccountConfiguration.validTo
Story
-
[SP-171] - MPP voucher
-
[SP-172] - Export generated MPP user accounts as ASCII file
-
[SP-173] - Respect MPP password policies
-
[SP-174] - Support LDAP servers with multiple IP addresses
-
[SP-175] - Introduce entry expiration date
8.38. Sponsoring Portal 2.2.1
Released: June 16, 2017
Bug
-
[SP-159] - Increase async request timeout
-
[SP-160] - Take ownership does not change group attribute on the MPP
-
[SP-161] - Delete devices on the MPP via CSV does not work
-
[SP-163] - MAC addresses of MPP device accounts cannot be added/removed anymore
-
[SP-164] - Datepicker is not visible if language is not english
-
[SP-165] - Redirect loop when requested language is not supported
-
[SP-166] - Update of MPP device account that doesn’t exist on MPP doesn’t show error
-
[SP-169] - Broken selected condition in selectOneControl
Story
-
[SP-162] - Improve CSV import error reporting
-
[SP-168] - Make charset of CSV import configurable
8.39. Sponsoring Portal 2.2
Released: May 31, 2017
Bug
-
[SP-156] - Missing entries in french navigation
-
[SP-157] - If a customer gets removed the groups remains
Story
-
[SP-155] - Allow user to select start and end date instead of session duration in minutes
8.40. Sponsoring Portal 2.1
Released: March 3, 2017
Task
-
[SP-90] - Rename SP to Sponsoring Portal in navigation title
-
[SP-110] - Choose different icons for MPP devices, Macman devices and MyDevices
Bug
-
[SP-91] - MyDevices view is accessible by URL even if you don’t have permissions
-
[SP-95] - OU add button missing under administration
-
[SP-105] - Fix search box help text alignment
-
[SP-115] - Running (sync) task book keeping is not updated on failure
-
[SP-116] - UserAccountRepository.deleteAllExcept method may throw an out-of-range integer error
-
[SP-125] - Broken datetime input control
-
[SP-134] - Handle partial result exception
-
[SP-135] - Make user login username case-insensitive
-
[SP-148] - Rename of MPP user account must be restricted
-
[SP-152] - Generated PDF is still a form
-
[SP-153] - foreach methods in repositories load the entire table into memory
Story
-
[SP-28] - Create PDF with user account details
-
[SP-41] - Manage devices on the Macman
-
[SP-42] - Manage user accounts on the Macman
-
[SP-43] - BYOD
-
[SP-62] - Fetch organizational units from Macman
-
[SP-63] - Macman Backend Connection
-
[SP-64] - Fetch device groups from macman
-
[SP-65] - Fetch device types from Macman (incl. Device Slots, Interface Types)
-
[SP-66] - Generate random frontend user account on macman
-
[SP-89] - Verify BYOD permission on Macman after LDAP sync
-
[SP-92] - Show approve button only if the user has remaining my devices
-
[SP-93] - Show delete confirmation dialog before deleting a my device
-
[SP-94] - The name of a OU should be clickable instead of the icon on the right side
-
[SP-96] - Validate remote users and groups before import
-
[SP-97] - Integrate user directory changes
-
[SP-98] - Make SP proxy aware
-
[SP-99] - Install and configure Nginx with the SP package
-
[SP-100] - Acceptable use policy
-
[SP-101] - Redesign welcome page
-
[SP-102] - Simplify select and multi-select components
-
[SP-103] - Provide documentation
-
[SP-104] - Make visible fields configurable
-
[SP-106] - Add/remove MAC addresses by CSV file
-
[SP-109] - Make username unique per directory
-
[SP-114] - Tooltips for all icons and icon alignment
-
[SP-117] - Remove orphaned devices and users
-
[SP-118] - Protocol user actions
-
[SP-130] - Show breadcrumbs on any page
-
[SP-131] - On duplicate strategy
-
[SP-132] - Update LDAP configuration after update
-
[SP-133] - Treat special Active Directory LDAP attributes correctly
-
[SP-137] - Change password for local users
-
[SP-139] - Allow DNS to configure remote directory
8.41. Sponsoring Portal 2.0
Released: January 12, 2017
Task
-
[SP-61] - Use 'and' instead of 'or' to concatenate search terms
Bug
-
[SP-32] - UserAccountRepository.findAllUserAccounts() can’t handle non-paged server result
-
[SP-85] - Inherited permissions cannot be updated
Story
-
[SP-1] - Setup GIT
-
[SP-2] - Bootstrap Java Web App
-
[SP-3] - React I18n Prototype
-
[SP-4] - Spring MVC + Thymeleaf I18n Prototype
-
[SP-5] - Setup Jira
-
[SP-6] - Security concept/prototype
-
[SP-8] - Switch GIT repository to branching model
-
[SP-9] - Define Java app structure
-
[SP-10] - Integrate NodeJS to provide dependencies
-
[SP-11] - Design login/welcome page
-
[SP-12] - Logging
-
[SP-13] - Provide application life-cycle hooks
-
[SP-14] - Organizational units
-
[SP-15] - Groups
-
[SP-16] - Local user accounts
-
[SP-17] - LDAP directory
-
[SP-19] - Assign user account to group
-
[SP-20] - Map directory groups to local group
-
[SP-21] - Assign group to organizational unit
-
[SP-22] - Service exception handling
-
[SP-23] - Local user account directory
-
[SP-24] - Make user accounts searchable/pageable
-
[SP-26] - Create MPP user accounts
-
[SP-27] - Manage user devices on the MPP
-
[SP-33] - LDAP synchronization
-
[SP-34] - Allow local and LDAP users to login
-
[SP-35] - Configure MPP connection
-
[SP-36] - Edit/delete MPP user accounts
-
[SP-37] - Show MPP user accounts
-
[SP-38] - Assign MPP user permissions to "group - OU" relationship
-
[SP-44] - Fetch MPP groups from all customers
-
[SP-46] - Assign directory user to a local group
-
[SP-49] - Assign all directory user accounts to a local user group