1. What’s New
| Please refer to the upgrade instructions if you want to upgrade your onway director (Sponsoring Portal) installation to the latest version. The upgrade instructions can be found here. |
onway director 6.0
- Upgrade to the latest Ubuntu LTS version
-
If you upgrade to this release, the onway director will run on Ubuntu 24.04 (Noble Numbat)
- PEAP device view
-
There is now a view that displays all devices that have connected using the PEAP user account.
The what’s new archive can be found here.
2. Configuration
Only users with the role Admin, such as the default user sp-admin are allowed to configure the Sponsoring Portal.
2.1. Certificates
All certificates are managed through the web console. If you use certificates from your internal PKI that are not globally trusted to secure your MPP or a user directory such as LDAP, you must import these certificates through the web console.
In order to verify a remote peer the Sponsoring Portal has to be able to verify the remote host’s certificate. Either you have the certificate already or you have to fetch it from the server.
remote_host=ldap.exmaple.com
remote_port=636
keytool -printcert -sslserver ${remote_host}:${remote_port} -rfc > ${remote_host}.crt
2.2. Organizational Unit
An organizational unit (shortened to org unit) is defined with a name and an optional comment. Multiple organizational units can be structured as parent-child relations.
2.2.1. Configure Organizational Unit
The behavior of an org unit (and its children) is configured through its Permissions & Settings view.
Permissions & Settings
New permissions & settings of an org unit are applied to a particular Group. Such a group must be configured beforehand. The Org Unit - Group relation owns the permissions & settings.
Permissions & settings are applied to these general types of entities:
-
Guest User (MPP user)
-
MPP Device
-
MPP Voucher
Permissions are read, create, edit and delete, while settings are entity type specific. Both permissons & settings are inherited within org units.
Any configuration issue is shown either as an error or as a warning. Errors indicate a configuration issue which must be corrected by the administrator of the Sponsoring Portal.
The optional field Delete After relates to an Input Template field. If it is defined here, make sure is is visible or enabled on the input template, and vice versa.
Guest User
Guest user specific settings are applied here.
User groups are retrieved from MPP MPP Configuration. These settings need to be configured, and are used to create a guest user.
MPP Device
MPP device specific settings are applied here.
User groups are retrieved from MPP MPP Configuration. These settings need to be configured, and are used to create a MPP device.
MPP Voucher
MPP voucher specific settings are applied here.
Voucher groups are retrieved from MPP MPP Configuration. These settings need to be configured, and are used to create a MPP voucher.
2.3. Group
A group is a container. It is used for Organizational Unit - Group relation, and to limit My Device approval.
Any synchronized user of a User Directory can be assigned to a group. This helps to easily identify remote users on the Sponsoring Portal.
A group that is used by the onway director for reporting permissions can’t be deleted.
2.3.1. Configure Group
A group has a unique name, an optional comment, and a max. my devices field. It specifies how much devices a user can approve.
2.4. User Account
User accounts are either created locally, or synchronized from a user directory.
If a user account belongs to the Local Directory, it can be assigned to zero, one or more Groups.
If a user account is synchronized from a LDAP Directory, the user is assigned to a standard group. The standard group is configured in the User Directory general administration.
2.5. User Directory
Two types of user directories can be configured:
-
Local Database
-
LDAP Directory
You can manage the users locally on the Sponsoring Portal or connect it to several LDAP directories including Microsoft’s Active Directory. The user chooses the directory on the login page.
2.5.1. LDAP Directory
Four sections of a LDAP directory can be configured:
-
General
-
Connection
-
User account LDAP attributes
-
Group LDAP attributes
General
A remote user is assigned to a local Standard Group, if it is synchronized. A standard group is like any other Group, with this exception: a synchronized User Account cannot unmap itself from the standard group. The LDAP directory is the authority of this user account, and the standard group defines the mapping to the Sponsoring Portal.
A standard group can be remapped to another group, nevertheless.
To remove all users from a directory on the Sponsoring Portal, the standard group can be set to (None).
Connection
This section defines basic connection settings and some synchronization related configuration options.
The LDAP time limit in seconds defines how long one request can go. Synchronization of a large directory uses multiple requests.
The LDAP count limit of 0 means that all entries are synchronized. This should be the default. For a general connection test run, the value can be set to i.e. 10, to limit the amount of transferred entries.
The LDAP sync intervall in minutes defines how often the whole(!) data is transferred from the directory to the Sponsoring Portal for synchronization.
The LDAP page size specifies the batch size of one result, which is transferred from the directory to the Sponsoring Portal.
Active Directory Attribute Mapping
| Field | Attribute |
|---|---|
User account ID attribute |
|
Display name attribute |
|
First name attribute |
|
Last name attribute |
|
Username attribute |
|
User group attribute |
|
Email attribute |
|
Phone number attribute |
|
User object class |
|
| Field | Attribute |
|---|---|
Unique group id attribute |
|
Display name attribute |
|
Group description attribute |
|
Group member attribute |
|
Group member of attribute |
|
Group object class |
|
Synchronization
| Sponsoring Portal synchronization goes one way, from remote to local. The remote directory is the authority of the data, and the Sponsoring Portal consumes the data. |
LDAP directory synchronization is done on configuration Save, is triggered automatically, or can be activated by pressing the Synchronize button.
Directory Service Groups
All available Directory Service Groups are shown here. It is possible to assign a directory service group to one or more local Groups.
A remote group is assigned to a Local Group, if it is synchronized. All users within the remote group are assigned to this local group. Like with the standard group, a synchronized User Account cannot unmap itself from such a group. The LDAP directory is the authority, and the local group defines the mapping to the Sponsoring Portal.
Local groups are optional. If none is chosen, just the standard group is used.
2.6. MPP Configuration
The MPP configuration is required to connect the Sponsoring Portal with the MPP.
2.6.1. Connection
Configure the MPP host and port and preferably use HTTPS, if configured. Set credentials, i.e. mpp-admin with the corresponding password.
The connection timeout defines how long the Sponsoring Portal tries to establish a connection to the MPP. The sync interval specifies the interval in which the Sponsoring Portal fetches data from the MPP.
2.6.2. Guest User Template Settings
The Sponsoring Portal lets you display or download the data of a created Guest User.
The template settings define how the data shall be rendered. The data is shown as PDF or plain TXT. Please see the supported fields information box for all available fields.
The file download time limit defines after how many minutes the template data shall be deleted. It must be deleted as it contains sensitive information.
2.6.3. MPP Voucher Template Settings
The Sponsoring Portal lets you display or download the data of a created MPP Voucher.
The template settings define how the data shall be rendered. The data is shown as PDF or plain TXT. Please see the supported fields information box for all available fields.
2.7. Custom Fields
Custom fields can be defined to enhance Input Templates with additional input fields.
A custom field consists of a unique name and has a type. Based on the type, additional fields such as values or regular expression can be defined.
The following types are available:
-
List: defines a list with values; a value can be selected
-
Text: any text is possible, supports a regular expression to validate the text
-
Yes/No: offers a simple yes-or-no checkbox
An ID is assigned to a custom field, if it is added to the Sponsoring Portal. The ID can be used to identify a custom field from the MPP configuration, for TXT or PDF export.
2.8. Input Template
An input template can be defined to configure which fields are visible on an input form. In addition, static or generated values can be assigned to an input field of a template. The purpose is to simplify and automate user input. The user requires less time to fill out the form. Some input templates can be enhanced with Custom Fields or support a factory.
Input templates exist for the following forms:
-
New Guest User (supports custom fields)
-
New MPP Device (supports custom fields)
-
New MPP Voucher (supports factory)
2.8.1. Configure Input Template
An input template has a unique name, an optional comment, and a priority. It is referenced from the Permissions & Settings of an Organizational Unit.
| The input template with the highest permission is presented to a Guest User, if he is member of multiple groups. |
A collection of field settings define how the input template looks and behaves. Each field is defined with a field name, if it is visible, if a value provider is enabled, and with a default value.
| Visible | Enabled | Value | Result |
|---|---|---|---|
True |
True |
A value must be configured |
Field is visible and has read-only value |
True |
False |
Value is ignored |
Field is visible and uses user-input |
False |
True |
A value must be configured |
Field is invisible and has value |
False |
False |
No value |
This combination is not allowed for mandatory fields! |
Two types of value providers do exist:
-
Static value. A default value is defined in the input template and is applied to the form; example: Valid For 1440 minutes, Enabled: true
-
Generated value. A value generator produces a value for the form; example: Valid From First Login, Voucher Code: 5313
Some value providers, such as the username-, password- or vouchercode-provider require additional configuration.
The MPP Device field MAC Addresses can’t be modified. It is shown for completeness.
The field Delete After (not available in MPP Voucher) needs to be visible or enabled if it is configured within Permissions & Settings. Adding this field to an input template without setting the permissions & settings doesn’t have any effect.
Guest User with Predefined Password (Voucher Code)
The password provider can be configured to generate guest user accounts with predefined passwords. This is a special case. The scenario can be used for a simplified use case where the user only has to enter a voucher code on the login page.
To achieve this goal, the username and password fields are swapped on the login page. The username is treated as a voucher code.
Input Template Configuration
-
Set the Password field to Enabled
-
Set the Password Length field to 0 (zero), ignore the password length policy
-
Define your fixed password (top s3cr3t) in the Password Characters field, pay attention to the minimum length of the password length policy
Login Form
-
The user enters his username in a Voucher Code: field
-
The password field is hidden and contains the predefined password characters of the input template configuration
Custom Fields
Some input templates can be extended with Custom Fields. A custom field of an input template supports the same configuration options. An additional optional field can be configured. It specifies if the field requires an input value or not.
Factory
The MPP voucher input template can be configured to create multiple vouchers instead of just one. An optional field Count must be configured to do so. It behaves like any other input template field and supports the visible and enable flags. The code field must be enabled and configured, as each MPP voucher code must be unique.
The factory input template can be added to any Organizational Unit.
2.9. FTP Servers
The Sponsoring Portal uses one or multiple FTP servers to download CSV files for import tasks.
2.10. Import Tasks
Import tasks are used to automatically download files from an FTP server and create or update entities via CSV Import. They can be created for Guest Users and MPP Devices using the CSV dropdown button on the Organizational Unit view.
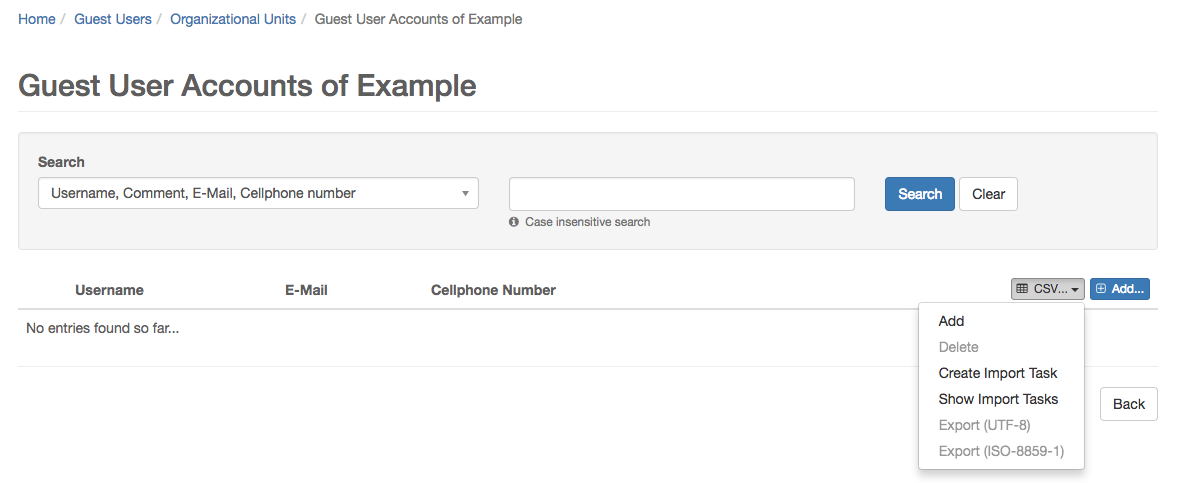
Existing import tasks can be managed in the Administration / Import Tasks view.
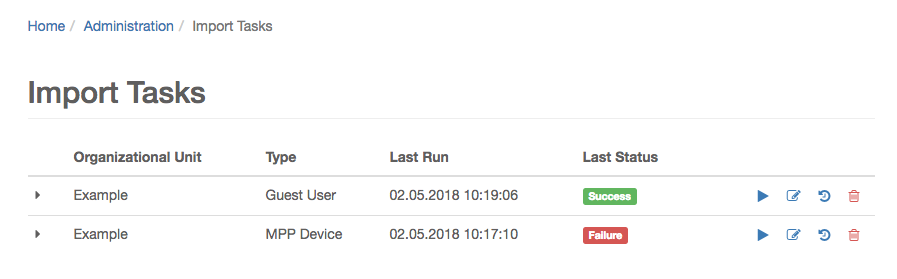
The Import task history view shows the status of the executions of a task. The number of task executions that are stored can be configured.
2.10.1. Configuration
| An import task runs with the permissions and settings of the user that last edited it. If you want to use a specific input template you can create a new user and change the settings accordingly. |
An import task is configured in the following 4 steps:
Step 1: General Settings
Source
The FTP server used to download files. At least one server must be configured in order to create an import task.
Import Strategy
-
Full: Creates or updates all entities that are in the downloaded file and deletes all existing entities that are not.
-
Cumulative: Creates or updates all entities that are in the downloaded file. No entities are deleted.
Step 2: Information Settings
Email Notification
E-mail notifications can be sent after a task execution. The SMTP server settings must be defined in the application.properties file.
One of the following notification types can be used:
-
Always: A notification is sent after each task execution.
-
Failure: A notification is sent after a failed task execution.
-
Success: A notification is sent after a successful task execution.
-
Never: No notifications are sent.
Step 3: File Settings
File Retention Policy
-
None: No action is performed.
-
Delete File: The downloaded file will be deleted from the FTP server after a successful task execution.
File Pattern
The file pattern is a regular expression that defines which file should be downloaded.
| If no pattern is defined, or if multiple files match the pattern, the newest file (ordered by last modified) will be used. |
Directory
The directory specifies the path on the FTP server used to download files.
File Selection
In order to reach the next step, a CSV file is required. Use the load button to get a list of all files that match the current settings. The file highlighted in green will be used for the field mapping in step 4.
Step 4: Field Mapping
The CSV field mapping is configured in the same way as for a manual CSV import. Please refer to CSV Field Mapping for more information.
3. Administration
3.1. Guest User
Manage user accounts on the MPP, in order to grant network access to guests.
A guest user is related to an Organizational Unit. Given the user has the required Permissions & Settings, three options to manage guest users are provided here.
-
To fill out the input form
-
To use the CSV Import / Export tool
-
To use the Import Task tool
The first option is interactive and can add / delete one device, while the second option offers bulk actions.
3.2. MPP Device
Manage user devices on the MPP, in order to grant headless or special devices network access.
A MPP device is related to an Organizational Unit. Given the user has the required Permissions & Settings, three options to manage MPP devices are provided here.
-
To fill out the input form
-
To use the CSV Import / Export tool
-
To use the Import Task tool
The first option is interactive and can add / delete one device, while the second option offers bulk actions.
3.3. MPP Voucher
Manage vouchers on the MPP, in order to grant network access to guests, by using voucher codes. The voucher code must be unique.
A MPP voucher is related to an Organizational Unit. Given the user has the required Permissions & Settings, two options to manage MPP vouchers are provided here.
-
To fill out the input form
-
To create multiple vouchers with a factory
3.3.1. MPP Voucher Factory
To generate multiple vouchers at once, the administrator must configure an MPP Voucher Input Template. An additional field Count defines the number of vouchers to be created. The generated vouchers can be downloaded as a CSV file afterwards.
| If you import the CSV file in a spreadsheet application, please define the code column type as Text (not as type Standard), if your code can contain 0, to prevent that 0123 is transformed to 123. |
3.4. CSV Import / Export
The tool can add or delete a number of entities (Guest Users or MPP Devices) to the Sponsoring Portal at once. The input data is a comma (,) or semicolon (;) separated file, encoded with UTF-8 or ISO-8859-1, also called Latin 1. Former Microsoft Excel versions use this encoding, typically, when exporting to a CSV file.
CSV files can be imported manually, or by an import task. The import task allows to update entities.
3.4.1. Manual Import
Importing a CSV file is done in three steps:
-
Uploading the file by choosing the file, encoding and separator
-
Mapping the column fields
-
Executing the import
| Click on the Download sample file link to get a template which contains the required header fields before uploading. |
CSV Field Mapping
First of all, it must be defined on which row the import shall start.
Then, each column of the CSV file must be mapped to a field name of the Sponsoring Portal. This is done in the Column-Field Name Mapping table. If a field is provided by an Input Template, it cannot be mapped. The sponsoring portal tries to guess the correct mapping by reading the first line of the file.
The first few lines of the uploaded file are shown in a Preview below, to support the mapping decision.
| It is not needed to map all fields to delete entities. An information box shows which fields are required. |
Import
If the mapping is set, the uploaded file is imported by clicking Add or Delete. Based on the number of lines that are imported, it might take some time. The Sponsoring Portal connects to remote MPP systems and does several validation checks to assure data integrity over all involved systems.
A success message is shown at the end, if no errors are detected.
| Updated entries are just counted for MPP Devices with multiple MAC addresses. A device is updated if some (not all) MAC addresses were deleted. |
Errors
If errors occur, a Summary page with Failed Lines appears. The summary shows deleted, updated and failed entries. Failed lines can be downloaded (as CSV), for correction. The error causes are added in a separate column. The whole import process can start over with the corrected CSV file.
3.4.2. Automatic import
A CSV import can be automated using an import Task. Please refer to Section 2.10, “Import Tasks” for more information.
3.4.3. Export
The entities of an organizational unit can be exported as CSV. The encoding is chosen, while the field separator (typically comma or semicolon) is determined automatically by the underlying locale. A header line is added to show the field names.
4. Installation
4.1. System requirements
| Component | Minimum | Recommended |
|---|---|---|
Processor |
Dual core with 2 GHz or faster |
Quad core with 2 GHz or faster |
RAM |
8 GB |
12 GB |
Storage |
60 GB |
>= 240 GB |
4.2. Product Dependency
The onway director (Sponsoring Portal) requires at least the following mpp and / or macman product versions.
onway director |
mpp Version |
macman Version |
customer entry point Version |
6.0.0 |
>= 9.4.0 |
>= 5.0.0 |
>= 3.5.0 |
4.3. Install
To install the Sponsoring Portal, we need either a bare metal server or a virtual machine that meets the requirements as specified above.
Download the latest onway ISO from https://packages.onway.ch/iso/.
After you have started from the disk image a similar GRUB screen will show up:
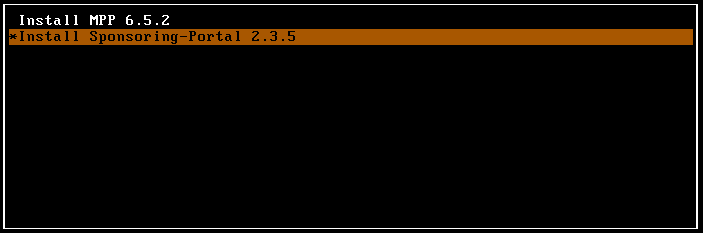
Select Install Sponsoring-Portal 6.0.0 and press return. As next, the setup wizard pops up. Follow the instructions. Next, to the wizard, the Sponsoring Portal gets installed on the local disk. This may take some minutes. To finish the installation the server reboots once, and a yellow Linux prompt appears.
4.3.1. VMware Tools
If you are running the Sponsoring Portal in a VMware virtual environment, we recommend that you install the open VM tools.
apt update
apt install open-vm-tools
4.3.2. Configure Reverse Proxy (Nginx)
With the default configuration the reverse proxy uses the self-signed certificates of the base system. In order to use your own certificates you have to change the host configuration.
4.4. Access the Web Console
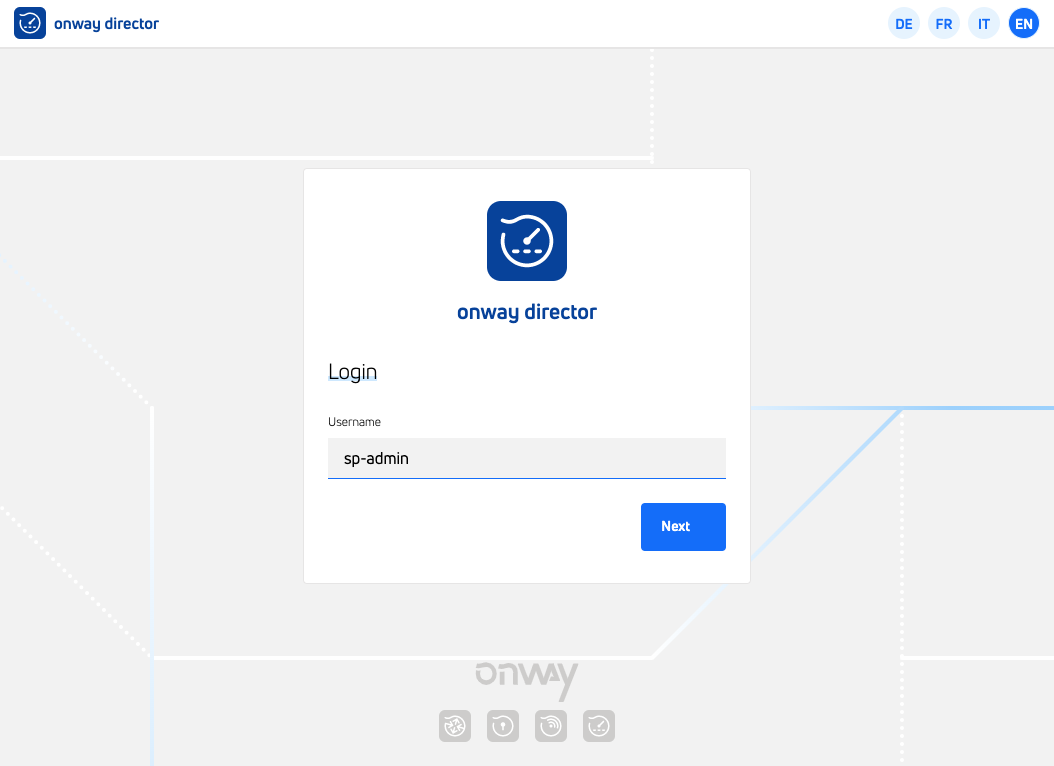
If nothing went wrong, you should now be able to access the web console by https://<server_name>/. Use sp-admin as username and password to login as administrator. This user has been created automatically during the package’s installation process.
5. Upgrade
| Perform backup before upgrade! It is recommended to backup the database before upgrading. You can do so, by either taking a snapshot of the VM or by performing a pg_dumpall. You can find more information about pg_dumpall on the following page: https://www.postgresql.org/docs/current/app-pg-dumpall.html. If you want to continue without creating a backup, please be aware that you are doing it at your own risk. |
5.1. onway director (Former Sponsoring Portal) < 6.0.0
onway director 6.0.0 is the first version that runs on Ubuntu 24.04 (Noble Numbat).
5.1.1. Upgrade all packages on Ubuntu 22.04
apt update (1)
apt upgrade (2)
apt autoremove --purge (3)| 1 | Update the local package information database |
| 2 | Install all available upgrades of all packages currently installed on the onway director |
| 3 | Remove packages that are no longer needed by the system |
5.1.2. Release Upgrade
-
Update sources.list file to new resources
sed -i 's/jammy/noble/g' /etc/apt/sources.list.d/packages-onway.list
Do not call apt update after you changed the sources.list until the release upgrade is finished.
|
-
Perform Ubuntu release upgrade from 22.04 to 24.04
systemctl stop sponsoring-portal.service (1)
do-release-upgrade (2)
apt autoremove --purge (3)
shutdown -r now (4)
1 Shutdown onway director and Sponsoring Portal before upgrade 2 Perform the release upgrade from Ubuntu 22.04 to 24.04. This will take some time 3 Remove packages that were automatically installed to satisfy dependencies for other packages and are now no longer needed 4 Restart system
5.2. onway director (Former Sponsoring Portal) < 5.0.0
| The nginx configuration is now managed by the system and no longer needs to be edited manually. After the upgrade, the server will use the self-signed snake-oil certificate until the correct certificate is configured on the host configuration page. |
onway director 5.0.0 is the first version that runs on Ubuntu 22.04 (Jammy Jellyfish).
5.2.1. Upgrade all packages on Ubuntu 20.04
apt update (1)
apt upgrade (2)
apt autoremove --purge (3)| 1 | Update the local package information database |
| 2 | Install all available upgrades of all packages currently installed on the onway director |
| 3 | Remove packages that are no longer needed by the system |
5.2.2. Release Upgrade
-
Update sources.list file to new resources
sed -i 's/focal/jammy/g' /etc/apt/sources.list.d/packages-onway.list
Do not call apt update after you changed the sources.list until the release upgrade is finished.
|
-
Perform Ubuntu release upgrade from 20.04 to 22.04
systemctl stop sponsoring-portal.service (1)
do-release-upgrade (2)
apt purge sponsoring-portal-console bastard-remote-client (3)
apt autoremove --purge (4)
shutdown -r now (5)
1 Shutdown onway director and Sponsoring Portal before upgrade 2 Perform the release upgrade from Ubuntu 20.04 to 22.04. This will take some time 3 Remove previously used packages 4 Remove packages that were automatically installed to satisfy dependencies for other packages and are now no longer needed 5 Restart system
6. onway director
The onway director is a business application of the onway provisioning and monitoring platform. It provides a reactive user interface and is configured through the Administration section. The GUI runs on any device such as desktop, tablet or mobile phone.
The onway director GUI follows a customer-centric approach. It is able to manage a single customer or multiple customers. The customer selection is done on the entry page, if more than one customer is configured.
Every enterprise application needs access permissions. So does onway director. It always supports the configuration of permissions where they are needed. The administrator keeps the focus while configuring the application in terms of permissions.
6.1. User Menu
The user menu is on top right and can always be accessed.
6.1.1. Settings
Settings are configured by clicking on top right. They allow to customize such things as user language and date or number format.
English is used as a fallback language for untranslated content.
You can configure your session timeout for the application. This determines how long you stay logged in.
You can define the CSV separator, if you don’t want to use the default, which is derived from your language.
6.1.2. Change Password
Users of onway director change their password here.
6.1.3. About
Information about software version
6.1.4. Logout
Logout from onway director.
6.2. Administration
Only users with the role Admin, such as the default user sp-admin are allowed to administer the onway director.
The configuration is split into a general and a customer specific part. The general part defines the setup of the whole system, and how it communicates with other components such as MPP, macman or onway controller.
The customer part contains all required settings for a particular customer.
Let’s start with the customer.
6.2.1. Customers
onway director customers must be added manually.
| The customer key must match with the MPP for identification, so check twice. |
A customer has one or more groups. Groups are managed in the
Sponsoring Portal Administration → Groups.
Customer permissions are derived from such groups. Choose as many groups as you need. Upcoming parts of the customer configuration will have access exactly to these groups. A permission is granted to all members of a group.
The following list shows examples of where permissions are required:
-
Access to a reporting category is not possible without customer permissions
-
Tags have an assign permission
-
Network Access Groups have permissions
-
Device Groups have permissions
-
My Device has a permission
-
Other places with permissions…
As you can see, these permissions are a central part of the customer configuration.
| A group can’t be deleted in the Sponsoring Portal if it is assigned in the onway director. |
The following sections are accessed by clicking on a customer card. A new main navigation on the left side opens for customer specific configuration.
Reporting
Permissions and settings must be configured to be able to access reports or log data such as the SMS registration log.
Permissions
First of all, one or more group(s) must be assigned to a customer. You can choose groups which were defined in customer permissions.
For these (Sponsoring Portal) groups, report categories are enabled or disabled. This means that reports or logs of a customer can either be accessed or not.
Settings
Specific settings such as retention time for data logs can be configured, too. The retention time defines how long data is retained. If the log contains sensitive fields such as MAC addresses or phone numbers, it is anonymized after an anonymization time. Such fields are not available earlier than the anonymization time.
If a customer is deleted, all reporting configuration and data of this customer is deleted, too.
Tags
A tag has a name and assign permissions. Assign permissions are defined for groups that are allowed to assign tags.
Tags are used to group components within onway director. Tags can be added to network access groups. Tags are assigned to all network access accounts which belong to a particular group with tags.
A search filter for such accounts or devices helps to find the requested items more easy.
macman
The most important macman settings are defined here.
General Settings
General settings such as retention time of deleted network access accounts and network access account sessions, and other session related settings.
Network Access Groups
A network access group (NA Group) is a container for accounts or devices. Such items must be unique within a NA Group. A NA Group is assigned to a customer and to a VLAN. A customer can have multiple NA Group’s. The following network access groups are available:
-
PEAP - Protected Extensible Authentication Protocol
-
iPSK - Identity Pre Shared Key
-
MAB - MAC Authentication Bypass
-
My Device - Also known as BYOD, "Bring Your Own Device"
All NA Groups except My Device are extended with access permissions. The permissions are defined for a customer group and have the following modes:
-
Account Read
-
Account Create
-
Account Edit
-
Account Delete
A higher permission includes a lower permission automatically. It is possible to combine network access groups into a network access group view.
PEAP, iPSK and MAB NA Groups can be extended with tags and with a custom input template.
Opening a NA Group opens a new main navigation on the left side.
A PEAP network access group has a unique name. A realm is optional, as long as a single NA Group is in use. It must define a realm if more than one NA Group is defined, to distinguish user accounts.
An iPSK network access group has a unique name and needs a Pairing VLAN in addition to the VLAN.
A MAB network access group has a unique name.
A My Device network access group has a unique name and needs a Pairing VLAN in addition to the VLAN. A realm is optional, as long as a single NA Group is in use. It must define a realm if more than one NA Group is defined, to distinguish user accounts.
My Device Settings
My Device settings specify how a new user device is handled by the onway director.
As the settings are quite detailed, they are separated into the following sections:
-
Network Options - defines NA Group, SSID and more
-
Acceptable Use Policy (AUP) Options - AUP files can be uploaded
-
Permissions - defines who can use My Device
-
User Options - defines username/password characters and more
Input Templates
Input templates are used to extend an input sidebar with custom fields. An input template is identified by its unique name and its type.
The administrator can define as many input templates per customer as she needs. An input template extends an input sidebar, such as in network access groups. It allows the administrator to query for custom data.
Custom Fields are language aware. The administrator can but does not have to define the custom field name in english, german, french and italian. At least one language must be provided. onway director will show the field in the user defined language (see settings), or fallback to the language in this order en→de→fr→it.
Type
As of now, three input template types are available:
-
Text - text field
-
Yes/No - choose field
-
List - selection field
Text
A text field to read any character. A regular expression can be defined to validate user input.
Yes/No
A simple option to choose either yes or no.
List
Define a list of items and choose one or some.
6.2.2. System
One important aspect of the onway director is its distributed service infrastructure. See how clients and servers are connected.
The configuration is system-wide and independent of a particular customer.
Remote Client
The onway director uses the Remote Client to connect to one or to multiple MPP’s, macman’s or onway controllers. Remote Clients are applications which are automatically started together with the Sponsoring Portal. Such application are called remote peers.
| How do we reach remote peers? For MPP, the communication uses TCP/IP on port 9011; macman uses port 9013; onway controller uses port 9015 |
The communication between the onway director and the remote peer’s
is encrypted and uses X.509 certificates for authentication. Client details
are shown in the Administration → System → Remote Client sub-menu.
Connections must be configured on both parties but can be done independently, even if one party is offline. Connections are configured in:
-
MPP
Administration → MPP → Connections -
macman
Administration → macman → Nodes -
onway controller
Administration → onway controller → Nodes
Server details are shown in the corresponding sub-menus.
| In MPP a connection is called a Remote Peer while in the onway director it is called MPP connection. A connection to a macman or onway controller is called a connection to a Node |
Processes
The following picture illustrates how the processes are connected to each other. The remote servers listen to a fixed TCP/IP port.
Remote Server port usage:
-
MPP - 9011
-
macman - 9013
-
onway controller - 9015
Failed to generate image: Could not load Ditaa. Either require 'asciidoctor-diagram-ditaamini' or specify the location of the Ditaa JAR(s) using the 'DIAGRAM_DITAA_CLASSPATH' environment variable.
                  Remote                     Remote
                  Server                     Client
+-----+          +--------+                 +--------+
|cFA4 |          |cFA4    |9011             |cAF4    |
| MPP +----------+ MPP RS +------+....+-----+ MPP RC +--------+
|     |          |        |                 |        |        |
+-----+          +--------+                 +--------+        |
                                                              |
                  Remote                      Remote          |
                  Server                      Client          |
+--------+       +-------+                   +-------+    +---+---+
|c8AF    |       |c8AF   |9013               |c8FA   |    |c2A2   |
| macman +-------+ MM RS +-------+....+------+ MM RC +----+ SP/OD |
|        |       |       |                   |       |    |       |
+--------+       +-------+                   +-------+    +---+---+
                                                              |
                  Remote                      Remote          |
                  Server                      Client          |
+------------+   +-------+                   +-------+        |
|cF98        |   |cF98   |9015               |c9F8   |        |
| onway      +---+ OC RS +-------+....+------+ OC RC +--------+
| controller |   |       |                   |       |
|            |   +-------+                   +-------+
+------------+
Connection State
A connection to a remote peer qualified by a State. It provides three values:
-
DISCONNECTED - peer is not reachable, or peer did not trust
-
UNTRUSTED - peer certificate is not trusted by us
-
CONNECTED - goal state, both parties trusted each other
The state will be shown as DISCONNECTED, if the remote peer did not add the onway director as its remote peer before.
The onway director tries to establish a connection to the remote peer for an infinite period of time. The connection is not established as long as the certificates are not trusted. This state is shown as UNTRUSTED. The Peer ID and the SHA-256 fingerprint of the certificate are shown to identify the other party.
| The Peer ID corresponds to the Subject Alternative Name (SAN) of the certificate and is equal to the hostname of the system during installation |
To establish a secure communication channel, both parties (onway director and remote peer) must trust each other. Trusting is a manual interaction, done by the administrator. A click on the lock button and approval changes the state to DISCONNECTED if done on one party.
It changes to CONNECTED, if both parties trust each other, and after a successful handshake has been done between onway director and the remote peer. This is the required final state for secure communication between the parties.
Disconnect onway director from a peer
If one party wants to revoke an established connection for any reason, a click on the unlock icon with approval is enough. The state changes to UNTRUSTED on the onway director and to DISCONNECTED on the remote peer. Communication between onway director and remote peer is refused. Please note that the onway director keeps trying to establish the connection to the remote peer.
A connection can be deleted if it is not required any more by clicking on the delete button.
Renew a certificate
It is possible to renew the built-in certificate in
Administration → System → Remote Client. But be careful. All
configured remote peers must trust the new certificate to be able
to communicate with the onway director!
Click on the button Create New Certificate to re-create a new remote client certificate.
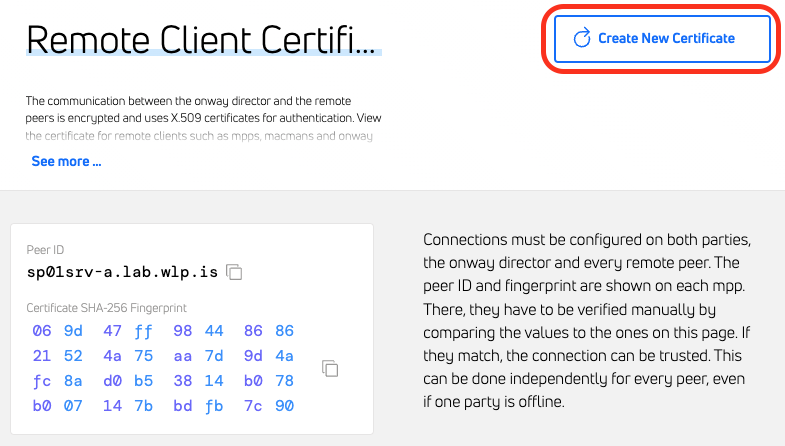
If you changed the hostname before creating the new certificate, the new certificate will have the new hostname as the Peer ID.
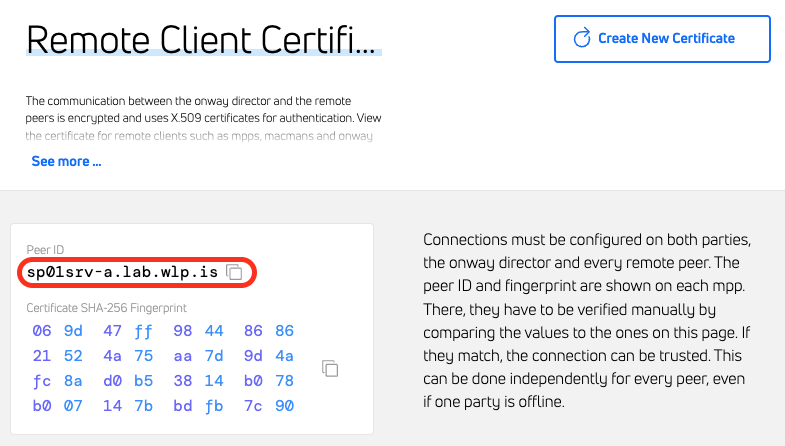
If you did not change anything, the new certificate will keep the original Peer ID.
Troubleshooting
Peer ID mismatch
As mentioned earlier, the Peer ID must be unique and is bound to the SAN. It is a configuration error if more than one connection to the same server is configured (i.e. by using the IP address and FQDN). Such a connection can never be trusted.
Remove the duplicate connection entry, and make sure to use the correct Peer ID.
Certificates
Certificates can easily be uploaded in the Administration → System → Certificates
page. Such certificates will be added to i.e. a macman configuration later.
Host Configuration
The host configuration made during the installation of the onway director can be overwritten in the
Administration → System → Host Configuration page.
Be aware that certain changes will require you to reconfigure parts of your macman, onway controller or MPP’s. You will therefore need administration rights on all these systems.
Hostname change
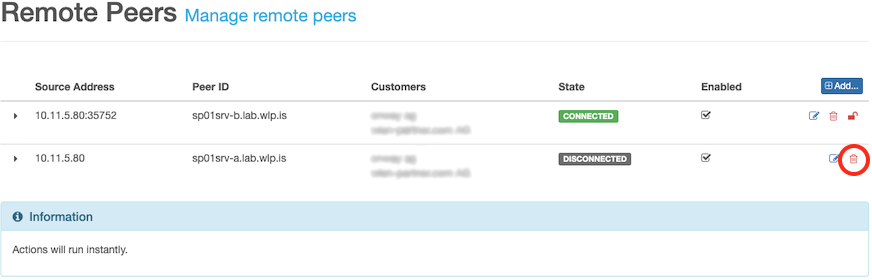
When changing the hostname, you must also perform the following steps on each configured MPP.
-
Log in to the MPP and go to
Services → Configuration → Remote Server → Remote Peers -
Add the unknown peer whose Peer ID matches the new Peer ID of the onway director
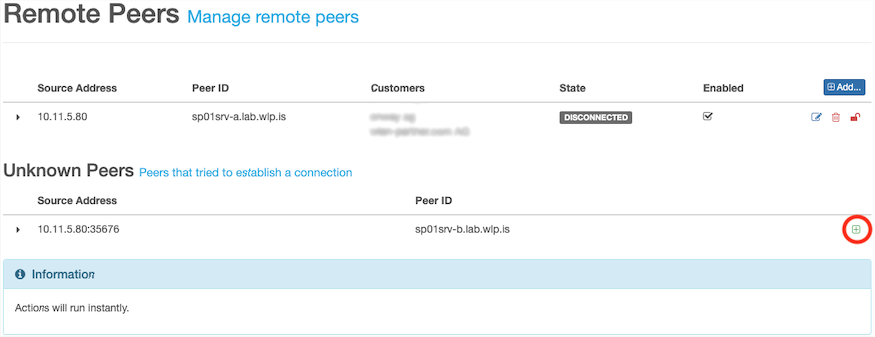
-
Trust the certificate of the new remote peer
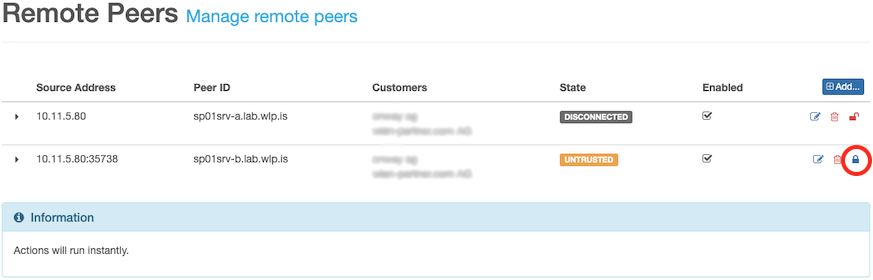
-
Delete the old remote peer
IP address change
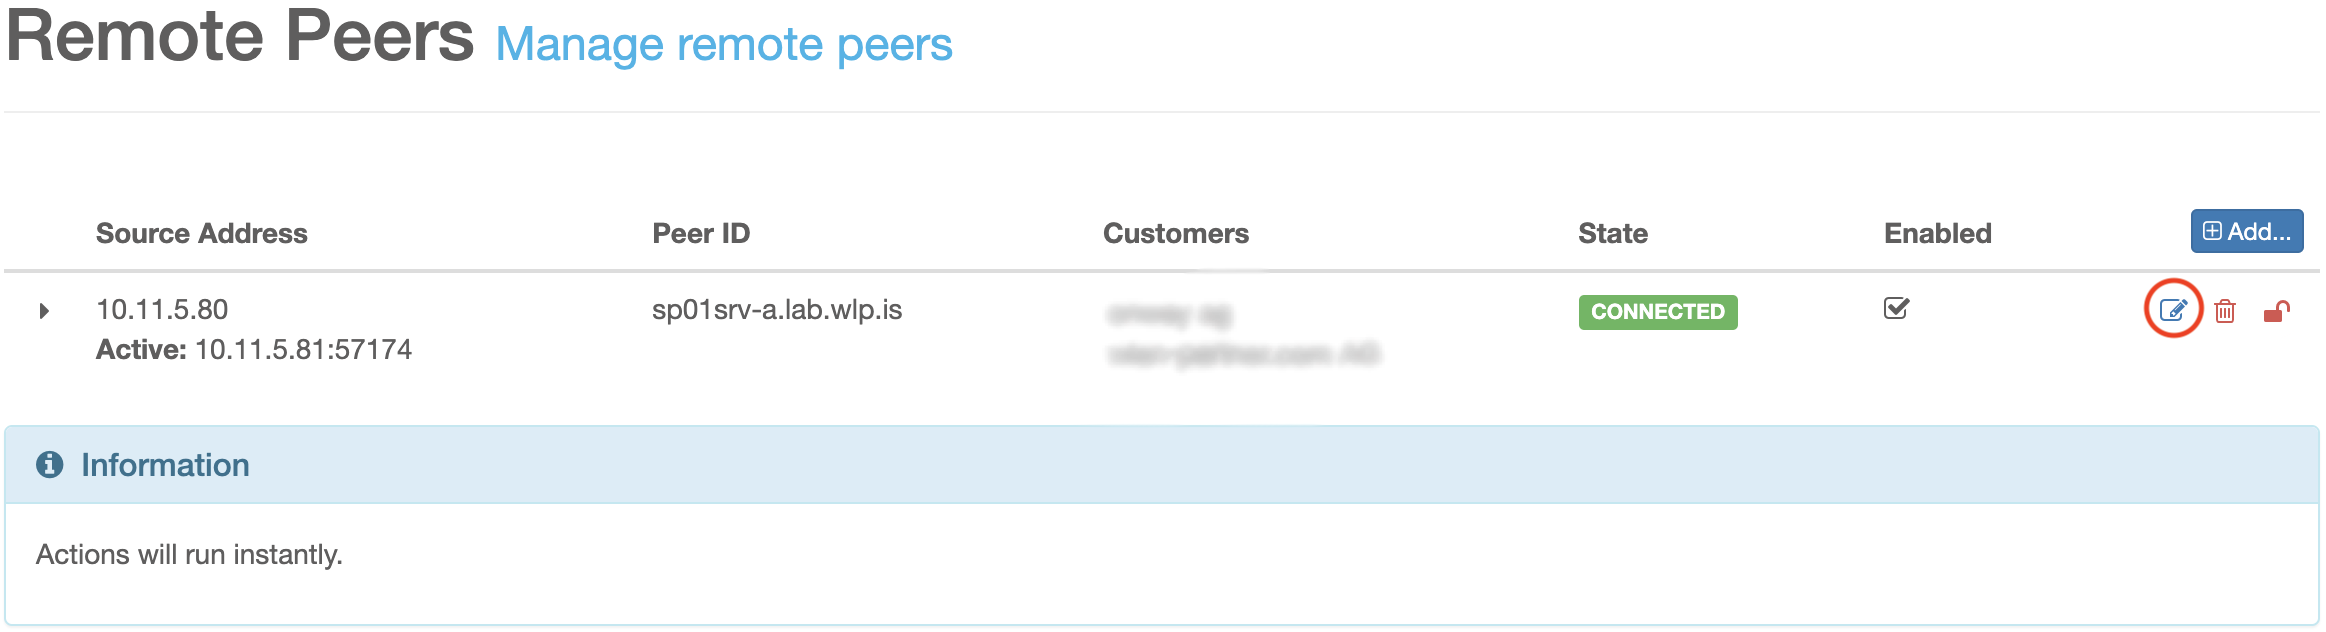
When changing the IP address, you must also perform the following steps on each configured MPP, macman- and onway controller node.
-
Log in to the MPP and go to
Services → Configuration → Remote Server → Remote Peers -
Change the source address of the remote peer whose Peer ID matches the Peer ID of the onway director
-
Log in to a macman node / onway controller node via SSH
-
Reconfigure the remote server package with the new IP of the onway director
Mail Configuration
Mail configuration of the local postfix can be created or uploaded in the
Administration → System → Mail Configuration page.
6.2.3. Users
Logged in Users
The table shows users which are currently logged in to onway director.
6.2.4. MPP
See how to connect onway director with MPP.
Connect onway director with MPP
First, add a MPP connection by adding the IP address or FQDN, and
the Peer ID of the MPP server. The MPP Peer ID is defined in the MPP in
Services → Remote Server → Service. It is the hostname of the MPP.
It is unique and can be configured for exactly one MPP connection.
On the MPP, add the remote peer by adding the Source address and
Peer ID of the onway director. The onway director Peer ID is defined
in the onway director in Administration → System → Remote Client.
It is the hostname of the onway director.
On the MPP, add the remote peer by adding the Source address and
Peer ID of the onway director. The onway director Peer ID is defined
in the onway director in Administration → System → Remote Client.
It is the hostname of the onway director.
Trust the connection and check the connection state.
Disconnect onway director from MPP
See disconnect peer.
MPP data stream services
Reports are created with log data which is streamed from MPP over a remote client connection.
Enable the following settings to stream data from the MPP to the onway director. Please note that the MPP must enable the corresponding data stream services on its remote server services.
-
User Session: enable this service to store the user session history log
-
SMS Accounting: enable this service to store the SMS accounting log
The log data which is provided by these services, is used to create various reports.
6.2.5. macman
See how to connect onway director with a macman node.
Connect onway director with macman
Macman nodes are configured in Administration → macman → Nodes.
Add a macman node by adding the server IP address or FQDN, and
the Peer ID of the macman node. The macman Peer ID is the hostname of the
macman node. It is unique and can be configured for exactly one macman
connection.
The macman remote peer is added during installation of the
macman-remote-server package. The peer_ip field of the configuration file
/var/lib/macman-remote-server/config/host.json defines the onway director as
its peer.
Trust the node and check the connection state.
Node Details
A click on a macman node card shows many details of that remote node, such as its configuration, connection state, connection certificate details and more.
Disconnect onway director from macman
See disconnect peer.
Configurations
The onway director supports multiple macman configurations. For example, you can imagine defining a laboratory configuration, a test configuration and a production configuration. The configuration acts as a container. A configuration has a unique name. It contains the macman revisions. A revision is a particular configuration at a time.
Instead of configuring node by node, the configuration workflow is the other way round:
-
Change the working configuration
-
Create a config revision
-
Assign the revision to one or many nodes
-
(Back to 1.)
This allows to update nodes quite fast, and even supports offline configuration.
NA Group Views
A network access group view is a container for network access groups. It is used if multiple NA Group’s are part of the authentication chain. This chain specifies the processing order for authentication. It is configured per NA Group View.
NAS Clients
Network Access Server Clients have a unique name, IP/Network, a shared secret with the RADIUS server (https://freeradius.org/) and reference at least one NAS Identifier.
The NAS identifier links to a network access group view.
The Big Picture
This graph shows how these components are connected to each other:
Failed to generate image: Could not load Ditaa. Either require 'asciidoctor-diagram-ditaamini' or specify the location of the Ditaa JAR(s) using the 'DIAGRAM_DITAA_CLASSPATH' environment variable.
+------------+
|            |
| NAS Client |
|            |
+----+-------+
     |
     |      +--------------------------+
     |   +--+------------------------+ |
     |   |                           | |
     +---> Network Access Group View | |
         |                           |-+
         +---------+-----------------+
                   |
                   |       +---------------------+
                   |    +--+-------------------+ |
                   |    |                      | |
                   +----> Network Access Group | |
                        |                      |-+
                        +----------------------+
RADIUS
A previously uploaded certificate can be added to the RADIUS configuration.
Revisions
A revision is a snapshot of a particular configuration at a time. It is identified by an ascending revision ID. A new revision can be created by the administrator at any time, if the working configuration has been changed. All revisions are kept in a revision log table. Select a revision to show its details.
Any revision can be loaded as working configuration. It can be deleted to remove it from the log, too. All referenced items of a revision must be removed, too. A revision can’t be removed otherwise.
| A revision is immutable and can’t be changed; create a new revision instead, if you want to make configuration changes |
Distribute new Revision
This is a two-step action: assign → apply.
A revision can be assigned to one or many nodes. If more than one node is
selected, the configuration revision is applied to one node after another.
It is persisted in /var/lib/macman-remote-server/config/macman-config.json
on the node. If a revision can’t be applied, a rollback to the previously
applied revision is done automatically. The assigned and applied revision
of a node is shown in the node details.
A macman revision can be assigned to a macman node, even if the node is disconnected. The distributed service infrastructure will try to make sure that all nodes have the assigned revision. A pending configuration update message might be shown. The node details provide all important information of a node.
Revision Cleanup
It is possible to remove unused revisions in one step.
6.3. Reporting
onway director is a reporting platform, too. It is connected to the remote client for this purpose. The remote client receives raw data from its peers continuously. This data is the basis for various reports.
All reports belong to a report category. The categories are used to group reports of the same topic. The following categories do exist:
-
User Session Reports: user session history data
-
SMS Reports: SMS accounting data
Users with reporting permissions are allowed to work with reports. The administrator doesn’t need special access right. He has access to all reports.
6.3.1. Report Overview
In this chapter you will find all currently supported reports:
User Session - Count
Shows the number of sessions.
User Session - Returning Users
Shows the number of users, grouped by their number of sessions. The report is divided into the following categories:
-
1 session
-
2-4 sessions
-
5-9 sessions
-
More than 9 sessions
User Session - Traffic
Shows the data traffic of users, grouped by download and upload of sessions. The report is divided into the following categories:
-
Incoming user traffic in the positive range of the y-axis
-
Outgoing user traffic in the negative range of the y-axis
User Session - Duration Distribution
Shows the distribution of sessions, grouped by their duration. The duration of a session is divided into the following categories:
-
0-5 minutes
-
5-15 minutes
-
15-30 minutes
-
30-60 minutes
-
1-2 hours
-
More than 2 hours
User Session - Total Duration
Shows the total duration of sessions.
User Session - Hourly Distribution
Shows the average number of sessions by hour of day.
User Session - Weekday Distribution
Shows the average number of sessions by weekday.
User Session - Tourism
Shows the number of sessions, grouped by users that have a phone number as their username. The report is divided into the following categories:
-
Sessions with domestic phone numbers
-
Sessions with foreign phone numbers
-
Sessions without phone numbers
User Session - User Registration
Shows the number of sessions, with newly registered users and others. The user report is divided into the following categories:
-
Sessions for which a new local user was created
-
Session with already known or anonymous users
User Session - Device Registration
Shows the number of sessions with new or updated user devices. The report is divided into the following categories:
-
Sessions for which a new device was registered
-
Sessions for which a registered device was updated
-
Sessions for which a registered device changed the user
-
Sessions for which no device was registered or updated
User Session - Authenticator
Shows the number of sessions per authenticator.
User Session - Profile
Shows the number of sessions per profile.
User Session - Type
Shows the number of users, grouped by the type of sessions. The session type is divided into the following categories:
-
Unauthenticated sessions
-
Login sessions
-
Auto sessions
-
Route sessions
SMS - Count
Shows the number of sent SMS as chart.
SMS - Country Distribution
Shows the number of sent SMS by country as table.
6.3.2. Create Report
There are two ways to create a report:
-
Periodic Report: schedule reports for continuous execution
-
Report: trigger an immediate or delayed report execution
Both types consist of two parts, a report configuration and the resulting report.
If a configuration is saved, it is listed within the reporting category.
A generated report is chosen from this list by clicking on its name. A configuration can be edited, or deleted. If a configuration is deleted, the derived report is deleted, too.
Report Configuration
A report configuration is defined for a category. All charts within the category use the same configuration. This makes it easy to compare the charts. It is possible to add multiple report configurations for the same category. A report configuration can be edited and reused. It must be removed manually.
It is possible to create multiple report configurations.
Example: adding a report configuration for the user session category will produce all available charts of that category.
A report configuration defines main aspects of the report, such as data filters, time period or data retention, execution and report permissions. The following sections explain this in more detail.
Data Retention (periodic report)
A periodic report is configured once, but runs every night. You can configure how many daily or monthly reports shall be kept, and if data from the past (earlier than now) shall be used or not.
Time Period (report)
Choose a time period. The From field is limited by the main data retention, which is configured by the administrator in the reporting settings. The To field can be any time after from.
Data Filter
A filter is added to limit the data of the report. A site filter can limit the number of involved sites for a session report, for example.
Tip: a filter can be configured as a regular expression in the advanced filter mode. Expressions can be tested immediately on existing data. A regular expression simplifies the filtering of sites that follow a naming convention.
Execution
Generation of a periodic report and a report is almost similar.
Run a report configuration immediately, or run it delayed or within a user
defined interval. Generation of a periodic report can be turned on/off.
All reports are scheduled on an application.properties cron entry of
the remote client.
Permissions
Access permission can be added to the report configuration, typically to limit access:
-
Read: defines groups with just read access
-
Edit: defines groups with read, create, edit and delete access
The edit permission includes the read permission.
Access is defined by the administrator. The administrator doesn’t need special access permissions.
6.3.3. Analyse Reports
After a report configuration was executed, multiple charts are generated and persisted on the remote client for analysis. The list of available reports is shown in the onway director. The charts open by a single click on the report name. In case of user session, a huge page of charts shows up.
You’re able to open report details, edit or delete the configuration which led to this report. You’re even able to regenerate the report in case of a periodic report. Of course you need the permissions for such actions.
Filter
Right on top, you’re able to adjust the filter, which is based on the underlying data. This allows you to analyze the data further. You can change the duration or the time range, and the sampling rate. The sampling rate shows the report as a time series over day or month. Reports have an additional sampling rate called aggregated.
Chart
The report chart provides additional features. A small info box explains the chart for better understanding.
Each chart has a status which shows details about its generation. In case of an error during the generation, it is possible to restart the generation.
Some charts offer to switch between percent and absolute values. Use percent to easily compare charts. Use count to see the amount of underlying data that led to this chart. Average/Total which is used, too, behaves similar.
Finally, click on the labels in the legend and turn values on/off to focus only on the data you want.
6.4. Logging
onway director offers access to logging data, too. It is connected to the remote client for this purpose. The remote client receives raw data from its peers continuously. This data can be accessed.
Users with reporting permissions are allowed to use logging. The administrator doesn’t need special access right. He has access to logging.
6.4.1. Logging Overview
In this chapter you will find all currently supported logs:
SMS Log
SMS Log offers access to the raw log data. SMS registrations can be searched and filtered.
It is possible to enable auto refresh, to see incoming registrations continuously.
6.5. Network Access Account
A network access account (NA Account) belongs to a Network Access Group. Four main types of NA accounts exist:
-
PEAP (Users/Devices)
-
iPSK Devices
-
MAB Devices
-
My Devices (Users/Devices)
NA Accounts can be added manually, or imported/exported as CSV.
All PEAP, iPSK and MAB accounts can be defined with a validity. It defines a start / end date for the account. Tags can be assigned to group accounts.
An account can also be deleted. It is marked as deleted in fact, and remains for a configurable retention time within onway director. If the retention time is exceeded, it is removed permanently.
The Search/Filter component on top offers many ways to find specific accounts. It can be used in combination with the CSV export, to limit the number of accounts. Or it allows finding deleted accounts, accounts with specific tags and much more.
6.5.1. PEAP Users
A PEAP user can be configured with the onway director. Search and manage PEAP users who can connect on a dedicated network via macman. Access is granted using a username and a password.
6.5.2. iPSK Devices
An iPSK device can be configured with the onway director. Search and manage iPSK devices that can connect to a dedicated network via macman. Access is granted using the MAC address and a WLAN Password (PSK).
Add manually
An iPSK device can also be added manually by filling in the fields.
-
Open the sidebar by choosing 'Add manually'
-
Fill in the fields and save the form
The device’s additional parameters can then be adjusted and saved in the next step.
6.5.3. MAB Devices
A MAB device can be configured with the onway director. Search and manage MAB devices devices that can connect to a dedicated network via macman. Access is granted using the MAC address only.
6.5.4. My Devices
A My Device (also known as Bring Your Own Device) can be configured with the onway director. Manage your My Devices to connect them to a corporate network via macman. Access is granted via the credentials provided.
To access My Devices, the Use My Device permission must be granted in My Device settings.
6.5.5. CSV
Accounts of type PEAP, iPSK and MAB are supported.
Export
CSV export downloads the complete list of network access accounts. Such accounts can be opened in a spreadsheet application. The character encoding is UTF-8, and the separator is derived from the language or defined by your settings.
The export respects the filter settings. This allows to export accounts of a specific network access group, for example.
Passwords are not exported.
Import
CSV import consists of three steps:
-
Prepare and upload CSV file
-
Map columns to network access account fields and run the import
-
Analyze import result summary, any maybe redo CSV import with failed accounts
Accounts which are already stored in the onway director are updated if they appear in the import.
Preparation and upload
Make sure that your CSV file contains all relevant fields. PEAP users need a username and a password, while iPSK devices need a MAC address and a PSK, and MAB devices need a MAC address.
Please do not mix accounts of different network access groups. All uploaded accounts must belong to the same group.
An exported CSV file is UTF-8 encoded. This is the default encoding. The alternative encoding ISO-8859-1 (Latin 1) is supported, too.
The locale defines the separator, typically ',' or ';'. You can define your own separator.
| Use the header line of a CSV export. onway director will try to map columns automatically if a header line is available. A header line can be marked with a #, but does not have to |
onway director supports several formats for time values, according to ISO-8601, or to our custom format:
-
custom format, 03.12.2011 10:15:30
-
ISO date-time format, i.e. 2011-12-03T10:15:30+01:00
-
ISO instant format, i.e. 2011-12-03T10:15:30Z
Column mapping and import
Columns are mapped automatically if the uploaded file has a header line with the correct names.
Examples:
-
usernameis mapped to the Username field -
mac_addressis mapped to the MAC Address field -
password→ Password -
psk→ PSK -
valid_from→ Valid from -
tag→ Tags -
and so on…
All available columns from the CSV file are presented in select boxes for all NA account fields. Two consecutive lines of the uploaded file are previewed in the select boxes. The preview shows the spreadsheet application column ([A1]..[Z99]) in order to keep the overview.
The mapping shows entries such as [A1] my cell text. This
defines a cell on the first column (A) and the first row (1) of your
input file
|
Increment or decrement Start at CSV row to preview different lines of the file.
If the uploaded file doesn’t provide a header line, you must set the mapping yourself, field by field. So define a header and things go easy.
| Set start at CSV row = 2, if a header line is provided, to skip the header line. Otherwise you’ll see a failed line afterwards. If a header line is marked with #, it is skipped automatically, and you don’t need to start at row 2. |
Start the import if at least all mandatory fields are set.
Import summary
onway director imports the file line by line. A percentage progress is displayed during import. At the end, a summary shows up. Is lists the number of inserted and failed accounts, if an error happened during import.
Errors might happen for various reasons, such as missing data, invalid data or if the header line was not skipped.
All erroneous data can be downloaded as CSV to be corrected in the spreadsheet application. Close the sidebar and redo the import with the failed accounts.
6.5.6. NA Account Details
Click on a specific NA Account to see all its Details.
Sessions
The Sessions tab shows very detailed information about sessions of this NA Account.
Example:
Status |
TERMINATED |
Client IP |
10.11.16.223 |
Client MAC |
00:24:d7:e7:3f:f8 |
Started at |
04.11.2021 13:58:06 |
Ended at |
04.11.2021 14:09:15 |
Acct-Terminate-Cause |
User Request |
Download |
17.22 KB |
Upload |
10.50 KB |
VLAN |
539 |
Called-Station-ID |
68-7d-b4-e7-57-60:LAB-DEV-BYOD |
Acct-Session-ID |
6183d8db/00:24:d7:e7:3f:f8/3956 |
Session ID |
7a75acfdafc7624b02dbbd87ed9d8149ecee5fc4 |
NAS IP |
10.6.9.20 |
NAS Identifier |
wlc01zrh2 |
NAS-Port-ID |
- |
NAS-Port-Type |
Wireless - IEEE 802.11 |
Journal
The Journal tab shows all modifications that were done on this NA Account. It lists the changed fields (before/after), and shows details of the author of the change.
Example:
Action |
EDITED |
Date |
05.11.2021 08:43:23 |
Changed Fields
Comment |
|
onway test user |
→ test user |
Valid For |
|
Unlimited |
→ 2 Days |
Authored by
Username |
local\sp-admin |
SID |
S-U-1 |
7. What’s New Archive
7.1. onway director 5.14
- macman session view
-
There is a macman session view that displays all current sessions. To use this feature, RADIUS accounting must be configured.
- BYOD without pairing
-
BYOD can now be configured without a pairing VLAN. When this feature is enabled, devices can go online without an additional approval step. When the pairing VLAN is disabled, no device limit can be set.
7.2. onway director 5.13
- PEAP user password reveal
-
You can now grant groups permission to view users' passwords. When a password is displayed, a journal entry is created.
7.3. onway director 5.12
- onway director API Breaking Changes
-
The
SimCardDTOrequest/response used by several onway director API endpoints/api/<customerKey>/sim-cardshas been changed: The various telemetry data properties are now grouped together undertelemetryand have been marked as read only.
See latest API documentation for details.
7.4. onway director 5.11
- onway director API Breaking Changes
-
The
NaAccountSeekRequestParamsrequest required by the onway director API endpoint/api/<customerKey>/accounthas been changed: The fieldstateFilterTypehas been renamed tostateFilterTypesand the type is no longer just astringbut an array of strings (string[]).
Apart from that, "ALL" has been removed as a state filter type. If you want accounts with all states, you now have the following three options for achieving that:
-
Pass all possible states.
-
Pass an empty array.
-
Pass a
nullvalue or leave this attribute out of the request. This means that anullvalue does no longer default to"NORMAL".
See latest API documentation for details.
- OpenRoaming
-
With this version, we provide the functionality needed to operate our macman servers as OpenRoaming IDPs and ANPs.
7.5. onway director 5.10
- onway director API Breaking Changes
-
The
SystemDeviceSlotEditDTOrequest required by the onway director API endpoint/api/system/<systemId>/device-slothas been changed: The fieldvariableshas been renamed toeditVariables.
The SystemDeviceSlotDTO contained within the SystemDTO response returned by several onway director API endpoints /api/<customerKey>/system/ and /api/system/ has been changed:
The field configurationState has been removed.
The SystemTemplateServiceCheckTargetIpDTO and SystemTemplateHttpServiceCheckTargetHostDTO contained within the SystemTemplateDTO response returned by onway director API endpoint /api/<customerKey>/system-template have been changed.
See latest API documentation for details.
7.6. onway director 5.9
In addition to bug fixes and some optimizations, this version provides the option of monitoring external services via HTTP or ICMP and displaying the logbook of the systems.
7.7. onway director 5.8
With this version, it is possible for the first time to define several slots on one system. We have also done a lot of work under the cover.
7.8. onway director 5.7
We have added a new widget to the customer homepage that shows all systems that are currently online on a map. Furthermore, the onway router integration has been refined in several places.
7.9. onway director 5.6
- Support for onway routers
-
This version is the first in a series in which we are introducing support for our onway routers.
- onway director API Breaking Change
-
The
SystemDTOresponse returned by several onway director API endpoints/api/<customerKey>/system/and/api/system/has been changed: The fieldeditSystemTemplateIdis now optional.
See latest API documentation for details.
7.10. onway director 5.5
- Tag permissions
-
So far, administrators were allowed to add tags to each entity if "Allow additional tags" was activated for the corresponding group. With this version, administrators must also have the "Assign" permission to do so.
7.11. onway director 5.4
- CarlOS Telemetry Data
-
The telemetry data from all connected customer entry points is collected and stored locally on the onway director.
7.12. onway director 5.3
- Big update
-
In this release we have closed over 75 tickets and added support for handling onway routers. A long-requested feature is now available. It is now possible to specify which columns are to be displayed for each table.
- onway director API Breaking Change
-
The response returned by the onway director API endpoint
GET /api/macman/grouphas been changed. See latest API documentation for details.
7.13. onway director 5.2
It is now possible to define an image and an introductory text that welcomes all users who log in to onway director.
7.14. onway director 5.1
The deb package bastard-remote-client was replaced by cep-remote-client.
Please remove the former package manually with apt autoremove --purge
to clean up all remaining traces of this obsolete package.
7.15. onway director 5.0
The onway director was equipped with a new front end. It has the same features as before, but got a fresher and more modern look-and-feel. Workflows were improved and simplified to increase productivity.
- Legacy macman users and devices
-
Legacy macman-users and -devices within Sponsoring Portal were dropped. Use the onway director to configure macman.
| configure the new macman before you upgrade to onway director 5.0. |
- onway director API Breaking Change
-
The response returned by the onway director API endpoint
GET /api/tags/{customerKey}has been changed. See latest API documentation for details. - NGINX configuration
-
The nginx configuration is now managed by the system and no longer needs to be edited manually. After the upgrade, the server will use the self-signed snake-oil certificate until the correct certificate is configured on the host configuration page.
7.16. onway director 4.14
- Additional information about mpp user accounts
-
Now you can see when an account was last used or how long it is valid. This information is gathered once a day by the mpp.
7.17. onway director 4.13
- Trusted Certificates
-
With this version, the trusted certificates can be managed via the web console. Thus, there is no need to work with the Java keytool on the CLI anymore.
7.18. onway director 4.12
- Health Report
-
Each application now provides a health-report.json that can be used to check the health of our applications.
7.19. onway director 4.11
- NAS Identifier
-
On the NAS client, the NAS identifier can now be configured as a regular expression.
- MAB Failure VLAN
-
A failure VLAN can be configured in the network access group view. This VLAN is returned if an MAB request does not find an account.
7.20. onway director 4.10
- Health Report
-
With this version we have integrated a health service that writes the state from the onway director every minute to
/var/lib/sponsoring-portal/health-report.json. This file can be used to monitor the application. If the verdict isok, everything is fine. If the property isvalidUntilafter now, something is wrong and the health report should be ignored and an error returned. - Default Redirect
-
It is now possible to configure the default redirect after the user logs in. In the file
/usr/lib/sponsoring-portal/config/application.propertiesthe propertyod.default-login-redirectcan be set to eitherspfor Sponsoring Portal orodfor the onway director. - Cisco Interface Template
-
It is now possible to configure an interface template for each network access group, which is present in the RADIUS responses (
Cisco-AVPair: interface-template-name=<template name>).
7.21. onway director 4.9
- system agent
-
-
Automatic configuration of local daemons like Kafka, Zookeeper and PostgreSQL
-
- onway director
-
-
Make host configuration (IP, Gateway, Hostname, NTP, …) possible via web console
-
Support secure FTP
-
7.22. onway director 4.8
- onway director
-
-
List logged in users
-
Disable LDAP directory synchronization at startup
-
7.23. onway director 4.7
- onway director
-
-
Configure LDAP synchronization interval as CRON expression
-
Add the possibility to disable LDAP synchronization
-
7.24. onway director 4.6
- onway director
-
-
Allow users to log out directly from onway director
-
Allow local user to change the password directly in onway director
-
Mark synchronized user accounts as deleted
-
Manage carlos powered devices
-
7.25. onway director 4.5
- onway director
-
-
Network access accounts can be filtered by their online status
-
Improved filtering of network access accounts by last seen date
-
Assign tags via network access groups
-
Ability to delete multiple network access accounts at once
-
7.26. onway director 4.4
- onway director
-
-
Passwords are displayed colored for better readability
-
Network access accounts can be filtered by the date they were last seen
-
Realm of the PEAP user is shown in the edit view
-
iPSK QR code rotation time is now configured as cron expression
-
The administrator now sees only configured functions
-
7.27. onway director 4.3
- onway director
-
-
CSV import for network access accounts
-
7.28. onway director 4.2
- onway director
-
-
My Devices (BYOD)
-
Export network access accounts as CSV
-
Introduce a public API for working with network access accounts
-
7.29. onway director 4.1
- onway director
-
-
View status of macman accounts/devices
-
Session history of macman accounts/devices
-
View deleted macman accounts/devices
-
Allow download of MPP report data as JSON or CSV
-
7.30. onway director 4.0
- onway director
-
-
macman 3.0 (PEAP, iPSK, MAB)
-
Ignore empty lines and lines beginning with '#' at CSV import
-
Upgrade to Ubuntu 20.04
-
7.31. Sponsoring Portal 3.4
- sponsoring portal
-
-
LDAP object filter for users and groups
-
- onway director
-
-
Session distribution statistics
-
Device registration report
-
User session duration report
-
User session authentication report
-
User session count report
-
User session tourism report
-
User session type report
-
User session profile report
-
7.32. Sponsoring Portal 3.3
- onway director
-
-
Intermediate MPP accounting updates for more accurate statistics
-
Multi tenancy support
-
Filtering by Regex
-
7.33. Sponsoring Portal 3.2
- onway director
-
-
Stream user session history log from MPP and show duration and quantity reports on the onway director.
-
Improved UI Design
-
7.34. Sponsoring Portal 3.1
- onway director
-
Gather SMS accounting information from the MPP and show them on the onway director.
- PostgreSQL 12
-
The database of the Sponsoring Portal has been migrated to PostgreSQL 12.
7.35. Sponsoring Portal 3.0
- Ubuntu 18.04 Bionic
-
The Sponsoring Portal has been updated to the new Ubuntu 18.04.1 Bionic.
- Java 11
-
The Sponsoring Portal has been upgraded to Java 11.
- PostgreSQL 10
-
The database of the Sponsoring Portal has been migrated to PostgreSQL 10.
7.36. Sponsoring Portal 2.8
- MPP Voucher Factory
-
You can create multiple MPP vouchers at once. The factory is enabled by configuring the field Count in the MPP Voucher Input Template.
- MPP Voucher
-
It is possible to limit the voucher duration in 'Permissions & Settings'.
- Move entities
-
Entities such as guest user, MPP device, MPP voucher, Macman user and Macman device can be moved from one organizational unit to another. Delete permission on the source (old) OU and create permission on the target (new) OU are required.
- Upload CSV File
-
The file upload offers to download a sample CSV file for the chosen entity. This sample file can be used as a template. It contains the required CSV header fields.
7.37. Sponsoring Portal 2.7
- LDAP Directory configuration
-
With this version, you can configure different base DNs for users and groups.
7.38. Sponsoring Portal 2.6
- API
-
We added an API to manage Guest users, MPP devices, MPP vouchers, Macman users and Macman devices. See dedicated client API documentation for more information.
- Improve SSL security
-
Peer verification algorithms have been improved to make SSL connections more robust.
| There may be situations where some user directories that were previously able to successfully connect to an LDAP or AD server may no longer be able to do so. In most cases, this is the reason because an IP has been specified instead of the fully qualified domain name. |
8. Changelog
8.1. onway director 6.0.0
Released: August 13, 2025
Story
-
OD-2039 Create onway director packages for Ubuntu 24.04 \(Noble Numbat\)
-
OD-2066 Create PEAP device view
-
OD-2069 Time range filter for the device and system event log
-
OD-2088 Remove iPSK QR code support
Bug
-
OD-2091 Too many data points may crash logbook view
-
OD-2097 Event log filter active state not correctly shown
-
OD-2100 Table settings changing column order sometimes doesn’t work
-
OD-2101 Users with BYOD use permission must not be able to monitor sessions
-
OD-2102 Open roaming permissions not correctly sent to frontend
8.2. onway director 5.14.0
Released: August 4, 2025
Story
-
OD-1633 Migrate from create-react-app to Vite
-
OD-2023 Reduce logging when customer info service is not available
-
OD-2031 Show some meta information on the index views of the network access accounts
-
OD-2043 Show account information after iPSK/PEAP account creation
-
OD-2046 Display warning on device on CEP key mismatch
-
OD-2047 Display assigned CEP on the details page
-
OD-2048 Redesign acceptable use policy configuration
-
OD-2050 Enhance ACL validation
-
OD-2055 Make router identity copyable
-
OD-2057 Handle unknown RADIUS sessions
-
OD-2061 Improve customer-aware cleanup tasks of the macman database
-
OD-2062 New BYOD permission to manage other My Devices
-
OD-2063 Make project related numbers copyable
-
OD-2064 Create My Devices/BYOD Users index view
-
OD-2065 Create the child views for My Device/BYOD
-
OD-2067 macman sessions view
-
OD-2068 Adapt mpp docking network configuration change
-
OD-2073 Display assigned device first
-
OD-2078 BYOD without pairing
-
OD-2079 Multiple BYOD network access groups per customer
-
OD-2092 Modify Pairing VLAN Modal(s)
Task
-
OD-2056 Improve customer not found error message in mpp site configuration wizard
Bug
-
OD-2070 Export button is active even though there are no systems to export
-
OD-2076 Postponement of system decommissioning does not always work
-
OD-2084 5G connections incorrectly colored
-
OD-2086 ByodDeviceWizard jumps directly to the device approval section when the AUPs do not have to be accepted for each device
-
OD-2089 BYOD settings should not be removed when all "manage_byod_users" groups are removed from the customer
-
OD-2090 The network access account metadata is missing in merge method
-
OD-2093 Wrong BYOD device sort order
-
OD-2094 Invalidate logged-in users after LDAP sync if necessary
-
OD-2095 BYOD device name may be overridden
-
OD-2096 Optimize cleanup tasks to use the same timestamp "now"
-
OD-2098 Triggering navigation during render causes a React state update error on the NaGroupIndexPage
8.3. onway director 5.13.0
Released: May 8, 2025
Bug
-
OD-2051 Logical decoding handler does not process INET columns correctly
Story
-
OD-2041 Introduce the reveal PEAP password permission
-
OD-2042 Reveal PEAP user password
8.4. onway director 5.12.0
Released: May 7, 2025
Bug
-
OD-1965 Inconsistent Tag handling
-
OD-1988 iPSK Devices Credentials Wi-Fi Key display broken
-
OD-1990 BuildProgressAggregator processing issue
-
OD-1991 Customer cannot be deleted
-
OD-1992 Selection of OpenRoaming user accounts for the ower identification should not depend on the login-user
-
OD-1993 System Template MPP Site Config validation allows MPP site configs from all customers
-
OD-1994 Alarm definition wizard fetches user-accounts without e-mail address
-
OD-1995 Router configuration is lost when the replication slot is recreated
-
OD-1996 Store language from user settings in LocalStore
-
OD-1997 Removed network access group is not removed
-
OD-2004 Manual mpp report generation times out
-
OD-2005 Loading logbooks takes a long time
-
OD-2011 Last seen filter validation missing from SIM card filter on index page
-
OD-2012 Public key change of cep on onway one is not propagated all the way
-
OD-2015 Logbook is unavailable
-
OD-2019 Request to apply new CEP configuration is sent too often
-
OD-2021 OpenRoaming and Byod NaAccount creation error is not visible
-
OD-2022 DeviceVpnTunnelTelemetryHandler does not correctly handle tunnels with multiple selectors
-
OD-2027 TelemetryRawDataCleanupTask is slow
-
OD-2030 System references are not taken into account when device management groups are deleted
-
OD-2038 ConsoleEventListener prolongs graceful shutdown
-
OD-2044 Duplicate iPSK account throws wrong exception
-
OD-2045 Mapping error in CSV import wizard not cleared
-
OD-2049 User without EDIT permission have edit buttons in na account details view
Story
-
OD-1876 Assign bundle to system template
-
OD-1903 Show IP addresses of all layer 3 interfaces
-
OD-1904 Display VPN tunnel quality per interface
-
OD-1920 Show used devices first
-
OD-1921 Search for the device by its system name
-
OD-1922 Search for the system based on its devices
-
OD-1953 Export SIM cards
-
OD-1956 DSI service to handle OpenRoaming profiles
-
OD-1968 Show mpp node and IP address pool
-
OD-1969 Make database cleanup task log less verbose
-
OD-1985 Windows always needs an anchor certificate
-
OD-1989 Show Operator-Name on the account’s session page
-
OD-1998 Credentials provider index page
-
OD-1999 Use credential provider in BYOD and OpenRoaming settings
-
OD-2000 Credentials provider details page
-
OD-2001 Make PEAP and iPSK settings credential provider aware
-
OD-2002 Use credential provider when creating PEAP/iPSK account
-
OD-2003 Restrict certificates that can be selected
-
OD-2006 Show certificate’s key usages and extended key usages
-
OD-2007 Move acceptable use policy configuration
-
OD-2008 Hide “Systems” navigation entry if no alarms are configured
-
OD-2009 Show system in which the SIM card is used
-
OD-2010 Search for SIM card by system name
-
OD-2014 Display warning on system on CEP key mismatch
-
OD-2016 Hide "Device Management" navigation entry if no device group is configured
-
OD-2017 Programmatic changes to the system template must be detected as pending changes
-
OD-2020 Show reason for pending system template changes
-
OD-2040 Read iPSK Wi-Fi key from backend
8.5. onway director 5.11.0
Released: February 8, 2025
Bug
-
OD-1966 Progress bar for CSV import is not making any progress
-
OD-1971 Deleted or disabled accounts may appear as valid
-
OD-1973 Certificate without common name not displayed correctly
-
OD-1974 Certificates without issuer common name crash the application
-
OD-1981 OpenRoamingProfileDataLoader loads any requested NaAccount even if it is not an open roaming user
-
OD-1983 onway director console app init may lead to an access forbidden error
-
OD-1984 OpenRoaming unique constraint is too strict
-
OD-1986 Skip RadiusAuthRequest and RadiusAccRequest (mmrc-radius-log) if na group is unknown
Story
-
OD-1933 OpenRoaming index page
-
OD-1934 OpenRoaming profile for macOS/iOS/iPadOS
-
OD-1948 OpenRoaming profile for Windows
-
OD-1949 OpenRoaming profile for Android
-
OD-1950 OpenRoaming details page
-
OD-1951 OpenRoaming journal page
-
OD-1952 OpenRoaming session page
-
OD-1954 Configure onway registrar nodes
-
OD-1967 Remove monitoring of IP address pools
-
OD-1972 OpenRoaming parameter ‘Domain’ is not sufficient
-
OD-1982 Remove OpenRoaming settings field “Wi-Fi Name/SSID”
8.6. onway director 5.10.1
Released: January 8, 2025
Bug
-
OD-1963 mpp-remote-client user cannot read system-id file
8.7. onway director 5.10.0
Released: January 7, 2025
Bug
-
OD-1828 Devices that have already been assigned can be selected in the equip wizard
-
OD-1833 SIM card ICCID label is displayed, even if ICCID is unknown
-
OD-1834 System create button is shown when user has no system\_manage permission
-
OD-1836 Filter active or inactive?
-
OD-1837 Differentiate between strings to and to\_capitalized
-
OD-1838 IpAddressValidator wrong constraint violation messages
-
OD-1844 Sim card CSV import throws NumberFormatException
-
OD-1846 Duplicate react key in byod add wizard
-
OD-1848 Tests fail when run in a different time zone
-
OD-1861 SystemTemplateTelemetryConfigurationJsonSerializer not registered
-
OD-1862 System create does not use the transactional DSL context
-
OD-1863 Align Add-wording and remove 'can not'
-
OD-1865 Missing NaGroup tag handling in NaAccount CSV import
-
OD-1872 Wrong not null message displayed
-
OD-1877 Replace “can not” wording with “cannot”
-
OD-1884 Host field of HTTP service check configuration accepts every variable type
-
OD-1895 Devices do not come online after being decommissioned and reassigned to same system
-
OD-1898 onway routers lose customer assignment when updated from onway-one
-
OD-1899 Loosing focus when editing with disabled family
-
OD-1906 IP Input must be monospace in Slot Equip
-
OD-1911 Service check function sub box not displayed
-
OD-1912 No pending changes on the system template when mpp site configuration is assigned
-
OD-1913 Use device online status in device services view
-
OD-1916 Invisible validation error in slot wizard
-
OD-1924 No new group or user can be created on the first attempt
-
OD-1925 Bubu client handlers are called from IO thread
-
OD-1926 WAL entry handler references some columns from the wrong table
-
OD-1937 Create alarm error
-
OD-1946 Entering a duration in the NAC filter is not possible sometimes
-
OD-1960 Anchor certificate does not need to have a private key
-
OD-1961 Skip entries with unknown system ID
-
OD-1962 Ignore mpps without assigned mpp site configuration
Story
-
OD-1669 Monitor systems
-
OD-1670 Create alarm definitions
-
OD-1672 Alarm overview list
-
OD-1673 Alarm history
-
OD-1723 Configure third-party devices
-
OD-1783 System template validation
-
OD-1785 Systems that are in the same location must not be hidden
-
OD-1786 System validation
-
OD-1790 System export
-
OD-1791 System import
-
OD-1793 Clear service check results
-
OD-1798 Alarm Definitions Details View
-
OD-1800 Unused source interface and check interval fields in service check configuration
-
OD-1810 Move the target of a service check to the right place in the ResultBox component
-
OD-1812 IP Address pool configuration index page
-
OD-1814 mpp site configurations
-
OD-1822 Filter system index page by system template revision
-
OD-1826 IP address pool configuration details page
-
OD-1827 Alarm overview summary
-
OD-1829 Pretty CSV header lines
-
OD-1831 Preselect modem in LogbookMap
-
OD-1835 Hide services tab if no service checks are defined
-
OD-1839 Changes to main navigation
-
OD-1840 Search by device identity in admin area
-
OD-1841 Show device identity in admin area
-
OD-1842 Display direction of travel in the logbook
-
OD-1843 Display user-defined data sources as unknown if data is outdated
-
OD-1845 Unify system device slot validations
-
OD-1849 New system template variable type integer
-
OD-1850 Enhance addrAt function
-
OD-1851 Search NAS clients by IP address
-
OD-1852 Allow systems to be renamed via export/import
-
OD-1854 Limit the logbook live data filter to the current day
-
OD-1856 Simplify storage of device configuration assignments
-
OD-1857 Remove the ‘IP network address’ variable type
-
OD-1858 System device slot details view
-
OD-1859 Postponement of system decommissioning
-
OD-1864 Minor system monitoring configuration changes
-
OD-1866 Assign mpp site configuration to the system template
-
OD-1867 Select subnet from mpp site configuration
-
OD-1868 Manage sites and docking networks on the mpp
-
OD-1870 Third-party page
-
OD-1871 Monitor third-party devices
-
OD-1873 Create bundle permission
-
OD-1874 Bundle index page
-
OD-1878 Unique system id
-
OD-1881 Product URL
-
OD-1882 Alarm message improvements
-
OD-1890 Make network editing more relaxed
-
OD-1891 Deploy systems that are not yet deployed
-
OD-1892 bubu client
-
OD-1894 Implement service to manage bundles
-
OD-1900 Improvements to alarm configuration
-
OD-1901 Force mpp node selection
-
OD-1902 OID table in 3rd-party row details
-
OD-1914 Monitor IP address pools
-
OD-1917 Loosen database access restriction for other users
-
OD-1918 Show help text which users can be selected
-
OD-1919 Freeze mpp site configuration
-
OD-1923 Refactor OD DatabaseCfg
-
OD-1927 Introduction of new network access group types and network user types
-
OD-1928 OpenRoaming network access group configuration
-
OD-1929 Configure certificate for RadSec
-
OD-1930 Add support for the new NAS client type RadSec
-
OD-1931 Configure WBA ID
-
OD-1932 Configuration of OpenRoaming in the RADIUS group view
-
OD-1955 Extend OpenRoaming network access group configuration
8.8. onway director 5.9.0
Released: July 12, 2024
Bug
-
OD-1768 Errornous escape character in translated validation messages
-
OD-1788 "Last seen" filter on the device inventory page broken
-
OD-1797 Restricted devices removed from all systems when one system is updated
-
OD-1799 Logbook timeline without GNSS GUI gap
-
OD-1805 Visible edit buttons of system template views without permission
-
OD-1806 Modem drop-down menu remains open
-
OD-1807 Exception is thrown if a user without system manage permission wants to see the devices of a system
-
OD-1808 Multiple map information on map
-
OD-1809 Small font on some select options
-
OD-1811 Assigning multiple routers to a customer creates wrong device journal entries
-
OD-1813 BYOD NaGroup wizard has an empty details section
-
OD-1818 Logbook map view does not show points without modem data
-
OD-1819 Missing IP address validation when defining slot variables
-
OD-1823 Incorrect placeholder for service check results
-
OD-1830 User with system manage permission cannot deploy systems
Story
-
OD-1658 Show a system’s logbook on a map
-
OD-1694 Configure service-check as an event-based telemetry source
-
OD-1695 Store received service check telemetry data in the database
-
OD-1696 Display service check results on the device status page
-
OD-1697 Configure ICMP service checks
-
OD-1715 Show a system’s logbook as a timeline
-
OD-1722 Configure HTTP service checks
-
OD-1730 Telemetry data from decommissioned or deleted devices should be visible
-
OD-1741 Define the slot used for GPS
-
OD-1763 Refine systems widget
-
OD-1765 Prevent SIM card from being updated too often
-
OD-1766 SIM card cleanup
-
OD-1772 System should be able to be displayed on the device index page
-
OD-1773 Show which system the device is assigned to
-
OD-1774 Show all devices in the list when a system slot is equipped
-
OD-1775 Check MCC/MNC before updating SIM card
-
OD-1776 Legend that explains the different colors
-
OD-1777 Logbook modem info facelift
-
OD-1779 Remove Status from Lifecycle Box
-
OD-1780 Define slot variables
-
OD-1781 Introduce the IP network variable type
-
OD-1782 Stop learning the customer name from the mpp
-
OD-1784 Filter onway routers by multiple serial numbers or identities
-
OD-1787 Filter device inventory index page by OS version
-
OD-1789 Connected since may be before boot date of the router
-
OD-1792 Improve bulk-assign of onway routers
-
OD-1801 Device status must be accessible
-
OD-1803 Refine logbook timeline view
-
OD-1815 Simplify the storage of telemetry data
-
OD-1816 Change order of data entries in Logbook timeline to match order of gauges on map
-
OD-1820 Device identity
-
OD-1821 Search by device identity
8.9. onway director 5.8.0
Released: May 31, 2024
Bug
-
OD-1759 Backlink from SystemsWidget to SystemDetailsView does not include tertiary navigation
-
OD-1761 Fix bug in partition range calculation
-
OD-1762 Remote user ID must be unique per directory
-
OD-1767 Pagination size not saved in device wizard
-
OD-1771 Maintain backlink
-
OD-1778 Table column configuration in GUI is broken
-
OD-1796 Signal executor may lose some signals
Story
-
OD-1659 Generate logbook report
-
OD-1718 Extension of the system template to be able to define string and IP variables
-
OD-1731 Formatting ICCID/IMSI data in blocks
-
OD-1735 Refine configuration of system template slots
-
OD-1736 Restrict system template slot
-
OD-1739 Status of the system on the system index page
-
OD-1742 Align views of the logbook retention settings
-
OD-1764 Disable clustering
8.10. onway director 5.7.1
Released: May 11, 2024
Bug
-
OD-1748 Modem is not displayed as offline
-
OD-1749 Wrong timestamp for the last time seen when the device is offline
-
OD-1750 Map is not displayed if an error occurs during initialization
-
OD-1751 Some gauges on the dashboard have no values
-
OD-1752 Routers marked as deleted cannot be deleted
-
OD-1753 CustomControl state
-
OD-1755 Fix gaps in partitioned tables
-
OD-1756 Offset with sidebar not working on FollowBoundsControl
-
OD-1757 MaptilerMap does not release its resources
-
OD-1758 Wrong offsets in SidebarBoxContext if sidebar gets undefined
8.11. onway director 5.7.0
Released: May 8, 2024
Bug
-
OD-1711 Adapt journal "create" fields layout
-
OD-1719 Device Slot is not visible if system is decommissioned
-
OD-1724 ICCID check fails when fill byte is present
-
OD-1726 Modem is displayed as connecting if no state is set
-
OD-1728 All user accounts loose their default customer settings when a customer is deleted
-
OD-1729 Some pages do not respect the user-defined page size
-
OD-1734 Deleting a system without a device causes problems for the WAL entry handler
-
OD-1737 Product number not searchable
-
OD-1738 Wrong speed unit used for GPS velocity speed value
-
OD-1743 Product number changes are not propagated
-
OD-1745 Gauges are not always displayed correctly in Safari
Story
-
OD-1418 Show system widget in full screen mode
-
OD-1657 Extend map component to show logbook
-
OD-1660 Logbook retention settings
-
OD-1678 Show systems and their position on a map
-
OD-1702 Show warranty end date
-
OD-1704 Polish SIM card index page
-
OD-1710 Sync product SKU to onway director and display it
-
OD-1714 Display some telemetry data as unknown when the management connection is offline
-
OD-1717 Telemetry raw data retention settings
-
OD-1725 Change sort in onway router and device inventory index view
-
OD-1727 Handle optional CarlOS telemetry fields
-
OD-1732 Move new layout widget to customer’s homepage
-
OD-1733 Move welcome widget to customer’s homepage
8.12. onway director 5.6.0
Released: April 9, 2024
Story
-
OD-1497 Deploy a system
-
OD-1517 Move onway router to another group
-
OD-1550 Equip the device slot of a system
-
OD-1552 System detail view
-
OD-1554 DSI service providing routers
-
OD-1556 Telemetry data processing infrastructure
-
OD-1573 Migrate from Tomcat to Jetty
-
OD-1579 Store device status information in the database
-
OD-1581 Extend the system with life cycle information
-
OD-1590 Show modem information on the device status view
-
OD-1593 Display device information on the device status view
-
OD-1600 Decommission a system
-
OD-1601 Event log
-
OD-1602 Device event log
-
OD-1603 System event log
-
OD-1604 Store device modem status information in the database
-
OD-1605 Store device tunnel link status information in the database
-
OD-1606 Store device link status information in the database
-
OD-1607 Page Header Cleanup
-
OD-1610 Display device link information on the device status view
-
OD-1611 Display tunnel link status on the device status view
-
OD-1616 System Journal View
-
OD-1617 Delete a system
-
OD-1618 Handle deletion of onway router
-
OD-1619 Display GPS information on the device status view
-
OD-1620 No auto Wizard on System Creation
-
OD-1623 Make macman node index table customisable
-
OD-1629 Make cep node index table customisable
-
OD-1630 Cleanup of telemetry data
-
OD-1635 Store OS version in device inventory table
-
OD-1646 Send onway router first seen TS to onway one as router status update
-
OD-1651 Hostname on device inventory index page
-
OD-1652 Make customer key visible in customer switcher
-
OD-1653 Customer map settings
-
OD-1656 Store GPS and radio module information
-
OD-1663 Save additional information of the modem status
-
OD-1665 Store SIM card information
-
OD-1667 API for integrating information into the customer’s environment
-
OD-1683 Change Wi-Fi telemetry sources reporting interval
-
OD-1684 Do not display Wi-Fi interfaces
-
OD-1687 SIM card journal
-
OD-1703 Dependent data must be stored together
-
OD-1708 Handle "track" as an optional gps-velocity field
-
OD-1712 Provide the modem signal quality from the backend
-
OD-1713 Extend data gateway
Bug
-
OD-1615 Password error message in wrong language
-
OD-1624 System template name not visible for read-only systems
-
OD-1626 NPE in LogicalDecodingServiceImpl shutdown
-
OD-1628 Avoid empty "Deleted At" lifecycle entry in device inventory detail view
-
OD-1631 Device status telemetry WAL handler stops if an entity is unknown
-
OD-1636 Remote host for peering cannot be changed
-
OD-1637 Skip empty telemetry data
-
OD-1638 Certificates not sorted correctly
-
OD-1640 Skip system deployment for devices that are not onway routers
-
OD-1641 Network access group detail view tags are still in header
-
OD-1642 Tags of a device not shown in wizard
-
OD-1643 EventLogRepository must skip duplicates
-
OD-1645 Alert not correctly shown due to CSP
-
OD-1647 A system with multiple slots cannot be deployed if the devices are swapped
-
OD-1648 A system with multiple slots and swapped devices cannot be reverted
-
OD-1649 Certain optional ModemStatusTelemetry fields are defined as mandatory fields
-
OD-1664 Device Inventory Journal: edited without visible changes
-
OD-1680 Deadlock situation when deleting orphaned network access accounts
-
OD-1682 cep Configuration and System Template Status Badge Overflow
-
OD-1685 Unexpected error when trying to delete a used system template
-
OD-1688 Journal entry is missing in the device journal after a decommissioning action
-
OD-1689 Various display issues in the detail view of a system
-
OD-1690 Customer select does not work on system template revision detail view
-
OD-1691 Loading state shown on NA account sessions view on auto refresh
-
OD-1692 Wrong default map in OD
-
OD-1698 Byte unit in reporting charts is not formatted correctly
-
OD-1700 Missing "|" in device inventory search_col
-
OD-1701 Missing search index for device_inventory, system, onway_router und sim_card table
-
OD-1705 Not rolled out systems have weird indicator
-
OD-1706 Deleted devices can be assigned to a system device slot
-
OD-1707 Broken change password view in legacy sp-console
-
OD-1709 Inappropriate actions are suggested on a detail page of a deleted device
-
OD-1716 Deletion of onway router via DSI stream throws exception
-
OD-1720 Online status of onway router is not propagated to onway one when a system is decommissioned
8.13. onway director 5.5.0
Released: January 15, 2024
Story
-
OD-1585 Enforce tag permissions for administrators
Bug
-
OD-1596 Missing unpublished changes indicator on system template index view
-
OD-1598 OCSP stapling check is not good enough
-
OD-1608 macman configuration with revision 0 should not be a latest configuration revision
-
OD-1609 Wrong hasUnsavedChanges representation when no latest revision is available
-
OD-1612 onway director upgrade hangs when executed with Ansible
-
OD-1613 Acknowledge skipped logical sequence numbers
8.14. onway director 5.4.0
Released: December 22, 2023
Story
-
OD-1553 Configure onway telemetry configuration
-
OD-1555 Consume and store telemetry data received from cep
-
OD-1582 Upload image for welcome widget for preview
-
OD-1583 Allow selection of system template revision
Bug
-
OD-1580 Make Inputs optional
-
OD-1592 SystemIndexPage search filter not clearable
-
OD-1594 SMS Log nav menu permission error
-
OD-1595 Wrong health items for new nodes
8.15. onway director 5.3.0
Released: December 19, 2023
Story
-
OD-1240 Make index view of user session report paginable
-
OD-1241 Make index view of SMS report paginable
-
OD-1378 List and add cep configurations
-
OD-1427 Disable device management
-
OD-1449 Consume onway routers from onway one
-
OD-1450 Administrative onway router index view
-
OD-1451 Administrative onway router details view
-
OD-1452 Administrative onway router journal view
-
OD-1455 Consume onway router products from onway one
-
OD-1466 Apply cep configuration to node
-
OD-1472 Delete specific macman configuration version
-
OD-1475 Dynamic Table Columns for NACs
-
OD-1476 onway Router groups index view
-
OD-1477 onway Router group detail view
-
OD-1478 onway router index view
-
OD-1479 Device Detail View
-
OD-1480 Show onway router management connections
-
OD-1481 Device Inventory CSV export
-
OD-1482 Device Inventory Journal View
-
OD-1483 Allow additional tags for network access groups
-
OD-1485 Consume accounting events from customer entry points
-
OD-1486 DSI service for onway router states
-
OD-1487 Use sender address of mail configuration for data import mailer
-
OD-1488 Handle onway router session events
-
OD-1489 Cleanup onway router sessions
-
OD-1494 Link macman configs in NAG Delete Modal
-
OD-1495 Make Configuration Version clickable in macman Node Detail
-
OD-1498 device management permission index page
-
OD-1500 Better Support for Password Managers in Username/Password Fields
-
OD-1505 New state representations for NA accounts
-
OD-1516 Prevent changing input field type
-
OD-1518 System template index view
-
OD-1522 Prevent peering from being disabled
-
OD-1524 SIM card index view
-
OD-1525 onway router state adjustments
-
OD-1526 SIM card details view
-
OD-1527 SIM card CSV import
-
OD-1528 System template details view
-
OD-1529 Publish system template
-
OD-1530 onway router group adjustments
-
OD-1531 Hide password change function
-
OD-1543 Device Inventory Index View
-
OD-1544 Delete Device Management Group
-
OD-1545 System Index View
-
OD-1547 Updated BYOD users must not become invalid because their start date is in the future
-
OD-1548 Mark mpp as offline when it is in maintenance mode
-
OD-1549 System template device slot configuration
-
OD-1551 Show system template permissions
-
OD-1570 Security Headers
-
OD-1578 Rename system template permissions
-
OD-1584 Rename system’s identity to name
Bug
-
OD-1474 Empty macman config revision options in macman node edit wizard
-
OD-1492 Include validity limits when searching for NaAccounts by custom validity
-
OD-1493 CSV import task run twice
-
OD-1496 NaAccountSession pagination is broken
-
OD-1502 Multiple intermediate certificate upload may fail
-
OD-1503 Error sign in custom range filter disappears
-
OD-1510 Na account journal uses url parameters from index page
-
OD-1511 Show graph generation date in doughnut graphs
-
OD-1512 Remove line after doughnut graphs
-
OD-1513 Input template wizard start section error
-
OD-1514 Inappropriate "autoComplete" values for certain input fields
-
OD-1515 InputTemplateWizard corrupted list items
-
OD-1533 User cannot edit or delete BYOD device
-
OD-1534 Add Edit Button to BYOD Settings
-
OD-1536 Users with "byod_use" permission can read other users byod devices.
-
OD-1537 Details Page of unpaired BYOD device is visible
-
OD-1538 Assigning an onway router to a customer does not work from the details page
-
OD-1541 Customer Device Management Menu Entry
-
OD-1542 SSE console event stream is closed by Nginx
-
OD-1546 MppUserAccount validation error
-
OD-1572 onway router / device inventory behavior inconsistencies
-
OD-1577 BYOD appears to be enabled although it is not
8.16. onway director 5.2.3
Released: June 7, 2023
Bug
-
OD-1469 CSV import fails with an unexpected error
-
OD-1471 Bulk delete may delete all accounts
Task
-
OD-1470 Close import wizard when final decision has been made
8.17. onway director 5.2.2
Released: June 5, 2023
Story
-
OD-1415 Use MultiSelect in NA Index Views
-
OD-1445 Show last duration
-
OD-1446 Show graph generation date
-
OD-1461 Add Trusted State to all Nodes
Bug
-
OD-1464 My Device cannot be added
8.18. onway director 5.2.1
Released: May 26, 2023
Bug
-
OD-1463 DB cleanup timeout is too low
8.19. onway director 5.2.0
Released: May 17, 2023
Story
-
OD-1361 BackLink should go back where you came from
-
OD-1379 Sort view for logged in users by last seen field
-
OD-1386 Create one-remote-client
-
OD-1393 Enhance reporting status view
-
OD-1400 Allow the administrator to define an introduction on the home page
-
OD-1407 Cleanup node security information
-
OD-1443 Mark own session in the view of the logged-in users
Bug
-
OD-1404 Exception processing failure
-
OD-1436 Empty sms_accounting_log_raw tables are not deleted
-
OD-1439 X-Real-IP contains wrong IP address when running behind a reverse proxy
-
OD-1440 Field errors for duplicate server and peer ID are no longer displayed
-
OD-1458 No network interfaces for selection
-
OD-1462 SMS counting can lead to an "out of memory" exception
8.20. onway director 5.1.0
Released: April 13, 2023
Story
-
OD-1041 Save page size for pagination in user settings
-
OD-1223 Always use TIMESTAMPTZ instead of TIMESTAMP
-
OD-1224 Use decimal format for user session graphs
-
OD-1233 Merge DTOs of mmrc and bastardrc general settings
-
OD-1235 Trigger auto-refresh globally
-
OD-1274 Update existing password with new hashing algorithm, if necessary
-
OD-1277 Collapse app sidebar automatically when not useful
-
OD-1296 Use InputSwitch in Email Configuration
-
OD-1352 Show not found error messages in GUI
-
OD-1362 Prohibit some characters in the name of a user directory
-
OD-1365 Set default customer per user
-
OD-1366 Version notes do not always show line breaks
-
OD-1367 Allow configuration of multiple interfaces in host configuration
-
OD-1368 Allow configuration of multiple routes in host configuration
-
OD-1373 Show peer id when server name is an IP address
-
OD-1376 List and add cep nodes
-
OD-1377 cep node details and host view
-
OD-1380 onway error page
-
OD-1381 Rename bastard-remote- artificats to cep-remote-
-
OD-1382 onway one node details
-
OD-1384 Renamings in OD app navigation
-
OD-1391 Provide a public API for searching mpp devices
-
OD-1392 Provide a public API for searching mpp users
-
OD-1397 Create audit log that shows logins
-
OD-1402 Inform user in which configuration a network access group is referenced
-
OD-1405 Improve login logging
-
OD-1406 Configuration must not be yellow-marked when there are no changes
-
OD-1408 Display username of BYOD device
-
OD-1409 Show realm of username when creating/editing account
-
OD-1412 Harmonize file/directory permissions
-
OD-1414 Warn when default route is removed
-
OD-1416 Allow the configuration of the Filter-Id attribute
-
OD-1419 Align Edit/Delete Buttons
-
OD-1420 Assign existing groups when creating a customer
Task
-
OD-1359 Remove Alert when logged-out
-
OD-1370 Filter Placeholder and Counter must be the same everywhere
-
OD-1394 Make use of the NodeCreateDTO when creating or updating macman nodes
-
OD-1417 Small configuration design changes
-
OD-1421 Use $http_host instead of $host
Bug
-
OD-1238 Remove only the BOM and not every control character
-
OD-1265 Username shown without AD group in Reports, macman node details and macman config history
-
OD-1333 Make sure the full entity name is always somehow readable
-
OD-1369 NA Account CSV Import Wizard - Failed import modal not removed on file change
-
OD-1371 Switching back to onway director may not work
-
OD-1372 Legacy URIs are not redirected to the new onway director
-
OD-1374 onway director does not start if /usr/lib/sponsoring-portal/config is not writable
-
OD-1375 Wrong app name in footer
-
OD-1383 Permissions cannot be applied to new tags
-
OD-1385 Permission sync fails sometimes
-
OD-1387 NotFound-Alert appears even if a NotFound-Page is already displayed
-
OD-1388 Limit pagination requests that have a high request size
-
OD-1395 Macman index page blank after creating node
-
OD-1399 User object filter in the LDAP directory settings is not displayed
-
OD-1401 LDAP login fails because checking with the wrong account
-
OD-1403 Exception handler failure
-
OD-1410 DSI deregisters services even if the connection was never authenticated
-
OD-1423 Login can trigger an endless loading state of the application
8.21. onway director 5.0.0
Released: February 11, 2023
Story
-
OD-1112 Redesign of the web UI
-
OD-1009 Configure NGINX
-
OD-1305 Install/remove certificate bundles on the file system
-
OD-1325 Upgrade onway director to Ubuntu 22.04 Jammy Jellyfish
-
OD-1326 Remove support for legacy macman
-
OD-1341 Remove iPSK QR code configuration
-
OD-1344 Show error message in GUI
-
OD-1358 Migrate from Jetty to Tomcat